
Imagine transforming ordinary backyard materials into enchanting tiny landscapes that spark wonder in both kids and adults. This creative activity lets you design whimsical worlds using sticks, stones, and everyday items – no expensive kits required. Many families find it’s the perfect blend of gardening and imaginative play.
These miniature spaces do more than look charming. They become living habitats where butterflies flutter between tiny structures and dragonflies dart over pebble pathways. As seasons change, so does your creation – blooming flowers in spring or golden leaves in fall keep the magic fresh.
Building these pocket-sized paradises teaches valuable skills. You’ll practice basic design principles while learning to repurpose materials creatively. For those tight on space, consider pairing this project with vertical gardening techniques to maximize your growing area.
Best of all, it’s an activity that grows with children. Younger kids can arrange smooth stones as stepping paths, while older ones might construct elaborate twig arbors. The process naturally introduces plant care basics and eco-friendly practices through hands-on experimentation.
Discovering the Magic of DIY Fairy Gardens

Crafting tiny realms from everyday items unlocks a unique blend of creativity and nature connection. These miniature escapes blend gardening with imaginative play, creating living art that evolves with your care and seasons.
What Makes These Mini Worlds Special?
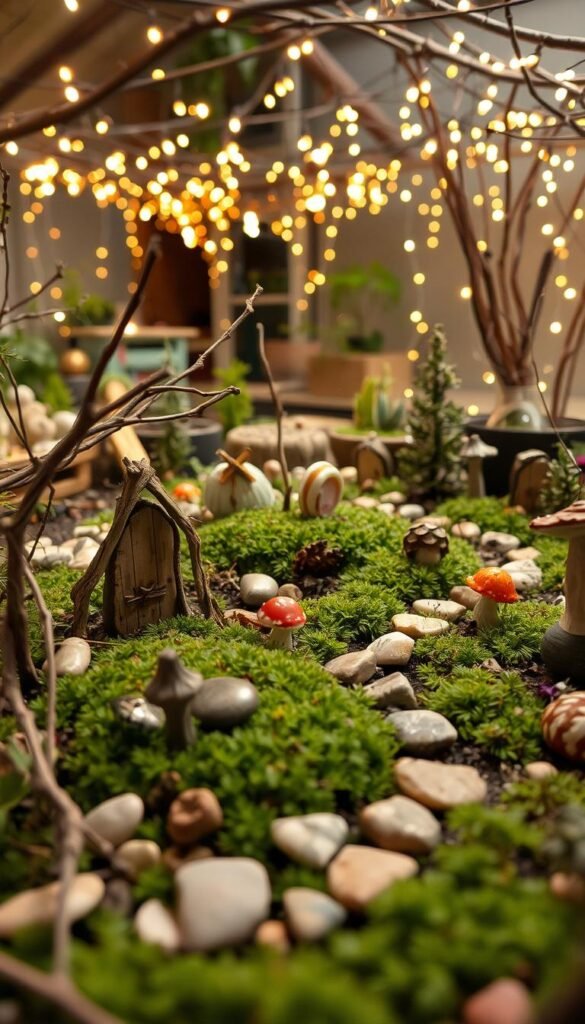
These charming creations act as magical portals in your outdoor space. Tucked between flowers or beneath shrubs, they surprise visitors with tiny benches and winding pebble trails. Adults rediscover childhood wonder arranging moss carpets, while kids invent stories about fairy inhabitants.
Why Build Your Own Enchanted Space?
Creating these landscapes offers more than pretty decor. Families bond while designing together – parents share gardening tips as children practice fine motor skills placing delicate acorn caps. Therapists often recommend this activity for its calming focus on detail work.
Seasonal changes keep the project exciting year-round. Swap snow-dusted pinecones in winter for blooming succulents in spring. You’ll naturally learn about plant cycles while crafting accessories from backyard finds.
The best part? Anyone can start small. Use an old teacup on your patio table or convert a forgotten corner into a woodland retreat. These spaces prove magic grows best in humble containers.
Planning Your Fairy Garden Container and Layout

Creating a magical miniature world starts with smart preparation. The right foundation ensures your tiny ecosystem thrives while leaving room for creative touches. Let’s explore how to set up your space for success.
Selecting the Ideal Container for Your Space
Your container choice shapes your design possibilities. While specialty trays from garden stores work beautifully, plastic planter dishes from Lowe’s (under $2) offer budget-friendly options. For heavier setups, reinforce thin materials with pizza box cardboard or cookie sheets underneath.
Always consider drainage. Use a nail to punch holes if needed, or water carefully to prevent soggy roots. A 12-inch pot fits 3-4 plants plus accessories, while shallow trays create sprawling scenes. Match your container size to available space – windowsills suit small setups, patios handle larger displays.
Choosing Small Plants and Garden Soil
Slow-growing varieties maintain perfect proportions. Succulents like echeveria thrive with minimal care, while ivy spearpoint adds cascading greenery. Hypoestes’ colorful leaves create visual interest without overwhelming the scene.
Use quality potting soil mixed with perlite for drainage. Fill containers ¾ full to leave room for rocks and pathways. Arrange plants first, spacing them 2-3 inches apart. This prevents overcrowding as they grow while preserving areas for tiny furniture and decorations.
Seasonal swaps keep your display fresh year-round. In sunny climates, try sedum varieties. For shaded spots, miniature ferns work beautifully. Always check plant tags for light requirements matching your chosen location.
Essential Guide to Homemade Fairy Garden Accessories: Twigs, Pebbles, and Found Objects

Building miniature wonderlands begins with nature’s toolbox and creative reuse of everyday items. This hands-on approach lets you design personalized scenes that evolve with your imagination. Let’s explore how to source materials responsibly and transform ordinary objects into extraordinary features.
Gathering Natural Materials and Found Objects
Nature walks become treasure hunts when you know what to look for. Seek smooth stones the size of quarters for building foundations, and collect curved twigs perfect for arched fences. Split pine cones into roof shingles using garden shears – their natural texture adds rustic charm.
Always clean materials before use. Scrub stones with water and a toothbrush, then air-dry bark pieces on a sunny windowsill. Store dried moss in ziplock bags to preserve its softness for future projects.
Tips on Repurposing Household Items
Turn forgotten items into functional decor. An old teapot becomes a cozy cottage when filled with soil and trailing plants. Use colorful buttons to create winding pathways, pressing them into the dirt at angles for visual interest.
Safety first when crafting with kids. Sand sharp edges on broken pottery before using it as garden borders. Teach children to collect materials only from approved areas, respecting both nature and property.
| Season | Best Materials | Ideal Projects |
|---|---|---|
| Spring | Fresh moss, cherry blossoms | Flowering arches |
| Summer | Seashells, smooth pebbles | Beach-themed scenes |
| Fall | Acorns, colorful leaves | Harvest displays |
| Winter | Pinecones, evergreen sprigs | Frosty landscapes |
Keep a dedicated storage box for your finds – egg cartons work great for sorting small pieces. With these techniques, you’ll always have materials ready when inspiration strikes. What unexpected item will you transform next?
Step-by-Step Instructions for Crafting a Fairy House

Constructing miniature architecture brings big rewards when you master essential building techniques. Start with a flat surface and gather quarter-sized stones – their uniform size creates stable walls that withstand outdoor elements.
Creating Walls and a Roof with Stones and Craft Sticks
Build your foundation using waterproof adhesive like E6000 or two-part epoxy. Arrange stones in a square pattern, leaving space for the entrance. Create triangular stone supports at both ends to hold the roof. Let each layer dry completely before adding the next.
For the roof, lay craft sticks side by side across the support triangles. Secure them with a horizontal stick glued perpendicularly. Cut excess length with nail clippers for clean edges. This overlapping pattern helps rainwater run off naturally.
Designing the Perfect Fairy Door and Windows
Create character with a curved-top entrance. Arrange craft sticks vertically, staggering their heights slightly. Glue a horizontal stick across the top third to simulate hinges. Add a pebble knob using tweezers for precision.
Fill gaps between roof sticks with tiny stones pressed into adhesive. Paint surfaces with outdoor-safe acrylics, then press sheet moss into wet paint for instant aging. These techniques ensure your house looks lived-in while surviving weather changes.
If walls lean during construction, reinforce corners with extra adhesive. For uneven floors, add a base layer of sand before gluing stones. Remember – imperfections add charm to these whimsical dwellings!
Building Enchanting Walkways and Fences

Designing miniature pathways adds structure and charm to your tiny landscape. These features guide visitors through your creation while offering creative opportunities for all skill levels. Kids especially love arranging materials to form winding trails and protective borders.
Using Gravel and Larger Stones for Pathways
Start by marking your path with a stick or string. Pour aquarium gravel between your guides – its small size and bright colors create instant visual appeal. Line both sides with palm-sized stones to define edges clearly.
Mix materials for playful textures. Try alternating wood slices with glass gems every few inches. For curved pathways, use tweezers to position pea gravel precisely. This method helps maintain smooth lines while allowing creative freedom.
Constructing Fences with Wooden Craft Sticks
Create posts by pressing sticks vertically into soil every two inches. Measure crossbeams by laying sticks across posts – mark cutting points with pencil. Use outdoor-safe glue to secure horizontal pieces, creating a sturdy barrier.
Paint fences with acrylics before sealing with clear spray. This adds weather-resistant protection while letting personality shine through. For gates, attach a small stick hinge using jewelry wire wrapped around posts.
Maintain your features by brushing debris from gravel monthly. Tighten loose fence posts with fresh glue, and replace faded stones with seasonal finds. These simple steps keep your miniature world inviting through changing weather.
DIY Adirondack Chairs and Other Miniature Furniture
Crafting miniature furniture brings your tiny landscapes to life with functional charm. These pint-sized pieces combine woodworking basics with artistic flair, letting you design cozy seating perfect for your magical scenes. Let’s explore how to build sturdy outdoor seating that withstands weather while adding personality.
Simple Steps to Build a Tiny Adirondack Chair
Start by cutting two craft sticks in half using sharp scissors. Arrange four pieces side by side for the seat, securing them with horizontal sticks glued across both ends. For the curved backrest, stagger four sticks’ ends by ¼ inch before gluing a horizontal support.
Attach the backrest to the seat at a 100-degree angle using waterproof adhesive. Reinforce joints with extra glue and let dry completely. Add armrests by connecting front legs to the backrest with full-length sticks, then install diagonal supports under each arm for stability.
Painting and Sealing Your Miniature Furniture
Prime surfaces with gesso before applying acrylic paints. Choose UV-resistant colors like cobalt blue or sunflower yellow for lasting vibrancy. Apply two thin coats with a detail brush, drying completely between layers.
| Paint Type | Best For | Dry Time | Coats Needed |
|---|---|---|---|
| Acrylic | Detailed designs | 30 minutes | 2-3 |
| Outdoor Enamel | Longevity | 2 hours | 1-2 |
| Spray Paint | Quick coverage | 15 minutes | 1 |
Seal pieces with clear acrylic spray, holding the can 12 inches away. Create matching tables using leftover sticks – cut four equal legs and attach them to a square seat base. These techniques let you build complete outdoor sets that enchant viewers for seasons.
Decorating with Polymer Clay Fairies and Natural Elements
Bring your miniature scenes to life by blending sculpted figures with lush greenery. This final decorating phase lets you infuse personality into every corner, combining hand-shaped characters with organic textures that mimic enchanted woodlands.
Crafting Charming Fairies from Polymer Clay
Start with flesh-toned clay for bodies, rolling pea-sized balls for heads. Shape wings using translucent clay mixed with glitter, pressing lace textures for delicate patterns. Bake pieces at 275°F for 15 minutes per ¼-inch thickness – use aluminum foil supports to maintain curved poses during hardening.
Create flowing dresses by layering thin clay sheets. Blend colors using a pasta machine for gradient effects. Insert wire armatures into legs for posable figures that withstand outdoor conditions. Seal finished pieces with UV-resistant varnish.
Incorporating Moss and Earthy Accents
Press preserved sheet moss into damp soil between structures. Use tweezers to position reindeer moss clusters as miniature shrubs. For pathways, sprinkle crushed walnut shells between stepping stones – their natural color mimics well-trodden forest trails.
Attach Spanish moss to twig trees using floral wire. Mist weekly to maintain pliability in dry climates. Combine multiple moss varieties to create depth, with taller fern moss patches suggesting wild undergrowth around your clay creations.


