
Your plants’ success begins with what’s beneath them. Just like a house needs solid footings, your elevated growing area thrives when built on thoughtfully prepared earth. Many enthusiasts focus on seeds and sunlight but overlook the living ecosystem that feeds their crops.
The right earth mixture prevents common headaches like waterlogged roots or nutrient deficiencies. Through strategic layering techniques used by professional growers, you’ll create self-sustaining conditions that boost yields naturally. This approach mimics forest floors where decaying organic matter continuously nourishes plants.
After building your raised bed garden, the next critical step involves balancing drainage, texture, and fertility. Popular recipes blend moisture-retaining elements with nutrient-rich components – imagine creating a layered cake where each tier serves specific purposes. We’ll break down why this method outperforms single-layer solutions and how it reduces long-term maintenance.
You’ll discover how proper earth composition impacts everything from tomato sweetness to lettuce crispness. We’ll also debunk myths about expensive store-bought mixes and show cost-effective alternatives that deliver better results. Get ready to transform your growing experience through science-backed strategies that keep your green friends thriving year after year.
Understanding Raised Garden Beds and Their Benefits

Elevated gardening spaces transform how you grow. Unlike traditional plots, these contained structures act like personalized plant homes. They sit above ground level, giving you command over earth quality and layout. Let’s explore why this setup stands out.
What Makes These Growing Spaces Unique
Raised beds create a tailored environment for roots. You’re not stuck with your yard’s native dirt. Instead, you craft ideal conditions using nutrient-rich mixes. This customization leads to stronger plants and fewer surprises.
“Elevated beds let gardeners bypass poor soil issues entirely – it’s like hitting the reset button on your growing space.”
Why Soil Control and Drainage Matter
Water behaves differently in raised setups. Excess moisture drains faster, protecting roots from drowning. Compare this to traditional methods:
| Feature | Traditional Beds | Raised Beds |
|---|---|---|
| Drainage Speed | Slow (clay soils) | Fast (custom mixes) |
| Weed Pressure | High | Low |
| Soil Warmth | Slow to heat | Quick spring warm-up |
These structures also ease physical strain. Less bending means happier knees during planting. When preparing your elevated bed, remember: good drainage starts with proper layering. Your plants will reward you with vigorous growth and higher yields.
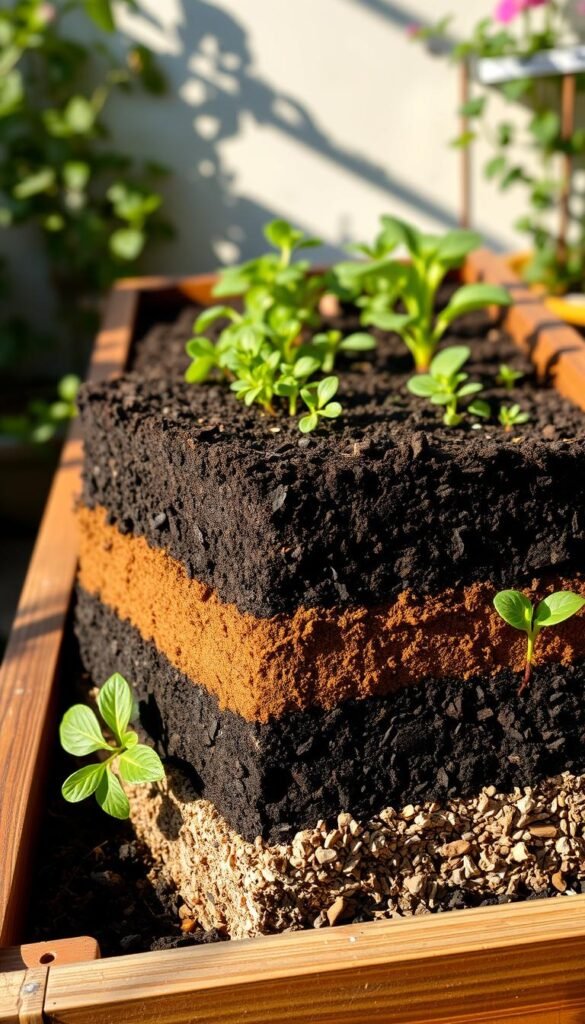
How to Fill a Raised Garden Bed: Soil Layering for Optimal Growth

Think of your garden as a living sandwich – each layer serves distinct purposes while working together. Professional growers use this approach to create root-friendly environments that outperform single-material fills.
The Science Behind Layering Soil for Plant Health
Natural decomposition drives the magic. When you alternate carbon-rich materials like straw with nitrogen sources like grass clippings, microbial activity skyrockets. This process:
- Releases nutrients gradually
- Maintains air pockets for roots
- Regulates moisture like a sponge
The Lasagna Gardening method takes 4-6 months to mature but creates self-sustaining beds. For quicker results, blend 2 parts compost with 1 part screened topsoil. This ratio provides instant nutrition while improving texture.
| Method | Timeframe | Best For |
|---|---|---|
| Lasagna Layers | 4-6 months | Long-term soil health |
| Quick Mix | Immediate use | Fast-growing crops |
Choosing the Right Mix of Topsoil, Compost, and Amendments
Quality matters more than quantity. Seek dark, crumbly compost that smells earthy. Combine with:
- Perlite for drainage
- Gypsum to loosen clay
- Aged manure for nutrients
“Customizing your blend lets you grow anything from juicy tomatoes to fragrant herbs in the same bed.”
Test your final mix by squeezing a handful – it should hold shape briefly before crumbling. This balance ensures roots get enough water without drowning. Remember, great gardens start below the surface!
Preparing Your Garden Bed for Layering

A thriving garden starts with a solid foundation. Before adding your layered soil mix, proper groundwork ensures your plants won’t battle hidden obstacles. Let’s transform your growing space into a weed-free, structurally sound environment.
Clearing the Area and Setting Up a Clean Base
Start by removing existing vegetation. Pull stubborn weeds by their roots using a garden fork. Clear grass patches within 12 inches of your bed edges to prevent creeping invaders. Sweep away leaves and debris that might harbor pests.
Inspect your garden bed’s frame for loose screws or rotting wood. Tighten connections and replace compromised boards. A level base prevents soil from washing away during rains – use a carpenter’s tool to check evenness.
Using Landscape Fabric and Cardboard for Weed Suppression
Line the bottom with breathable landscape fabric or overlapping cardboard sheets. This barrier blocks weeds while letting water drain. For cardboard:
- Remove tape and staples
- Wet thoroughly before adding soil
- Overlap edges by 6 inches
Yard waste like fallen leaves makes excellent filler beneath barriers. One gardener reported:
“Cardboard decomposed in 3 months, leaving rich humus that earthworms love.”
Initial Steps for a Stable Structure
Secure your bed against shifting soil by anchoring corners with rebar. Add a 2-inch gravel layer under the bottom if your yard has poor drainage. This prevents water pooling around roots.
| Material | Best Use | Lifespan |
|---|---|---|
| Landscape fabric | Sloped yards | 5-7 years |
| Cardboard | Flat surfaces | 1 season |
| Newspaper | Temporary beds | 6 months |
Finally, moisten the entire garden bed base before adding soil layers. This simple way activates decomposition and helps materials settle evenly. Your plants will thank you with robust growth!
Layering Materials and Building a Healthy Soil Profile

Transform yard leftovers into plant superfood. Those fallen leaves and trimmed branches become gold when layered properly. Let’s turn your green waste into black gold for thriving plants.
Smart Use of Natural Resources
Start with bulky materials at the bottom raised section. A 4×4 bed needs about one trash can of yard debris to fill half its space. Try this mix:
- Twigs for airflow
- Fresh grass clippings for nitrogen
- Dry leaves for carbon balance
| Material | Benefit | Decomposition Time |
|---|---|---|
| Small branches | Creates air pockets | 12-18 months |
| Green clippings | Adds nitrogen | 2-4 weeks |
| Shredded leaves | Improves texture | 6-12 months |
Mixing Magic for Root Happiness
Top your layers with two bags of quality earth per 4×4 area. Combine equal parts:
- Screened topsoil
- Aged compost
- Perlite or vermiculite
“Proper mixing feels like making chocolate cake batter – stop when it’s crumbly but holds shape when squeezed.”
Water each layer lightly as you build. This activates decomposition and helps materials settle. Your plants will dive deep into this nutrient-rich paradise!
Avoiding Common Pitfalls in Filling Raised Garden Beds

Smart material choices make all the difference between thriving plants and disappointing harvests. What you leave out matters as much as what you put in. Let’s explore hidden hazards and maintenance tricks for lasting success.
Steer Clear of These Contaminants
Old pressure-treated wood contains arsenic and copper that leach into soil. Railroad ties and pallets pose similar risks. Instead, use cedar or redwood for bed frames—they naturally resist rot without chemicals.
Inorganic materials like plastic sheets or gravel create drainage nightmares. One gardener learned the hard way:
“My zucchini roots hit a buried Styrofoam chunk and stopped growing completely—lesson learned!”
| Material | Risk | Safer Alternative |
|---|---|---|
| Treated lumber | Chemical leaching | Untreated cedar |
| Pet waste | Pathogens | Composted manure |
| Large logs | Nitrogen theft | Small twigs |
Keeping Your Earth in Prime Condition
Test soil pH every spring using affordable strips. Most veggies prefer 6.0-7.0. Too acidic? Add crushed eggshells. Too alkaline? Mix in coffee grounds.
Watch for telltale signs:
- Yellow leaves = nitrogen deficiency
- Purple stems = phosphorus shortage
- Stunted growth = compacted earth
While Hugelkultur works in ground beds, raised setups often struggle with large wood chunks. Stick to fist-sized chips if using this method. Refresh compost annually to maintain quality without breaking your budget.
Wrapping Up Your Raised Garden Bed Journey
Nurturing your garden’s foundation leads to seasons of abundance. Annual soil care keeps raised beds thriving—mix in 2-3 inches of compost each spring to replenish nutrients. Let fresh blends settle for 10 days before planting, allowing microbes to activate fully.
Watch your plants like nature’s dashboard. Yellow leaves? Add nitrogen-rich amendments. Slow growth? Check compaction with a simple squeeze test. Successful gardeners treat their beds as living systems, adjusting pH with coffee grounds or lime as needed.
Start with one well-prepared plot and expand gradually. Those juicy tomatoes or crisp greens will prove the value of proper layering. Over years, your customized earth becomes richer, requiring less effort for bigger harvests.
Pair these strategies with organic gardening practices for a truly sustainable setup. Your raised beds aren’t just planting spaces—they’re evolving ecosystems that reward thoughtful care with endless flavor-packed rewards.


