
Imagine transforming ordinary corners of your house into whimsical escapes that spark joy every time you glance at them. Tiny landscapes with delicate bridges, cozy cottages, and winding paths let you design a personal retreat without stepping outside. Unlike outdoor setups, these displays thrive in controlled environments, protecting fragile elements from sun or rain damage.
Building these captivating scenes isn’t just about decoration—it’s a creative outlet that soothes the mind. Arranging miniature furniture or crafting tiny accessories becomes a calming ritual, offering a break from daily stressors. Whether placed on a bookshelf or bedside table, each piece adds personality to your decor while inviting curiosity.
The best part? You can refresh your design anytime. Swap seasonal accents like autumn leaves or winter snowflakes to keep the display feeling current. With endless options for themes and materials, your creation evolves with your imagination, making it a year-round source of delight.
Getting Started with Your Indoor Fairy Garden

Creating a magical miniature scene starts with two key steps: location and preparation. Think of it like setting up a stage—the right spot ensures your tiny world thrives, while having the right materials on hand keeps the process smooth.
Selecting the Ideal Spot in Your Home
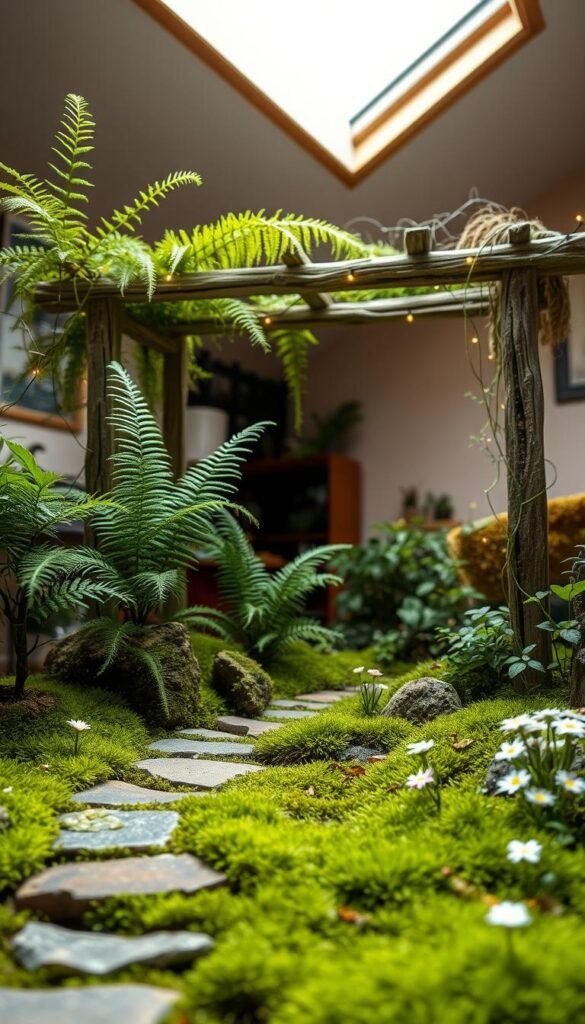
Look for areas with bright, indirect light—near east-facing windows or well-lit shelves. Avoid direct sun, which can dry out plants. Consider how the room’s style influences your design. A cozy reading nook might suit a woodland theme, while a kitchen counter could host herb-filled planters.
Check accessibility. You’ll want easy reach for watering and rearranging. Bonus points if the location sparks joy when you pass by!
Gathering Supplies and Tools
Start with basics: shallow containers, potting mix, and small plants like succulents or moss. Add character with miniature benches, pebble paths, or DIY cottages. Thrift stores often have tiny teacups or decorative stones for budget-friendly flair.
Keep supplies organized in trays or jars. This saves time and lets creativity flow without hunting for missing pieces. Remember—every great garden begins with a well-planned toolkit!
Indoor Fairy Garden Ideas for Bringing Magic Inside Your Home

Transform your living space into a realm of wonder with themed miniature landscapes that spark joy and creativity. Picture a tiny tea party scene with dollhouse-sized cups and saucers, or an enchanted forest dotted with resin mushrooms and hand-painted critters. These designs turn everyday spaces into conversation starters while letting you express your unique style.
Seasonal swaps keep your display fresh year-round. Add miniature pumpkins and golden leaves for fall, then switch to glittery snowflakes and tiny evergreens in winter. A springtime setup might feature blooming flowers and pastel eggs, while summer invites seashell paths and mini beach chairs. This flexibility makes your creation feel alive and ever-changing.
Tell stories through your arrangements. Place a tiny ladder against a tree trunk as if fairies are climbing, or position a miniature picnic basket beside a pebble “stream.” These details invite viewers to imagine hidden narratives. Pair earthy greens with soft blues for a calming woodland vibe, or mix jewel tones for a mystical feel that complements modern decor.
Maintain visual harmony by sticking to one-inch scale for most pieces—a bench shouldn’t tower over nearby shrubs. Soft LED string lights wrapped around structures add dreamy ambiance without heat risks. With these strategies, your tiny world becomes both an artistic outlet and a daily dose of whimsy.
Choosing the Perfect Fairy Garden Container

Your container isn’t just a home for tiny wonders—it’s the foundation of your miniature world’s personality. Whether you crave storybook charm or rustic character, the right vessel elevates your design from cute to captivating.
Exploring Unique Containers Like Teacups and Washtubs
Teacups whisper whimsy, creating instant Alice in Wonderland vibes with their dainty curves. Pair them with miniature roses or moss for instant magic. For grander scenes, galvanized washtubs become blank canvases—their spacious interiors fit entire villages with bridges and ponds.
Glass terrariums let viewers admire your work from all angles, while woven baskets add earthy texture. “The container’s shape guides the story,” says one designer. “A vintage birdcage suggests enchanted forests, while mason jars feel like captured daydreams.”
Using Recycled Materials for a Vintage Look
Transform forgotten items into fairy realms. An old suitcase becomes a traveling gnome’s home when lined with pebbles and thyme. Chipped mixing bowls gain new life as bubbling mushroom groves. Even colanders work—their holes double as drainage vents!
Consider practical needs: shallow pots prevent root rot in succulents, while deep containers suit taller plants. Add personality with paint or patina, but always prioritize your tiny plants’ needs over pure aesthetics.
Crafting DIY Fairy Houses and Accessories

Building miniature homes lets you channel creativity into tangible magic. Whether crafting a cozy cottage or a mystical tree hollow, these projects blend artistry with practicality. Start with simple tools like polymer clay and twigs—your imagination handles the rest.
Designing Miniature Doors and Houses
Create enchanting entryways using polymer clay. Roll out thin sheets to form fairy door shapes, then etch woodgrain patterns with toothpicks. Bake small hinges from wire for movable parts. “A detailed door makes the whole scene feel lived-in,” notes a miniature artist. Pair these with stone-textured walls made from air-dry clay pressed with gravel.
For rustic structures, bundle twigs with jute twine. Stack flat stones with hot glue to build weather-resistant walls. Always test adhesives on scraps first—some melt delicate materials!
Customizing with Polymer Clay and Natural Materials
Mix birch bark shingles with moss roofs for earthy charm. Press dried flowers into clay windowsills or fashion chimneys from pebbles. Turn bottle caps into tiny ponds by lining them with blue resin. Shells become elegant bathtubs when filled with micro beads.
Add personality through accessories: carve wooden benches from popsicle sticks or shape clay lanterns. Cluster these around your diy fairy house to suggest bustling activity. Remember—imperfections add character, so embrace crooked fences and uneven stones!
Designing Lush Miniature Landscapes
Bringing tiny worlds to life starts with choosing the right greenery. Live or faux? The answer depends on your lifestyle and creative vision. Let’s explore how to balance practicality with charm when building your pint-sized paradise.
Selecting Live Plants Versus Faux Alternatives
Live plants like succulents and dwarf rosemary thrive in sunny spots, needing just weekly watering. Their natural growth patterns create evolving scenery—a jade tree might sprout new branches, while creeping thyme forms living carpets. But they demand care: “You’re basically a tiny landscape gardener,” says houseplant expert Mia Johnson.
Artificial options shine in low-light areas. Silk flowers or plastic moss stay vibrant without maintenance. Mix both for best results—use real herbs near windows and faux ferns in shadowy corners.
Incorporating Miniature Trees, Moss, and Herbs
Sheet moss makes instant grassy knolls when pressed into soil. Combine it with pebble paths and bonsai-style trees for depth. Miniature basil or mint adds fragrance and doubles as kitchen garnishes—just trim regularly to maintain scale.
Arrange taller elements like dwarf ferns at the back, with creeping groundcover up front. This layering trick makes spaces feel larger. Rotate pots every few days so succulents grow evenly, and mist moss daily to keep it emerald-green.
Creating Enchanting Display Setups

Designing a captivating miniature scene requires more than just cute trinkets—it’s about crafting visual stories through smart arrangement. Think of your fairy garden as a stage where every tiny bench or lantern plays a role in the narrative.
Arranging Accessories for Visual Interest
Start by choosing one standout piece—like a miniature gazebo or glowing lantern—as your focal point. Place it slightly off-center to create dynamic tension. Surround it with smaller accessories like flower pots or wheelbarrows, ensuring each item relates to your theme.
Balance is key. “A cluttered display confuses the eye, but intentional spacing invites exploration,” notes miniature artist Lara Finch. Use odd numbers of objects (three mushrooms, five pebbles) for natural harmony. Elevate taller items at the back to build depth, and angle pieces toward your focal point.
Thrift stores offer unique finds like vintage buttons as stepping stones or dollhouse furniture. Stick to a 1:12 scale so your fairies don’t get dwarfed by oversized benches. Secure lightweight pieces with museum putty—it holds items firmly yet allows easy rearranging when seasons change.
Finally, tell a story. Position a tiny watering can beside a garden path as if left mid-task. Cluster colorful stones near a miniature well to suggest hidden treasures. These details transform your space into a living world that sparks imagination with every glance.
Integrating Lighting and Atmospheric Accents
Lighting transforms your miniature world from charming to spellbinding after sunset. Strategic placement adds depth and drama, turning tiny details into focal points that shine day and night.
Choosing Battery-Operated Fairy Lights
Opt for warm white LEDs to mimic firefly glows without overheating plants. Wrap strands around miniature trees or tuck single bulbs under resin mushrooms for subtle magic. Waterproof options let you create “reflecting pools” by submerging lights in clear epoxy.
Use timer-equipped sets to automate your display. “Lights should enhance, not overpower,” advises designer Ellie Torres. “Drape them loosely over structures—never squeeze delicate wires into tight spaces.”
Enhancing Ambience with Seasonal Decor
Swap accessories to match the calendar while keeping core elements intact. Try these ideas:
- Autumn: Mini hay bales with amber lights
- Winter: Cotton batting “snow” dotted with blue LEDs
- Spring: Pastel eggs nestled in moss with twinkling tea lights
Combine seasonal colors with permanent fixtures. A red lantern paired with miniature holly becomes festive, while the same base structure with sunflowers transitions to summer.
Always secure electrical components with silicone adhesive—it withstands humidity from plants. With layered lighting and timely accents, your tiny realm stays fresh through every season.
Incorporating Indoor and Outdoor Influences
Why choose between cozy interiors and fresh-air charm when your tiny paradise can enjoy both? Many garden designs thrive in transitional spaces like sunrooms or covered patios, blending the best of both worlds. By selecting versatile containers and durable materials, you create displays that adapt effortlessly as seasons shift.
Adapting Designs for Flexible Spaces
Raised planters with drainage holes work wonders. They elevate your fairy garden to eye level indoors while surviving occasional outdoor trips. “Choose planters with neutral finishes,” suggests landscape designer Clara Myers. “A weathered concrete look complements modern decor and rustic patios equally.”
For small spaces, try vertical stacking. Use tiered shelves to showcase multiple miniature scenes without crowding tabletops. Swap accessories seasonally—a summer seashell path becomes autumn’s pinecone trail in minutes.
- Weatherproof delicate pieces with clear sealant spray
- Use lightweight resin furniture for easy relocation
- Anchor tall plants in removable pots for quick swaps
Modular systems let you rearrange sections like puzzle pieces. A central cottage stays indoors year-round while outdoor-bound modules feature weather-resistant moss and stone paths. This approach keeps your design fresh without starting from scratch.
Engaging the Whole Family in Fairy Garden Projects
Crafting miniature worlds becomes even more special when shared with loved ones. These projects offer a chance to bond while sparking creativity across generations. Whether you’re working with toddlers or teens, there’s a role for everyone in designing tiny enchanted spaces.
Simple DIY Projects Kids Will Enjoy
Start with upcycled items like water tables transformed into sprawling landscapes. Younger kids love arranging durable plastic cottages, while older ones craft bridges using popsicle sticks and twine. Kits with pre-cut materials simplify the process for busy families.
Turn sensory bins into magical play areas filled with kinetic sand and silk flowers. Assign tasks based on age—gluing pebbles for paths or painting tiny signs. These activities teach patience and nature appreciation through hands-on fun.
Rotate themes monthly to keep excitement fresh. A springtime butterfly habitat or winter wonderland encourages seasonal learning. Watch teamwork blossom as your crew creates shared memories in miniature form.


