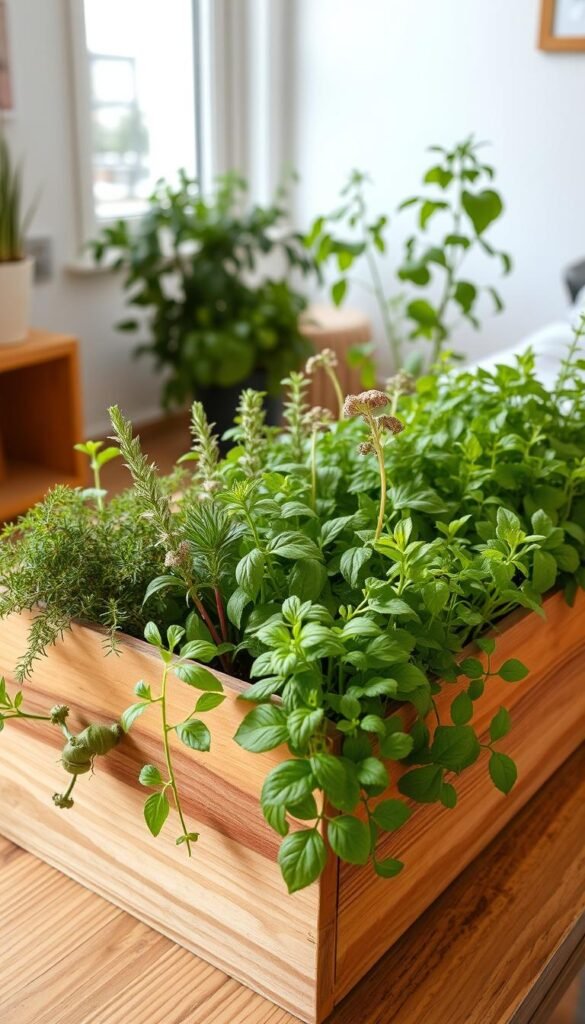
Imagine plucking fresh flavors right from your windowsill. Growing edible greens at home isn’t just for expert gardeners—it’s a simple, rewarding project anyone can try. You’ll skip wilted grocery-store bundles while adding vibrant tastes to meals. Think rosemary-roasted potatoes or basil-topped pizza, all from plants you nurtured.
These leafy companions thrive in small pots and adapt to most spaces. A sunny corner or balcony works perfectly. Many varieties grow faster than you’d expect, forgiving the occasional missed watering. Studies show tending plants reduces stress, making this hobby both practical and calming.
You don’t need fancy tools or a green thumb to succeed. Start with a few easy-to-grow picks, and soon you’ll enjoy herbs that outlast pricey supermarket packs. They’ll inspire healthier cooking habits and connect you to every dish’s ingredients.
Ready to transform your kitchen routine? Let’s explore how simple it is to create your own fresh-flavor station—no backyard required.
Discover the Benefits of Growing Herbs Indoors

Your culinary adventures just got an upgrade. Freshly snipped leaves beat dried spices any day—they pack 3x more flavor compounds according to food scientists. No more settling for limp supermarket bundles that lose their zing in plastic packaging.
Flavor That Follows the Seasons
Store-bought options can’t match the punch of homegrown varieties. Basil picked straight from your windowsill keeps its peppery sweetness, while rosemary maintains those earthy notes perfect for roasted veggies. You control when to harvest, ensuring peak taste for every dish.
Winter won’t stop your creations either. Unlike outdoor gardens, your pots provide year-round access to vibrant flavors. Need thyme for Sunday stew? Just reach over instead of braving icy roads.
Green Decor That Works Overtime
Those leafy friends do more than taste good. Studies show they remove up to 87% of airborne toxins in 24 hours. Their roots and leaves team up to clean your air while releasing moisture—a natural humidifier for dry winter rooms.
| Benefit | Store-Bought | Homegrown |
|---|---|---|
| Flavor Intensity | Medium | High |
| Availability | Seasonal | Year-Round |
| Cost Per Use | $2-$5/bunch | Pennies per harvest |
| Air Purification | None | Filters 3+ toxins |
Place pots near your kitchen sink for extra humidity. The steam from dishwashing gives herbs like mint and parsley a growth boost. Plus, their bright greens and purples turn meal prep into a visual treat—no need for artificial decor.
Why an Indoor Herb Garden is Perfect for Beginners
Starting your green journey doesn’t demand perfection. These leafy companions thrive where other plants struggle, making them ideal for first-timers. Forget strict schedules—they bounce back if you miss a watering or two.
Low-Maintenance and Space-Friendly Options
No need for deep pots or sprawling setups. Basil, oregano, and thyme flourish in shallow containers—even repurposed mugs work. Terra cotta pots help roots breathe, preventing soggy soil disasters. Most varieties handle chilly nights better than tropical houseplants.
- Grow 3-4 varieties in a 12-inch windowsill planter
- Use leftover yogurt tubs with drainage holes
- Rotate pots weekly for even sunlight exposure
Cost-Effective and Sustainable Living
Store-bought bundles add up fast. One $4 mint plant yields 20+ harvests—compare that to $3 weekly supermarket packs. Reuse takeout containers instead of buying new pots. You’ll slash plastic waste while enjoying fresher flavors.
| Expense | First Year Cost |
|---|---|
| Seeds/Starter Plants | $10-$15 |
| Containers (reused) | $0 |
| Soil & Fertilizer | $8 |
| Total Savings vs Store-Bought | $200+ |
Your countertop garden becomes a living recipe ingredient station. Snip what you need, when you need it—no more wilted leftovers.
Setting Up Your Indoor Herb Garden

Your leafy companions need the right foundation to flourish. Let’s build their perfect habitat using smart container choices and strategic placement.
Choosing the Ideal Containers and Potting Soil
Size matters more than style. Pick pots with drainage holes—6 inches deep for thyme or chives, 12 inches for basil’s taproots. Terra cotta breathes better than plastic, preventing soggy soil.
Skip garden dirt—it’s too dense. Mix peat moss, perlite, and vermiculite for fluffy texture. This combo holds moisture without drowning roots. One study found herbs in soilless blends grew 40% faster than those in regular dirt.
Selecting the Right Location and Lighting
South-facing windows deliver the gold standard: 6+ hours of direct sunlight. Rotate containers weekly so all sides get equal light. No sunny spot? LED panels 6 inches above leaves mimic natural rays.
Keep temperatures steady—60-70°F avoids shock. Avoid drafty areas near AC vents. A kitchen counter near the sink offers humidity boosts during cooking, helping plants stay perky between waterings.
How to Care for Your Herbs Indoors

Keep your greens thriving with simple daily habits. The right balance of water, nutrients, and environment keeps flavors bold and growth steady. Let’s break down the essentials.
Watering, Fertilizing, and Light Requirements
Check soil moisture daily using the finger test: push your fingertip to the first knuckle. Water only if it feels dry. Overwatering drowns roots—always empty drainage trays after 10 minutes.
Feed herbs every 14 days with diluted liquid fertilizer. Half-strength solutions prevent flavor loss. Pair this with 6+ hours sunlight daily. Rotate pots weekly so all leaves get equal light exposure.
| Task | Frequency | Pro Tip |
|---|---|---|
| Watering | When soil is dry | Use room-temp water |
| Fertilizing | Biweekly | Skip in winter |
| Rotating | Weekly | Mark pots with tape |
| Airflow check | Daily | Use a small fan |
Managing Temperature, Humidity, and Airflow
Most varieties prefer 65-75°F days. Basil needs steady warmth—keep it above 60°F. Nighttime drops to 55°F help rosemary and thyme develop stronger oils.
Boost humidity by grouping plants or using pebble trays. Ensure air circulates freely—space pots 6 inches apart. A gentle fan 3 feet away prevents stagnant air without stressing leaves.
For more tips on growing herbs indoors, track seasonal changes. Adjust care as daylight shifts to maintain vibrant flavors year-round.
Guide to Growing Your Favorite Culinary Herbs

Your kitchen deserves fresh flavors at your fingertips. Let’s break down care strategies for popular varieties, helping you avoid common pitfalls while maximizing harvests.
Planting Tips for Basil, Mint, and Parsley
Basil thrives in warmth—keep it above 50°F near sunny windows. Water when the topsoil dries, but never let roots sit in puddles. Pinch off flower buds to extend leaf production.
Contain mint in its own pot—it’ll invade neighboring plants if given space. Partial shade keeps its leaves vibrant, while moist soil prevents bitter flavors. Harvest frequently to encourage bushier growth.
Soak parsley seeds overnight before planting. They sprout faster this way. Once established, this herb handles varied light conditions but rewards you best with 4-6 hours of sunlight.
Insights on Chives, Thyme, Rosemary, and More
Chives grow effortlessly from divisions or nursery starts. Snip stems 2 inches above the soil for regrowth. Their grassy onion notes elevate eggs, soups, and dips.
Mediterranean varieties like thyme prefer neglect. Let soil dry completely between waterings. Full sun intensifies their earthy aroma—perfect for roasted meats.
Skip rosemary seeds—buy young plants instead. They need gritty soil and bright light. Wait until the pot feels light before watering to mimic their native dry climate.
Troubleshooting and Essential Tips for Herb Garden Success

Even the most attentive plant parents face challenges. Your leafy friends communicate through visual cues—learning their language helps you act fast. Most issues stem from three factors: light mismatches, watering mishaps, or nutrient imbalances.
Identifying and Managing Common Issues
Leggy stems stretching toward windows? They’re begging for more sunlight. Move them closer to bright areas or add LED grow lights 6-8 inches above leaves. Pinch back elongated stems to encourage bushier growth.
Yellowing leaves often signal overwatering. Check soil moisture with your finger—if damp, wait 2-3 days before watering again. Crispy edges? Increase humidity using pebble trays or group plants together.
| Symptom | Likely Cause | Quick Fix |
|---|---|---|
| Drooping stems | Underwatering | Soak pot in sink for 15 minutes |
| White webs | Spider mites | Spray with diluted neem oil |
| Slow growth | Low nutrients | Apply half-strength liquid fertilizer |
Adjusting Care Routines for Robust Growth
Rotate pots weekly for even light distribution. Reduce watering frequency in winter when herbs grow slower. If using artificial lights, maintain 14-hour daily cycles with timers for consistency.
Prune regularly to prevent overcrowding. For container setups, refresh soil every 8 months to replenish nutrients. Remember: stressed plants often produce more flavorful oils—slight neglect can enhance your dishes!
Indoor Herb Garden for Beginners: Easiest Culinary Plants to Start
Transform your cooking with fresh-picked flavors that evolve with your skills. Proper techniques ensure your leafy allies produce abundantly while adapting to your home’s rhythm.
Step-by-Step Planting and Harvesting Strategies
Start seeds in shallow trays with moist potting mix. Cover lightly with soil—most varieties sprout in 7-14 days. For faster results, try stem cuttings from grocery store bundles. Dip ends in rooting hormone before planting.
Harvest strategically:
| Herb Type | Best Method | Frequency |
|---|---|---|
| Leafy (Basil) | Pinch above leaf nodes | Weekly |
| Woody (Thyme) | Snip green stems | Every 10 days |
| Cluster (Parsley) | Cut outer stalks | Biweekly |
Cilantro needs special attention. Sow new seeds every 14 days to outpace bolting. When plants reach 4 inches, harvest ⅓ of leaves at once. For sage, pluck mature leaves from the base to encourage bushiness.
Maintaining Your Garden Throughout the Seasons
Rotate plants monthly to prevent lopsided growth. In winter, cluster pots near south-facing windows for 6+ hours of light. Summer may require sheer curtains to filter intense afternoon rays.
| Season | Light Adjustment | Watering Shift |
|---|---|---|
| Winter | +2 hours daily | Reduce by 25% |
| Summer | Use indirect light | Increase by 30% |
Refresh soil annually and trim roots if repotting. For detailed guidance on starting seeds, track moisture levels closely during germination. Your efforts will yield aromatic rewards across all seasons.
Wrapping Up Your Herb Garden Journey
You’ve now got everything needed to keep flavors thriving at your fingertips. Those leafy companions do more than spice up meals—they transform how you connect with cooking. Each snip brings restaurant-quality zest to weeknight dinners and weekend feasts alike.
Remember: success lies in simplicity. Start small with sturdy varieties like basil or mint near a sunny windowsill. Rotate pots occasionally, water when dry, and watch your kitchen come alive with fragrance. Even busy schedules can handle this low-effort routine.
Notice how those green sprigs spark creativity? They’ll nudge you to experiment with new recipes while cutting grocery bills. Best of all, you’re growing skills alongside herbs—every harvest builds confidence for future projects.
Stick with it through trial and error. Plants might droop or yellow occasionally, but they’re resilient partners in your beginner journey. Share cuttings with friends to spread the joy of fresh flavors grown indoors.
Your countertop oasis proves good things grow in small spaces. Keep celebrating those tiny victories—they add up to a lifetime of vibrant meals and mindful moments.