
Imagine growing crisp lettuce, fragrant herbs, or juicy tomatoes right in your kitchen—no backyard required. With a hydroponic system, you can nurture plants using water and nutrients instead of soil. This method isn’t just for experts; it’s a simple and efficient way to cultivate food at home, even if you’re new to gardening.
Why choose this approach? Traditional gardens depend on weather and space, but a well-designed setup lets you grow year-round. You’ll use up to 90% less water than soil-based methods while getting faster harvests. Plus, you control every detail—from lighting to nutrient levels—for healthier plants.
This guide walks you through the basics. You’ll learn how to pick containers, set up grow lights, and choose quality seeds. Whether you want a compact countertop garden or a larger vertical system, we’ll help you start strong. No guesswork, just clear steps tailored for beginners.
Key Takeaways
- Grow produce indoors regardless of outdoor conditions or space limitations.
- Save water and skip soil while accelerating plant growth.
- Customize lighting and nutrients for optimal results.
- Start small with beginner-friendly systems and expand over time.
- Enjoy fresh, pesticide-free greens within weeks of planting.
Overview of Indoor Hydroponic Gardening: Fresh Greens Year‑Round
Soil-free cultivation lets you grow herbs, leafy vegetables, and even fruiting crops using water infused with essential minerals. Instead of relying on dirt, roots absorb nutrients directly from a controlled solution. This method eliminates weeds and reduces pests, giving you cleaner results.
Here’s why it’s efficient: Traditional gardens waste water through evaporation and runoff. In contrast, closed-loop systems recycle moisture, cutting usage by over 80%. You’ll also see plants mature 25% faster since they don’t expend energy searching for food.
| Feature | Soil-Based | Water-Based |
|---|---|---|
| Water Use | High | Low |
| Growth Speed | Standard | Accelerated |
| Space Needed | Large plots | Compact setups |
| Nutrient Control | Limited | Precise |
Urban dwellers love this approach. A small shelf or countertop can host basil, spinach, or cherry tomatoes. No yard? No problem. You maintain full control over light cycles and pH levels for healthier yields.
This guide simplifies the process. We’ll explain pumps, timers, and mineral mixes so you can start confidently. Whether you’re nurturing mint for tea or kale for salads, every step becomes straightforward.
Benefits of Indoor Hydroponic Systems for Year‑Round Growth
Cutting-edge growing methods let you produce more with less effort. Closed-loop setups recycle moisture, preventing waste while delivering nutrients directly to roots. This approach works especially well for quick-growing crops like spinach and arugula.

Smart Resource Use
Traditional farms lose gallons through evaporation and uneven watering. In water-based setups, pumps circulate liquid precisely where needed. Studies show these methods use 90% less water than dirt gardens—perfect for drought-prone areas.
| Factor | Soil | Water-Based |
|---|---|---|
| Weekly Water Use | 50 gallons | 5 gallons |
| Harvest Time (Lettuce) | 60 days | 45 days |
| Common Issues | Root rot | pH imbalance |
Accelerated Results
Plants grow faster when they get perfect nutrition on demand. Basil reaches full size in 3 weeks instead of 5. Kale develops deeper color without bitter flavors. You’ll notice:
- Larger leaves on herbs like mint and parsley
- Consistent yields every 4-6 weeks
- No soil pests ruining your harvest
“Controlled environments reduce crop losses by 40% compared to outdoor farms.”
This process lets you grow a lot without constant upkeep. Start with simple greens, then experiment with strawberries or dwarf peppers. Your kitchen could become a mini farm!
Understanding Hydroponic Components and Setup
To grow plants in water effectively, you’ll need specific tools that replace traditional soil. A basic setup includes containers, reservoirs, and specialized holders for roots. Let’s break down how these pieces work together.
Deep Water Culture and Alternative Systems
Deep water culture (DWC) keeps roots submerged in oxygen-rich liquid, ideal for fast-growing greens like lettuce. For small-scale setups, this method costs less than $50 to start. Alternatives like the Kratky method skip pumps entirely—perfect for beginners.
| System Type | Cost | Maintenance |
|---|---|---|
| DWC | Low | Weekly checks |
| Kratky | Minimal | Hands-off |
| Ebb & Flow | Moderate | Daily monitoring |
Net Pots, Substrates, and Support Structures
Net pots cradle plants while letting roots reach the nutrient mix below. Materials like Rockwool or coconut coir provide stability and air pockets. Here’s why they matter:
- Rockwool: Retains moisture without drowning roots
- Coconut coir: Eco-friendly and reusable
- Clay pebbles: Improve drainage in dense setups
Always make sure your support materials are pH-neutral. This prevents mineral imbalances that could harm your crops. With the right foundation, you’ll see healthier growth in weeks.
Choosing the Right Hydroponic System for Your Home
Picking the perfect setup for your space doesn’t require a degree in botany—just clear comparisons. Three popular hydroponic system designs dominate home setups, each with distinct advantages. Let’s explore which matches your goals and living area.

Deep Water Culture vs. Nutrient Film vs. Drip Systems
Deep water culture (DWC) suspends plant roots in oxygenated water, making it ideal for beginners. Nutrient film technique (NFT) uses a shallow stream flowing through tubes—great for herbs. Drip systems deliver nutrients directly to roots via timed emitters, perfect for larger plants like peppers.
| System | Cost | Space | Maintenance | Best For |
|---|---|---|---|---|
| DWC | $40-$80 | Compact | Weekly checks | Leafy greens |
| NFT | $90-$150 | Horizontal | Pump monitoring | Basil, mint |
| Drip | $120-$300 | Vertical | Daily adjustments | Tomatoes, peppers |
Matching Systems to Your Space and Budget
Small apartments thrive with DWC’s space efficiency—a 2’x2’ area grows 12 lettuce heads. NFT works well on kitchen counters but needs consistent power. If you’re growing a crop like strawberries, drip systems offer precision despite higher upfront costs.
Consider your weekly time investment too. DWC requires minimal effort, while drip setups demand daily attention. Start with one option, then expand as you master water and light management. Your home can host a thriving garden without crowding your living space.
Setting Up Your Indoor Hydroponic Garden
Building a productive water-based growing area starts with smart equipment choices. Your container acts as the foundation, while proper lighting and airflow keep plants thriving. Let’s break down how to assemble these pieces for maximum efficiency.
Picking Containers That Work Hard
Choose food-grade plastic or glass reservoirs to avoid chemical leaks. Containers should be 6-12 inches deep—shallow for herbs, deeper for root vegetables. Lids must fit snugly and support net pots without wobbling.
| Material | Pros | Cons |
|---|---|---|
| Plastic | Lightweight, affordable | May degrade over time |
| Glass | Non-reactive, durable | Heavy when filled |
| Metal | Sturdy | Risk of rust |
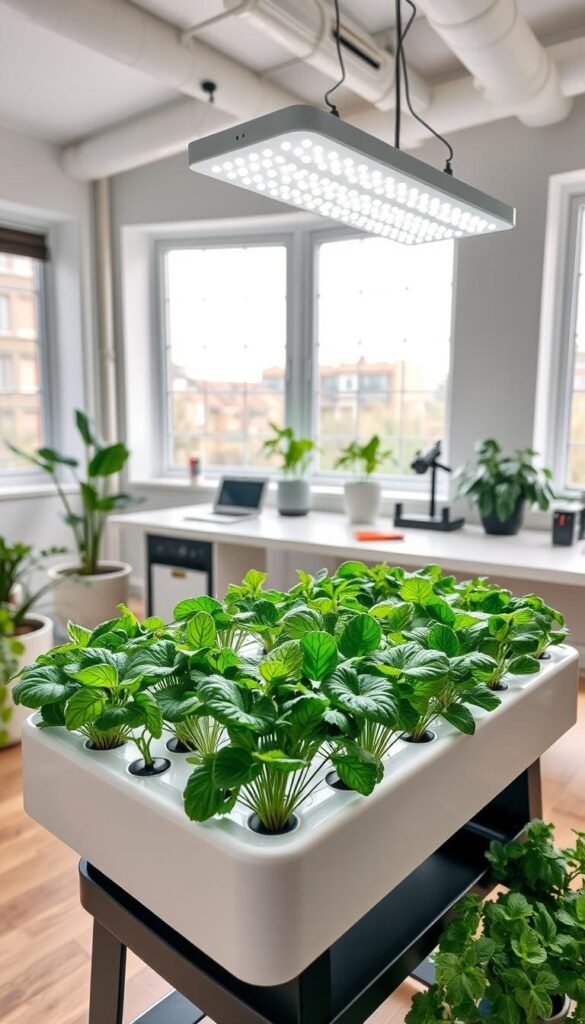
Lighting and Oxygen Essentials
Install LED panels 12-18 inches above plants for balanced growth. These use less energy than fluorescent bulbs while emitting less heat. For aeration, add an air stone connected to a quiet pump—it bubbles oxygen into the water, preventing root rot.
Position your setup near a power source but away from direct sunlight. This prevents algae growth and keeps water temperatures stable. Test all parts together before adding seeds to make sure pumps, lights, and lids function smoothly as one system.
Exploring Different Grow Lights for Hydroponics
Light fuels growth in water-based setups more powerfully than any other factor. Choosing the right illumination determines whether your crops thrive or merely survive. Let’s explore how to match lighting technology to your goals.

LED Versus Fluorescent Options
LED panels shine for energy efficiency, using 40% less power than fluorescent tubes. Though pricier upfront, they last 50,000+ hours—5x longer than alternatives. Fluorescent bulbs work as a budget-friendly starter option but struggle with heat management in tight spaces.
| Feature | LED | Fluorescent |
|---|---|---|
| Cost/year | $18 | $42 |
| Heat Output | Low | High |
| Lifespan | 5-7 years | 1-2 years |
Balancing Light Spectrum for Leafy Greens
Leafy varieties like kale and spinach crave blue wavelengths for lush foliage. Add 10% red light to boost vitamin content and texture. A 4000K-6500K range mimics midday sun, perfect for compact growth.
Position lights 12-18 inches above plants using adjustable hangers. Use timers to maintain 14-hour daily cycles. This consistency prevents leggy stems while maximizing harvest weight.
“Proper spectrum balance increases antioxidant levels by 15% in water-grown greens.”
For small spaces, clip-on LEDs offer targeted coverage. Larger systems benefit from panel arrays that evenly distribute photons. Test different intensities weekly—your plants will show brighter colors and crisper leaves when dialed in correctly.
Water Quality and Nutrient Management
Your plants’ health depends on what’s in their water—not just H₂O, but a precise mix of minerals and balanced acidity. When the chemistry’s right, roots absorb food faster. Get it wrong, and growth stalls. Let’s explore how to keep your liquid foundation in top shape.
Maintaining Optimal pH Levels
Most crops thrive when water stays between 5.5 and 6.5 pH. Outside this range, nutrients turn into unusable forms. Test weekly with digital meters or strips. If levels drift:
- Too acidic? Add pH Up solution drop by drop.
- Too alkaline? Use pH Down products carefully.
| pH Level | Effect on Plants | Solution |
|---|---|---|
| Below 5.0 | Iron toxicity | Add potassium bicarbonate |
| 5.5-6.5 | Ideal absorption | Maintain current levels |
| Above 7.0 | Nutrient lockout | Use citric acid |
Mixing Nutrient Solutions Effectively
Start with filtered water to avoid contaminants. Follow package instructions for your crop type—leafy greens need more nitrogen, while fruiting plants crave extra potassium. Always mix part A and B separately before combining to prevent clouding.
Check electrical conductivity (EC) with a meter. Higher EC means stronger food concentration. Adjust based on growth stages:
- Seedlings: 0.8-1.3 mS/cm
- Mature plants: 1.8-2.5 mS/cm
| Problem | Likely Cause | Fix |
|---|---|---|
| Yellow leaves | Low nitrogen | Increase nutrient dose |
| White crust | Hard water | Use reverse osmosis filter |
| Algae growth | Light exposure | Cover reservoirs |
Change the solution every 7-14 days. Rinse tanks thoroughly to prevent salt buildup. Your system will reward you with vibrant, fast-growing plants.
Plant Selection for Successful Indoor Hydroponic Gardens
The key to a thriving setup lies in matching plant varieties to your system’s capabilities. Some species adapt better to water-based environments than others. Focus on quick-growing options first, then branch out as you gain confidence.

Leafy Greens, Mustard Greens, and Herbs
Start with low-maintenance choices like butterhead lettuce or red mustard. These plants mature quickly and tolerate minor nutrient fluctuations. Herbs like basil and oregano thrive with minimal effort—perfect for countertop setups.
| Plant Type | Light Needs | Nutrient Focus |
|---|---|---|
| Leafy Greens | 12-14 hrs/day | High nitrogen |
| Mustard Greens | 10-12 hrs/day | Balanced NPK |
| Herbs | 8-10 hrs/day | Moderate potassium |
Mustard varieties add peppery flavors to salads while growing 30% faster than soil counterparts. Keep their roots slightly cooler (65-70°F) for crisp textures.
Considerations for Fruit and Flower Varieties
Once you’ve mastered greens, try strawberries or dwarf tomatoes. These need stronger lighting (16+ hours daily) and extra calcium. Edible flowers like nasturtiums bring color while repelling pests naturally.
- Fruiting plants: Use trellises for support
- Flowers: Harvest petals before full bloom
- Root crops: Rarely recommended—stick to leafy types
“Choosing compact varieties increases yields by 22% in confined spaces compared to traditional breeds.”
Always check seed labels for terms like ‘container-friendly’ or ‘dwarf’. Pair your selections with a grow hydroponic system designed for their specific needs. Your grocery bill will shrink as your garden expands!
Starting Your Seeds: Soil Versus Starter Cubes
Your garden’s success begins with strong seedlings. Choosing between traditional soil and starter cubes impacts how easily young plants adapt to water-based systems. Let’s explore which method fits your goals.
Using Rockwool, Coconut Coir, and Smart Soils
Starter cubes simplify the transition to hydroponic systems. Rockwool retains moisture while letting roots breathe—soak it in pH-balanced water first. Coconut coir, made from husks, resists mold and offers eco-friendly support. Smart Soils expand when watered, creating air pockets ideal for delicate sprouts.
| Method | Pros | Cons |
|---|---|---|
| Soil | Familiar process | Messy cleanup |
| Cubes | Root-friendly | Extra prep steps |
Seeds germinate best in warm, humid conditions. Cover trays with plastic until sprouts appear. Once plants grow two true leaves, they’re ready for transfer. Gently rinse soil from roots to avoid shock.
For cubes, keep them moist but not soaked. Use a spray bottle to mist seedlings daily. Add diluted nutrients after the first week—half-strength solutions prevent burning tender roots.
“Starter media reduce transplant stress by 60% compared to soil-based starts.”
Whether you grow hydroponically with coir or prefer Smart Soils, make sure your setup matches the seedlings’ needs. This care ensures your hydroponic garden thrives from day one.
Practical Tips for Indoor Hydroponic Maintenance
Keeping your setup in top shape ensures lush growth and avoids surprises. A little attention goes a long way in preventing issues before they affect your plants. Let’s break down how to maintain peak performance without turning it into a chore.

Cleaning and Regular System Checks
Start with a weekly routine. Empty and scrub reservoirs every 7 days to prevent slime or mineral deposits. Check water levels daily—top off as needed to keep roots submerged but not drowning.
Test pH and nutrient strength twice weekly. Adjust levels immediately if readings drift outside ideal ranges. Replace the entire solution every 14 days to avoid stale mixtures that stress plants.
Key areas to monitor:
- Pump function: Listen for irregular noises
- Light timers: Confirm consistent cycles
- Root health: Look for discoloration or mushiness
Keep a logbook tracking adjustments and plant responses. Spot patterns like recurring pH drops or faster growth under specific conditions. This data helps refine your process over time.
Make sure to sterilize tools between uses to prevent disease spread. A simple bleach solution (1 part bleach to 9 parts water) works for wiping surfaces. Rinse thoroughly before reintroducing plants to the system.
Stick to your schedule, even when everything looks fine. Consistent care keeps water clean, equipment running smoothly, and harvests abundant. Your efforts now mean fewer headaches later!
Troubleshooting Common Hydroponic Challenges
Even the best setups sometimes hit snags—but don’t worry, most issues have straightforward fixes. Catching problems early keeps your plants thriving and prevents small glitches from becoming major headaches.
Managing Pests and Diseases
Spider mites and aphids love tender leaves. Check under foliage weekly for webbing or sticky residue. If spotted:
- Isolate affected plants immediately
- Spray with diluted neem oil every 3 days
- Add yellow sticky traps near grow lights
Root rot shows up as brown, slimy roots. Trim damaged parts and replace the water. Improve airflow with an extra air stone to prevent recurrence.
| Symptom | Likely Cause | Quick Fix |
|---|---|---|
| Yellow spots | Fungal infection | Reduce humidity by 15% |
| Wilting stems | Clogged pump | Clean filters & test flow |
| White powder | Powdery mildew | Apply potassium bicarbonate spray |
Keep tools sterilized and avoid cross-contamination between systems. Wipe surfaces with hydrogen peroxide after each harvest. Healthy practices stop 80% of diseases before they start.
Test water quality every 4 days. Balanced pH (5.5-6.5) and proper nutrient strength make plants less inviting to pests. Change reservoirs completely if algae appears—cover them to block light exposure.
Weekly checklist:
- Inspect roots for discoloration
- Verify pump operation
- Clean debris from net pots
Smart Hydroponic Systems and Automation
Technology transforms how you nurture plants with minimal effort. Smart hydroponic systems handle timing, measurements, and adjustments so you focus on harvesting. These setups use sensors and programmable features to maintain ideal conditions around the clock.
Automatic Watering and Lighting Solutions
Modern systems like AeroGarden and Gardyn eliminate guesswork. Built-in pumps deliver water when roots need moisture. LED lights activate at sunrise intensity, then dim automatically. You’ll see:
- Self-cleaning reservoirs that prevent algae
- Wi-Fi alerts for low nutrient levels
- Adjustable schedules for varied crops
Brands like Click & Grow take it further. Their plant pods contain pH-balanced soil substitutes. Sensors track root health, adjusting oxygen flow to prevent rot. One study showed these tools reduce daily care time by 70%.
| Feature | AeroGarden | Gardyn | Click & Grow |
|---|---|---|---|
| Water Automation | Yes | Yes | No |
| App Control | Basic | Advanced | Limited |
| Seed Variety | 30+ | 50+ | 15+ |
Upgrade existing setups with timers or smart plugs. Pair them with moisture meters to automate watering cycles. Always make sure new parts match your system’s capacity to avoid overloading pumps.
Compare models based on your space and goals. Compact units suit kitchens, while larger ones handle herbs and veggies together. With the right tech, your home becomes a self-sustaining garden hub.
Integrating Hydroponics into Your Home for Fresh Produce
Transforming your living space into a productive food source is simpler than you think. Whether you’re working with a studio apartment or a suburban kitchen, modern setups adapt to your environment. A compact vertical unit can grow 18 plants in 4 square feet—ideal for renters or families wanting fresh ingredients daily.
Design your layout around crop variety. Pair quick-growing herbs like cilantro with slower fruiting plants like peppers. This staggered approach ensures continuous harvests. One urban gardener in Portland grows 50% of their leafy greens using wall-mounted systems, cutting grocery trips by half.
| Plant | Space Needed | Harvest Time | Best Use |
|---|---|---|---|
| Herbs | 6-8″ vertical | 3-4 weeks | Daily cooking |
| Strawberries | 12″ deep | 8-10 weeks | Snacks & desserts |
| Peppers | 18″ width | 12-14 weeks | Meals & preserves |
| Flowers | 4-6″ height | 6-8 weeks | Garnishes & decor |
Schools and restaurants showcase hydroponics’ versatility. A Phoenix elementary school’s science project now supplies their cafeteria with basil and cherry tomatoes. A Brooklyn bistro grows 15 herb varieties in its basement, ensuring fresh flavors year-round.
View your setup as a practical food hub, not just a hobby. Start with a countertop unit for mint and lettuce. Expand to include strawberries or dwarf peppers as confidence grows. You’ll enjoy:
- Lower grocery bills: Grow $200 worth annually in a 2’x3’ area
- Custom flavors: Cultivate rare basil types or spicy peppers
- Nutrition control: Skip pesticides for cleaner meals
One family in Texas replaced 30% of their store-bought produce using a hydroponic garden. Their system fits neatly beside the fridge, proving even tight spaces can yield abundant, nutrient-packed crops.
Conclusion
Embracing hydroponics unlocks a world where fresh produce thrives within arm’s reach. By combining controlled environments with efficient resource use, you gain power over growth cycles and harvest quality. Whether nurturing herbs or strawberries, success hinges on balancing light, water, and nutrients tailored to your plants’ needs.
Careful planning turns compact spaces into productive hubs. Start small—optimize your system step-by-step and track progress. Regular pH checks and timely solution changes keep roots healthy, while automation tools simplify daily tasks.
Remember: thriving gardens demand attention. Stick to maintenance routines and adapt as crops mature. Over time, you’ll refine techniques to boost yields and flavor intensity. The process rewards patience—crisp greens or juicy chard await those who commit.
Ready to transform how you access food? Hydroponic gardening offers a sustainable way to reduce grocery trips and enjoy homegrown meals. Share your harvests or experiment with rare varieties—your journey starts with a single seed.


