
Imagine plucking juicy tomatoes or crisp herbs from your living space, even when snow blankets the ground outside. With a few smart choices, you can turn any sunny corner into a thriving source of fresh food. This approach lets you enjoy homegrown flavors without relying on seasonal weather or outdoor plots.
Growing edibles indoors isn’t just practical—it’s a rewarding way to brighten your space. You’ll have control over soil quality, light exposure, and pest management. No more wilted store-bought greens or bland winter meals!
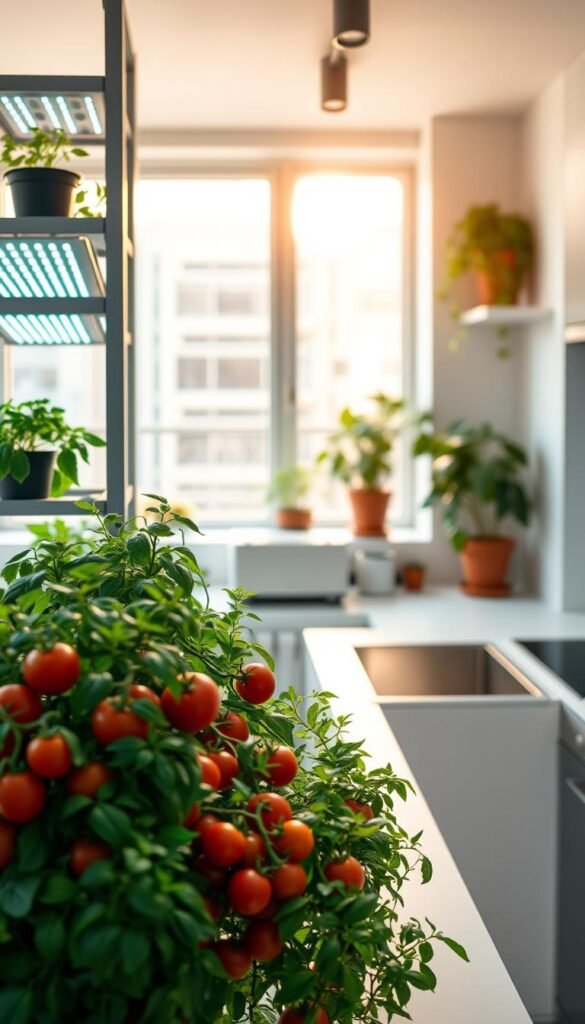
Start by assessing your available light. South-facing windows work best, but LED grow lights offer flexibility. Compact varieties like cherry tomatoes and dwarf peppers adapt well to containers. Pair them with basil or parsley for instant culinary upgrades.
This guide walks you through selecting the right containers, soil blends, and care routines. You’ll learn how to avoid common pitfalls and keep plants productive. Ready to transform that empty windowsill? Let’s dig in!
Setting Up Your Indoor Kitchen Garden
Creating a thriving plant environment starts with smart planning. You’ll want to balance practicality with aesthetics while meeting your greens’ basic needs. Let’s break down the essentials for success.
Find Your Light Sweet Spot
South or west-facing windows are goldmines for sun-loving varieties. But seasons change—winter might leave your plants craving more rays. If natural light dips below 6 hours daily, consider full-spectrum bulbs. Fruiting varieties like those you start from seed need bright conditions to flourish.
Watch out for temperature swings. Keep containers away from heating vents and drafty areas. Stable conditions prevent stress, letting roots focus on growth rather than survival.
Containers That Work Smarter
Drainage holes are non-negotiable—they’re your first defense against soggy soil. Pair pots with saucers to protect surfaces while catching excess water. Material matters too: plastic retains moisture longer, while terra cotta breathes better for humidity-sensitive plants.
Skip regular dirt from outside. A quality potting mix designed for containers ensures proper airflow and nutrient retention. Look for blends with perlite or vermiculite to keep roots happy in their confined space.
Understanding the Basics of Indoor Gardening

Growing fresh produce year-round becomes simple when you master a few key principles. Unlike traditional methods, this approach lets you bypass seasonal limitations and unpredictable weather patterns. You’ll enjoy flavorful results while tailoring conditions to your schedule.
Benefits of Bringing the Garden Inside
Fresh herbs and vegetables thrive regardless of outdoor conditions. Imagine snipping basil in January or harvesting cherry tomatoes during a summer storm. You control moisture levels, nutrients, and exposure times for healthier plants.
Cost savings add up quickly. A single packet of seeds yields months of organic greens—no supermarket markups. Plus, tending your green space reduces stress and connects you with nature daily.
| Plant Type | Day Temp (°F) | Night Temp (°F) | Daily Light Hours |
|---|---|---|---|
| Tomato varieties | 68-75 | 60-65 | 12-14 |
| Leafy greens | 65-70 | 55-60 | 8-10 |
| Herbs | 70-75 | 65-68 | 6-8 |
Adapting to Indoor Light and Temperature
Most edible plants need bright conditions. South-facing windows work well, but LED panels ensure consistent coverage. Rotate pots weekly for even growth.
Maintain 65-70°F daytime temperatures for active photosynthesis. Nighttime drops to 60°F help many varieties like peppers conserve energy. Use thermal curtains to stabilize conditions near windows.
For those with limited space, space-saving varieties maximize your growing potential. Pair smart layouts with proper airflow to prevent disease.
Planning Your Indoor Vegetable and Herb Selection

Choosing what to grow transforms your space into a productive food source. Focus on compact varieties that adapt well to containers and limited light. This ensures healthy growth without overwhelming your setup.
Deciding on Tomatoes, Peppers, and More
For juicy results, try dwarf tomato types like Little Sicily. These stay under 24 inches tall but deliver full-sized flavor. Pair them with peppers—Snackabelle Red offers sweet crunch, while Hot Burrito brings heat in small packages.
Leafy greens thrive with minimal effort. Butterhead lettuce grows fast, even in dim corners. Spinach and kale add nutrition to salads and stir-fries. Want roots? Radishes sprout quickly in deep pots, rewarding you with peppery bites.
Herbs like basil and parsley elevate meals instantly. Rosemary and mint handle drier soil, making them low-maintenance picks. Rotate crops every 6-8 weeks for nonstop harvests. Match choices to your cooking habits and sunlight availability.
Remember: smaller plants mean easier care. Prioritize varieties labeled “patio” or “container-friendly.” This strategy maximizes yield while keeping your garden tidy and efficient.
Mastering the Essential Tools and Equipment

Equipping your growing space with the right gear turns challenges into smooth routines. Start with these fundamentals to nurture plants from seeds to harvest-ready crops.
Seed-starting trays with drainage holes prevent waterlogged roots. Pair them with plastic covers to lock in humidity during germination. A table knife gently lifts seedlings without damaging delicate roots.
Light management makes or breaks growth. Use adjustable fixtures with warm and cool bulbs to mimic natural cycles. Keep lights 1-2 inches above sprouts, moving to 4-6 inches as plants mature. Timers ensure 14-16 daily hours of exposure.
- Label everything: Mark containers with variety names and planting dates
- Water smartly: A narrow-spout can targets soil without drenching leaves
- Trim efficiently: Micro-tip clippers handle precise thinning
Repurpose household items to save costs. Yogurt cups become starter containers, while chopsticks support climbing stems. For lighting, basic shop fixtures work until you upgrade to full-spectrum LEDs.
| Tool | Purpose | Budget Alternative |
|---|---|---|
| Seed trays | Organize sprouts | Egg cartons |
| Grow lights | Boost growth | LED desk lamps |
| Potting mix | Nutrient foundation | Compost + perlite blend |
Consistency matters most. Automate light schedules and track watering needs with phone reminders. Your plants will thrive when tools handle the grunt work.
Step-by-Step Guide to Planting Your Indoor Garden

The magic of homegrown flavors begins with proper planting techniques. Whether starting from tiny seeds or nurturing young sprouts, each step builds toward robust growth. Let’s explore how to set your green journey up for success.
Sowing Seeds and Transplanting Seedlings
Begin with clean plug trays filled with sterile potting mix. This prevents mold and gives seeds a healthy start. Planting depth matters—bury each seed three times its size. A good rule? “Cover them just enough to tuck them in snugly,” as seasoned growers say.
Keep soil temperatures between 75-85°F using heat mats or warm spots. Cover trays with plastic wrap to lock in moisture. Most seeds sprout within three days under these cozy conditions. Once green shoots appear, remove covers and lower temps to 70°F.
Position bright lights 1-2 inches above seedlings. Rotate trays daily for even growth. When leaves touch, thin to one plant per cell. This reduces competition for nutrients and light.
Watch for roots peeking through drainage holes—your cue to transplant. Gently lift seedlings using a spoon, keeping soil intact. Move them to 4-inch pots with fresh mix. Maintain 65°F days and 55°F nights for sturdy development.
Struggling with leggy stems or yellow leaves? Adjust light height and check watering habits. For more tips on growing vegetables indoors, explore our detailed guides. Remember: patience and consistency turn tiny seeds into thriving crops!
Using Proper Potting Mix and Soil Solutions

Your green companions rely on their foundation—literally. What’s beneath those leaves determines whether they’ll struggle or thrive. Let’s explore how to craft the perfect home for your potted pals.
High-Quality Potting Mix Recommendations
Not all dirt is created equal. Container gardening demands lightweight blends that balance moisture and airflow. Miracle-Gro Performance Organics All-Purpose Container Mix shines here, offering quick drainage while retaining nutrients. Another winner? Espoma Organic Potting Mix, enriched with myco-tone for stronger roots.
Regular garden soil becomes concrete in pots. “It’s like wearing ski boots to run a marathon,” one urban gardener quips. Premium potting mixes contain perlite or coconut coir to prevent compaction. For heavy feeders like peppers, try FoxFarm Ocean Forest—its earthworm castings provide slow-release fuel.
DIY Organic Soil Alternatives
Mix your own powerhouse blend with:
- 5 gallons compost (nutrient base)
- 5 gallons peat moss (moisture control)
- 4 gallons perlite/vermiculite (aeration)
Add ½ cup each of lime (balances pH), bonemeal (phosphorus), and greensand (minerals). This recipe creates a fluffy, fertile home for plants. Always use sterile components to avoid damping off—a fungal nightmare that kills seedlings.
For more container-specific blends, check our guide to the best soil mixes for container vegetables. Remember: healthy roots start with smart soil choices!
Efficient Watering and Fertilization Strategies
Keeping your greens happy comes down to smart hydration and nutrition. Nail these elements, and you’ll see vibrant growth without guesswork. Let’s explore how to balance both for plants that thrive.
Watering Best Practices
Check soil moisture by sticking your finger an inch deep. If it’s dry, it’s time to hydrate. Overdoing it? That’s worse than forgetting—soggy roots can’t breathe. Aim for one inch of water weekly, poured slowly at the base.
Skip the sprinkler effect. Direct watering to the soil line using a narrow-spout can. This prevents leaf diseases and ensures every drop counts. Remember: containers dry faster than garden beds!
Choosing the Right Fertilizer
Feed hungry plants with balanced liquid formulas every 4 weeks. Half-strength doses prevent nutrient burn while supporting steady growth. Look for mixes labeled 10-10-10 for versatility.
Organic options like fish emulsion boost soil health over time. Pair with compost tea monthly for a microbial kick. Your greens will reward you with bold flavors and lush leaves!


