
Imagine stepping into your kitchen and plucking fresh, vibrant leaves for tonight’s meal. No more wilted store-bought greens or last-minute grocery runs. With a little creativity, you can turn any corner of your home into a lush, productive space that thrives 365 days a year.
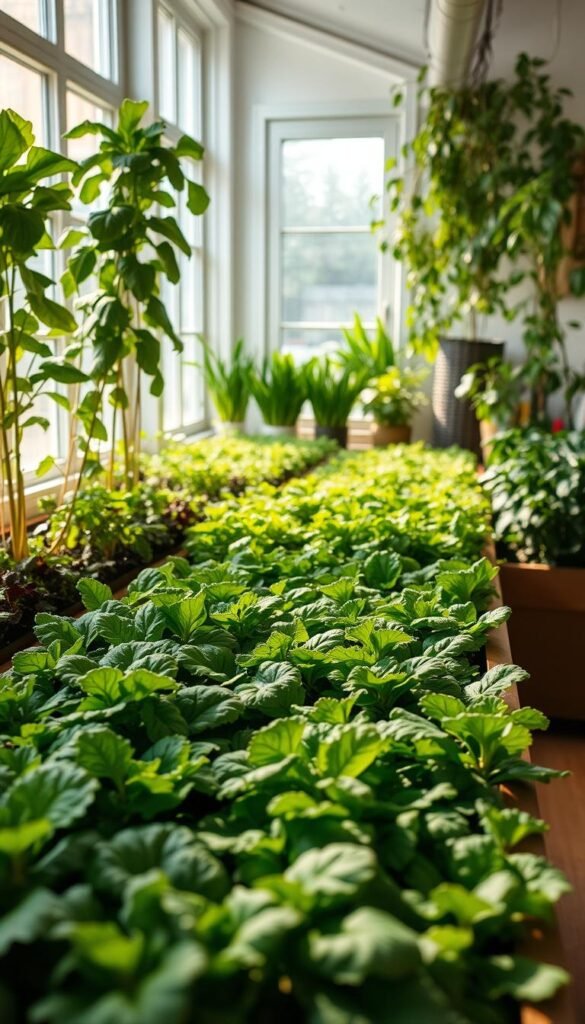
Cold climates or limited outdoor areas don’t have to limit your access to nutritious ingredients. Compact setups using containers, vertical planters, or even repurposed jars let you cultivate crisp lettuce, peppery arugula, and tender herbs. These systems fit seamlessly into apartments, kitchens, or sunny windowsills.
Beyond convenience, homegrown produce offers unmatched flavor and nutrients. Store-bought options often lose freshness during transport, but your harvest goes from soil to plate in minutes. You’ll also reduce plastic waste and save money over time—no more tossing spoiled greens from the back of your fridge.
This guide walks you through every step, from selecting the right seeds to optimizing light exposure. Whether you’re a seasoned gardener or a first-time plant parent, you’ll find practical solutions tailored to your space and lifestyle. Let’s transform how you think about fresh food—starting today.
Indoor Vegetable Garden: Grow Your Own Salad Greens and More – Your How-To Guide

Discover how even novice plant enthusiasts can cultivate restaurant-quality ingredients at home. Unlike outdoor gardening, growing lively greens inside demands precise light management and moisture control. Traditional soil techniques often fail here—container depth and airflow become critical factors.
Start by rethinking your approach to plant care. Leafy greens thrive with shallow roots, needing just 2-3 inches of soil. Use trays with drainage holes to prevent soggy roots—a common rookie mistake. Position them near east-facing windows or under full-spectrum LED lights for 12-14 hours daily.
Within seven days, you’ll see sprouts transforming into edible salad starters. Daily misting replaces heavy watering, while strategic rotation ensures even growth. This method works equally well for peppery mustard leaves and delicate butterhead varieties.
Seasoned gardening fans often marvel at how these compact systems outperform their backyard plots. You’ll harvest three times faster than traditional methods, with zero pesticides. Ready to trade grocery-store bags for scissors and a harvesting bowl?
Understanding the Benefits of Soil Sprouts

What if your salads could pack twice the nutrients without a trip to the farmers’ market? Soil-grown sprouts offer precisely that—transforming bland meals into vibrant dishes while cutting grocery bills. Their secret lies in how roots interact with nutrient-rich soil, creating a flavor and texture leap compared to jar methods.
Nutritional and Flavor Advantages
Unlike jar sprouts limited by water alone, soil sprouts absorb minerals from compost and sea kelp throughout their growth. This constant feeding produces greens with deeper flavors—think earthy kale meets peppery radish. Families often prefer them because they mimic store-bought lettuce’s crunch without the bitter aftertaste.
Studies show higher acceptance rates among kids when meals include these tender leaves. Their familiar appearance helps too—no slimy stems or loose hulls floating in bowls. You’re not just growing food; you’re crafting crowd-pleasers.
Comparing Soil-Grown and Jar-Grown Methods
Traditional sprouting jars work for beginners but struggle with consistency. Hulls stick to leaves, and moisture control becomes a guessing game. Soil eliminates these headaches by providing natural drainage and airflow. Harvests stay fresh longer, reducing waste.
For those pursuing year-round harvests, soil systems adapt effortlessly to countertops or shelves. They require less daily attention while delivering restaurant-quality results. Once you taste the difference, those glass jars might just collect dust.
Choosing the Right Seeds, Soil, and Containers

Your indoor harvest’s success starts with three essentials: premium seeds, balanced soil, and smart containers. These elements work together to create a thriving ecosystem, even in compact spaces. Let’s break down what truly matters when building your setup.
Selecting Organic, Non-GMO Seeds
Always prioritize organic and non-GMO seed varieties. Heirloom options often outperform hybrids indoors because they’re bred for flavor, not shelf life. Look for labels like “baby greens” or “container-ready”—these strains handle tight spacing better.
Local nurseries are goldmines for climate-adapted plants. Their staff can recommend varieties that flourish in your home’s conditions. Bonus: Building these relationships gives you ongoing support for future crops.
Container and Soil Recommendations
Shallow trays (2-3″ deep) with drainage holes prevent root rot—a common issue in small-space setups. Pair them with lightweight potting mixes containing perlite or coconut coir. This combo keeps roots oxygenated while retaining moisture.
Skip garden soil—it’s too dense for containers. Instead, choose blends labeled for microgreens or sprouts. They’re pre-balanced with nutrients your salad garden craves from day one.
Preparing Your Indoor Space for Successful Gardening

Transform your living area into a thriving oasis where practicality meets beauty. A well-designed setup keeps plants healthy while blending seamlessly with your décor. Let’s explore how to balance function and style effortlessly.
Optimizing Lighting, Temperature, and Airflow
Natural light works best for most leafy varieties. Position trays near south-facing windows where they’ll get 4-6 hours of indirect sun daily. If your place lacks brightness, affordable LED strips can fill the gap without hiking energy bills.
Keep temperatures steady between 65-75°F—ideal for tender greens. Avoid placing containers near drafty windows or heat vents during colder seasons. A simple thermometer helps monitor conditions.
Good airflow prevents mold and strengthens stems. Open windows briefly each day or use a small fan on low settings. Rotate trays weekly so plants grow evenly toward the light.
Designing a Dedicated Greenspace
Create visual harmony by arranging trays among houseplants. Mix textures like feathery dill with broad spinach leaves for contrast. This approach turns your salad garden into living art that freshens the air.
In winter, these lush corners become hopeful reminders of warmer days ahead. “The sight of vibrant greens lifts moods when skies turn gray,” notes an urban gardener from Chicago.
Choose narrow shelves or wall-mounted planters to save space. Leave room for easy harvesting—you’ll appreciate quick access when adding fresh picks to meals. With smart planning, your gardening zone stays tidy and productive year-round.
Mastering the Technique of Presoaking and Planting

Unlock faster growth and healthier sprouts through two game-changing methods. While traditional approaches treat small seeds differently, indoor success comes from equal treatment. Every tiny starter gets the same head start—no exceptions.
Pre-Soak Methods for a Jumpstart
Soak all seeds in room-temperature water for 4-12 hours. Smaller varieties like broccoli need less time, while sunflower might require overnight soaking. This hydration trick wakes up dormant enzymes, speeding up germination by 1-2 days.
Drain thoroughly after soaking. Spread them on paper towels to remove excess moisture. This step prevents rot while keeping energy focused on root development. You’ll see tiny white roots emerging within 24 hours—your green light for planting.
Planting Seeds on Top of the Soil
Skip the burial ritual. Scatter prepped seeds directly onto moist soil surfaces instead. Lightly press them down—no covering needed. Surface contact allows immediate light absorption while preventing hulls from trapping dirt.
This method lets stems stretch freely without pushing through barriers. Your plants conserve energy for leaf growth rather than stem elongation. Bonus: Harvesting becomes cleaner since sprouts aren’t coated in soil particles.
“Surface-sown crops show 30% faster maturation in controlled studies,” notes a hydroponics researcher. Pair this technique with daily misting, and you’ll bypass mold issues common in buried seeds. Watch your countertop transform into a crisp, vibrant producer within days.
Establishing a Daily Care Routine
Consistency becomes your secret weapon for thriving plants. During the first four days, your setup does all the work. Covered trays stay in darkness, preserving moisture from initial watering. No peeking, no tinkering—nature handles everything.
Effortless Watering Strategies
Day five flips the script. Remove covers and introduce light—your cue to water once daily. Use a spray bottle for gentle hydration. “This method cuts time spent by 75% compared to jar rinsing,” shares an urban farming coach.
Check soil dampness before spraying. If the surface feels dry, give a quick mist. Overwatering? Nearly impossible here. Miss a day? The soil’s moisture buffer buys you 24-48 hours. Your salad garden stays resilient through busy weekends or forgotten mornings.
Maintaining Optimal Growth Conditions
Keep trays near indirect sunlight 6-8 hours daily. Rotate them 180 degrees each day for even growth. Steady temperatures between 65-75°F prevent stress. A small fan nearby strengthens stems without drying leaves.
Notice drooping? Revive plants with a thorough soak in water for 10 minutes. They’ll bounce back within hours. This gardening approach fits seamlessly between work calls or school runs—no green thumb required.
Maximizing Harvest Yields in Small Indoor Spaces
Your windowsill could become a powerhouse of fresh flavors—with yields rivaling outdoor plots. A single square foot of trays delivers over one pound of tender leaves weekly. Compare that to the size of traditional setups, and you’ll see why this method shines in apartments and small homes.
Visual Cues for When to Harvest
Watch for stems reaching 2-3 inches tall—they’ll stand upright like tiny soldiers. First true leaves signal peak nutrition. “That’s when flavors intensify and textures crisp up,” notes a square foot garden plan expert. Delay cutting, and stems turn woody.
Harvest in the morning when leaves hold maximum moisture. Use sharp scissors to snip just above soil level. This preserves roots for potential regrowth. Store unwashed sprouts in their trays for 2-3 days—they’ll stay crisp until meal prep.
One tablespoon of sunflower seeds grows lush in 1/8th of a square foot indoors. Outdoor gardens need 50 foot rows for the same yield. Your countertop setup skips weeds and pests while delivering restaurant-worthy salad bases daily.
Comparing Soil Sprouts with Traditional Jar Sprouts
Ever wonder why chefs prefer soil-grown sprouts for their dishes? The answer lies in simplicity and superior results. While jar methods have their place, soil systems offer distinct advantages that transform your kitchen into a low-maintenance farm.
Why Soil Outperforms Glass
Jar sprouts demand constant rinsing to prevent mold—often leaving bitter hulls clinging to leaves. Soil-grown varieties shed these casings naturally as they mature. You’ll spend seconds rinsing instead of minutes picking debris from your salad ingredients.
Storage becomes effortless too. Keep trays on your counter with daily misting—no fridge space required. Jar sprouts spoil fast without refrigeration, forcing you to use them immediately. Soil’s natural moisture control extends freshness by 3-4 days.
| Factor | Soil Sprouts | Jar Sprouts |
|---|---|---|
| Hull Removal | Automatic shedding | Manual rinsing |
| Storage | Countertop-friendly | Requires refrigeration |
| Watering Flexibility | 24-48 hour buffer | Daily rinsing mandatory |
| Revival Options | Plastic bag + fridge trick | Limited recovery methods |
Busting Myths About Sprouting
Many believe jar methods are easier for beginners. Truth? Soil requires less daily work once seeds are planted. Forget strict rinsing schedules—your sprouts thrive with minimal intervention.
Another myth claims jar systems yield faster results. Studies show soil-grown greens reach harvest size 1-2 days quicker due to consistent nutrient access. Their robust stems also handle rough handling better during meal prep.
“Soil isn’t just a medium—it’s a growth accelerator,” notes an urban farming researcher. When you prioritize flavor and convenience, trays beat jars every time. Your salad gains texture and nutrients without the fuss.
Creative Ways to Showcase Your Indoor Salad Garden
Brighten your living space with edible artistry that serves both form and function. Certain seed varieties produce striking pink or purple stems, turning trays into living centerpieces. These colorful accents elevate rooms while keeping fresh ingredients within arm’s reach.
Integrating Greens into Home Décor
Place shallow trays on floating shelves or sunny windowsills where their vibrant hues catch the eye. Pair them with trailing ivy or succulents for contrast—feathery basil next to spiky aloe creates visual intrigue. Use decorative pots or upcycled ceramics to blend your plants seamlessly with existing décor.
During winter, these lush displays combat gray skies with bursts of life. Rotate trays weekly to maintain even growth and showcase different angles. “The ruby stems of bull’s blood beet varieties became our holiday table’s star,” shares a Minnesota-based decorator.
This approach transforms your garden into a dynamic design element. You’ll enjoy fresh flavors while creating conversation-starting focal points. Every snip for your plate becomes an opportunity to refresh the arrangement—beauty and nutrition thriving together.


