
Cold weather doesn’t mean your green thumb has to hibernate. With the right tools, you can nurture vibrant greens and flavorful herbs right at home. Imagine plucking crisp lettuce or aromatic basil in January—no backyard required.
Many plants thrive when grown indoors during winter. Leafy greens like kale and spinach adapt well to containers, while herbs such as thyme and oregano flourish under controlled conditions. The secret? Mimicking natural sunlight with full-spectrum grow lights and using nutrient-rich soil mixes.
Why choose this approach? You’ll dodge unpredictable frosts and pests. Plus, adjustable shelving lets you maximize space—perfect for apartments or small kitchens. Real growers swear by LED panels for energy efficiency and fabric pots for root health.
Starting is simpler than you think. Begin with low-maintenance varieties like microgreens or cherry tomatoes. Track progress with a journal, and soon you’ll enjoy salads grown steps from your table. Ready to turn that sunny corner into a mini-farm?
Getting Started with Indoor Vegetable Gardening

Don’t let frosty windows stop you—your next harvest is just a windowsill away. Shifting your growing efforts inside requires a fresh perspective, especially when sunlight feels scarce and temperatures drop. But with small adjustments, you’ll unlock a rewarding year-round hobby.
Understanding the Winter Gardening Mindset
Growing plants indoors during winter means embracing flexibility. Days are shorter, but your greens don’t need to suffer. Start by choosing compact varieties that adapt to containers. For example, baby spinach grows well in shallow pots, while dwarf tomatoes thrive in 12-inch-deep planters.
Focus on progress, not perfection. Track daily light exposure near south-facing windows, and rotate pots weekly for even growth. A simple journal helps spot patterns—like which herbs need more humidity or when to adjust your LED timer.
Why Grow Veggies Indoors?
Beyond beating the cold, this method slashes pest issues and extends your harvest window. You control every detail: soil quality, watering schedules, and even airflow with small fans. No more battling aphids or surprise frosts!
Make sure your setup includes containers at least 6 inches deep for root development. Pair them with well-draining soil to prevent waterlogged plants. Compact shelving units let you stack trays vertically—ideal for herbs like basil or parsley.
Ready to begin? Clear a sunny corner, test your grow lights, and start with forgiving greens like arugula. Within weeks, you’ll taste the difference homegrown makes.
The Benefits of Growing Vegetables Indoors in Winter

Winter’s chill doesn’t have to empty your plate of homegrown goodness. With a few smart adjustments, you can enjoy crisp greens and savory herbs straight from your living space—no matter the weather outside.
Year-Round Fresh Produce
Imagine snipping fresh basil for pasta in February or tossing garden-fresh lettuce into salads during a blizzard. Growing indoors lets you bypass seasonal limits. Plants like spinach and kale thrive under LED lights, while herbs such as cilantro keep producing leaves all winter.
Here’s how it works:
| Crop | Outdoor Season | Indoor Harvest Window |
|---|---|---|
| Spinach | Spring/Fall | Year-round |
| Basil | Summer | Every 3-4 weeks |
| Cherry Tomatoes | Late Summer | 8-10 weeks after planting |
Enhanced Control Over Growing Conditions
No more guessing games with Mother Nature. Adjust light schedules to speed up growth or tweak watering routines to prevent root rot. A study by Urban Garden Magazine found that controlled environments boost yields by 30% compared to traditional methods.
Use timers for grow lights to mimic sunrise cycles. Test soil moisture weekly with a simple probe. These steps ensure your plants get exactly what they need—when they need it.
Ready to taste the difference? Start with low-effort crops like radish sprouts. Within weeks, you’ll have a ready harvest that’s fresher than anything from the store.
Essential Equipment for Successful Indoor Gardening

Equip your space wisely, and watch your plants flourish all season long. The right tools bridge the gap between sparse winter light and vibrant, healthy crops. Let’s break down what you’ll need to create a thriving setup.
Choosing the Right Grow Lights
Not all lights are created equal. For lettuce indoors and leafy greens, full-spectrum LEDs like SunBlaster mimic natural sunlight. These energy-efficient options provide the blue and red wavelengths plants crave. Position them 6-12 inches above your crops to prevent leggy stems.
During darker months, aim for 12-16 hours of daily light. Use timers to automate cycles—your greens grow best with consistency. A 20W LED panel covers a 2×2-foot area, perfect for herbs or a tray of microgreens.
Selecting Containers and Quality Soil
Drainage is non-negotiable. Opt for pots with holes and saucers to avoid soggy roots. Fabric grow bags work wonders for air pruning, while plastic containers suit small-space setups. Depth matters: 6 inches for lettuces, 10+ inches for deeper-rooted veggies.
Pair containers with loose, nutrient-packed soil. Mixes labeled for seed starting or container use grow well because they retain moisture without compaction. Add perlite for extra drainage—your greens grow faster when roots breathe easily.
| Container Type | Best For | Tips |
|---|---|---|
| Fabric Bags | Root vegetables, herbs | Prevents overwatering |
| Plastic Pots | Lettuces, microgreens | Lightweight and affordable |
| Ceramic Planters | Decorative herbs | Use saucers to protect surfaces |
Step-by-Step Guide to Setting Up Your Indoor Garden

Transform any corner into a thriving oasis with these setup essentials. Whether you’re growing herbs or root veggies, proper preparation ensures your plants get the best start. Let’s break it down into simple, actionable steps.
Preparing Your Space and Materials
Clear a flat surface near a power source—a table or shelf works perfectly. Wipe down the area to remove dust, then gather your pots, trays, and tools. For crops like carrots, choose containers at least 12 inches deep to accommodate their roots.
Soil quality is non-negotiable. Mix equal parts potting soil, compost, and perlite for drainage. This blend retains moisture during dry winter months while preventing waterlogging. Test the pH with a kit—most greens prefer 6.0-7.0.
Arranging Your Grow Lights and Shelving Systems
Position adjustable shelves first, leaving 18-24 inches between tiers. Hang LED panels 6 inches above where plant tops will grow. Use chains or hooks to easily raise lights as seedlings mature.
Rotate pots weekly so all sides receive equal exposure. In winter, add a small fan to circulate air and mimic outdoor breezes. This prevents mold and strengthens stems.
Ready to plant? Start with carrots—they’re forgiving and thrive in deep containers. Keep soil consistently moist but never soggy. Within weeks, you’ll see sprouts reaching for your carefully arranged lights!
Maximizing Natural and Artificial Sunlight

Light is the secret sauce for thriving plants—even when snow piles up outside. Whether starting seeds or nurturing leafy greens, proper exposure fuels growth from sprout to harvest. Let’s explore how to blend sunlight and bulbs for year-round success.
Tips for Utilizing Window Light
South-facing windows steal the show in winter, offering 4-6 hours of daily brightness. Place shallow trays of lettuce or spinach here, but rotate pots every few days. This prevents lopsided growth as stems stretch toward the light.
Boost weak rays with reflective surfaces. Foil-covered boards or white walls bounce sunlight onto shaded leaves. For herbs like thyme, a sunny kitchen ledge works wonders—just keep them away from chilly drafts.
Optimizing Artificial Lighting for Vegetable Growth
When days are shortest, LEDs and fluorescents fill the gap. Position lights 6-12 inches above seedlings for 14-16 hours daily. Use timers to mimic natural dawn-to-dusk cycles—your plants grow stronger with consistent routines.
Red-spectrum bulbs encourage flowering in crops like cherry tomatoes. Blue wavelengths suit leafy greens. For a mixed setup, full-spectrum panels cover all bases. Pair these with adjustable stands to raise lights as your vegetables shoot up.
Remember: seeds need darkness too! Cover starter trays with lids at night to simulate soil conditions. Once sprouts appear, remove covers and keep lights steady. Ready to level up? Our guide to growing herbs indoors dives deeper into light recipes for specific plants.
Growing Fresh Salad Greens Indoors

Who says winter salads have to come from the store? Leafy greens adapt beautifully to container life, offering quick harvests and endless variety. Their shallow roots make them ideal for small spaces, and most mature in just 3-5 weeks.
Selecting Easy-to-Grow Varieties
Start with these forgiving options:
| Green | Days to Harvest | Light Needs |
|---|---|---|
| Baby Spinach | 25-30 | 4-6 hours daily |
| Arugula | 20-25 | Partial shade friendly |
| Mustard Greens | 30-35 | Bright indirect light |
Mix seeds in one tray for instant salad blends. Keep soil moist but not soggy—spritz with water every 2 days.
Practical Indoor Harvesting Techniques
Use the cut-and-come-again method: snip outer leaves 1 inch above the soil. Plants regrow 2-3 times before needing replacement. For peak flavor, harvest in the morning when leaves are crispest.
Rotate trays weekly if using window light. South-facing spots work best, but LED strips can supplement darker areas. A study by Homegrown Labs found greens grown under 14-hour light cycles yielded 40% more than those with irregular exposure.
Ready to taste your success? Toss homegrown arugula with lemon dressing or layer spinach into warm sandwiches. Every bite proves winter can’t dull your green ambitions!
Building Your Indoor Microgreens and Herb Station

Elevate your kitchen’s potential with a dedicated space for microgreens and herbs—no backyard needed. These tiny powerhouses pack up to 40x more nutrients than mature plants, according to USDA research, and thrive in compact setups. Perfect for adding fresh flavor to soups, salads, and stir-fries year-round.
Simple Steps to Start Microgreens
Growing these nutrient-dense greens takes minimal gear. Here’s what works best:
- Shallow trays (2-3 inches deep) with drainage holes
- Organic seed-starting soil
- Full-spectrum LED grow lights or sunny windowsill
Sow seeds densely across moist soil—no need to bury them. Cover trays with plastic wrap for 3 days to boost germination. Once sprouts appear, remove covers and provide 12-14 hours of daily light. Harvest when leaves reach 2-3 inches tall, usually within 7-14 days.
Rotate trays every morning for even growth. Use a spray bottle to mist soil instead of pouring water—this prevents mold. Herbs like basil and cilantro need deeper containers (6+ inches) but follow similar care rules.
Pro tip: Start new batches every 5 days for continuous harvests. Label trays with planting dates to track growth stages. Within weeks, you’ll have vibrant greens ready to jazz up omelets or garnish cozy winter meals!
Indoor Vegetable Gardening: Fresh Produce Even in Snowy Climates

Transform your home into a year-round oasis of flavor where frosty landscapes become mere window dressing. Through strategic planning and simple techniques, you can maintain a steady supply of vibrant greens and aromatic herbs—no matter how deep the snow piles up outside.
Key strategies make this possible:
- Precision watering: Check soil moisture daily using your fingertip. Water only when the top inch feels dry to prevent root rot
- Light optimization: Rotate plants weekly under grow lights or windows to ensure even exposure
- Container smarts: Match pot depth to root systems—shallow for lettuces, deep for dwarf varieties
Controlled environments let you sidestep nature’s curveballs. A study by Cornell Cooperative Extension found indoor-grown crops experience 75% fewer pest issues compared to outdoor plots. You decide the humidity, temperature, and nutrients—factors that make or break winter growth.
See how small changes yield big results:
| Challenge | Outdoor Solution | Indoor Fix |
|---|---|---|
| Limited light | Wait for spring | LED panels on timers |
| Soil freezing | Row covers | Heated seedling mats |
| Short seasons | Single harvest | Succession planting |
Struggling with leggy stems or slow growth? Adjust your light height or try a different soil mix. Every setback teaches something new. Remember—those windowsill basil leaves taste sweeter when you’ve nurtured them through January’s gloom.
Keep experimenting. Start a new tray of microgreens every Friday. Track progress in a notebook. Before long, you’ll master the rhythm of indoor cultivation—where every season is growing season.
Cultivating Root Vegetables and Carrots in Containers

Who needs a backyard when your carrots can thrive in cozy containers? Growing root crops inside presents unique rewards—and a few puzzles to solve. Unlike leafy greens, these underground treasures demand extra attention to depth and timing for optimal results.
Choosing Deep Containers and Proper Soil Mixtures
Root vegetables need room to stretch downward. Standard pots often fall short. Aim for containers at least 12 inches deep—window boxes work for radishes, but carrots require deeper homes. Fabric grow bags or repurposed storage bins make excellent choices.
Soil matters just as much as space. Mix equal parts potting soil, coarse sand, and compost. This blend prevents compaction while letting roots push through easily. Test drainage by watering—if puddles form, add more perlite.
| Vegetable | Minimum Depth | Key Tip |
|---|---|---|
| Carrots | 12 inches | Use shorter varieties like ‘Paris Market’ |
| Radishes | 6 inches | Harvest in 3-4 weeks |
| Beets | 10 inches | Thin seedlings early |
Timing is everything. Sow seeds every 4 weeks for a steady supply year-round. Keep soil consistently moist during germination—this phase can’t be rushed. Once sprouts appear, provide 14 hours of daily light. Rotate pots weekly for even growth.
Watch for cues. Carrot tops peeking above soil? They’re ready in 60-75 days. Gently loosen the soil before pulling to avoid snapped roots. With practice, you’ll master the rhythm of container-grown roots—no yard required!
Nurturing a Variety of Indoor Herbs
Your kitchen windowsill can become a year-round herb haven with the right care. These fragrant plants add zest to meals while purifying your air—no backyard required. Let’s explore how to keep them thriving through every season.
Caring for Basil, Parsley, and Other Favorites
Basil loves warmth and light. Use containers at least 8 inches deep for its sprawling roots. Place pots under LED lights for 14 hours daily, and pinch off flowers to prolong leaf production. Harvest upper leaves first to encourage bushier growth.
Parsley prefers cooler spots near east-facing windows. Keep soil consistently moist but never waterlogged. This biennial herb grows slower than basil—expect mature leaves in 70-90 days. Curly varieties handle lower light better than flat-leaf types.
| Herb | Container Depth | Daily Light | Harvest Time |
|---|---|---|---|
| Basil | 8-10 inches | 14 hours | 6-8 weeks |
| Parsley | 6-8 inches | 6 hours | 10-12 weeks |
| Thyme | 6 inches | 8 hours | Ongoing |
Ambient temperature matters. Most herbs thrive between 65-75°F. Avoid placing mint near heat vents—it’ll wilt faster than you can say “mojito.” Use a humidity tray for Mediterranean varieties like oregano.
Water when the top inch of soil feels dry. Herbs like rosemary prefer drier conditions, while cilantro needs frequent sips. Rotate pots weekly for balanced growth, and watch for yellow leaves—they signal overwatering.
Snip what you need, and savor the instant upgrade to soups, pastas, and teas. There’s nothing like fresh thyme in scrambled eggs or basil muddled into lemonade. Your taste buds—and windowsill—will thank you!
Overcoming Common Challenges in Cold-Weather Gardening
Struggling with crispy leaves or unwelcome bugs? Winter’s dry air and cozy indoor spaces create unique hurdles for plant parents. But with smart adjustments, you’ll keep your crops thriving through the toughest months.
Managing Humidity and Preventing Pests
Low humidity often strikes within 2-3 weeks of turning on heaters. Leaves curl or brown at the edges—a cry for moisture. Place trays of water near plants or group pots together to create a microclimate. For lettuce, which loves 40-60% humidity, a small humidifier works wonders.
Pests like spider mites appear suddenly, especially after 6-8 weeks of growth. Check undersides of leaves weekly. Spot tiny webs? Wipe plants with diluted neem oil or insecticidal soap. Prevent infestations by quarantining new plants for 14 days.
| Challenge | Solution | Timeline |
|---|---|---|
| Dry air | Pebble trays | First month |
| Fungus gnats | Sticky traps | Weeks 4-6 |
| Mold | Air circulation | Ongoing |
Consistency beats crises. Water lettuce every 3-5 days, letting soil dry slightly between sessions. Rotate plants under lights to avoid weak, leggy stems. If aphids invade, blast them off with water—no chemicals needed.
Remember: most issues fix quickly when caught early. Keep a spray bottle handy for misting, and celebrate small wins. Your patience now means fresh greens for months to come!
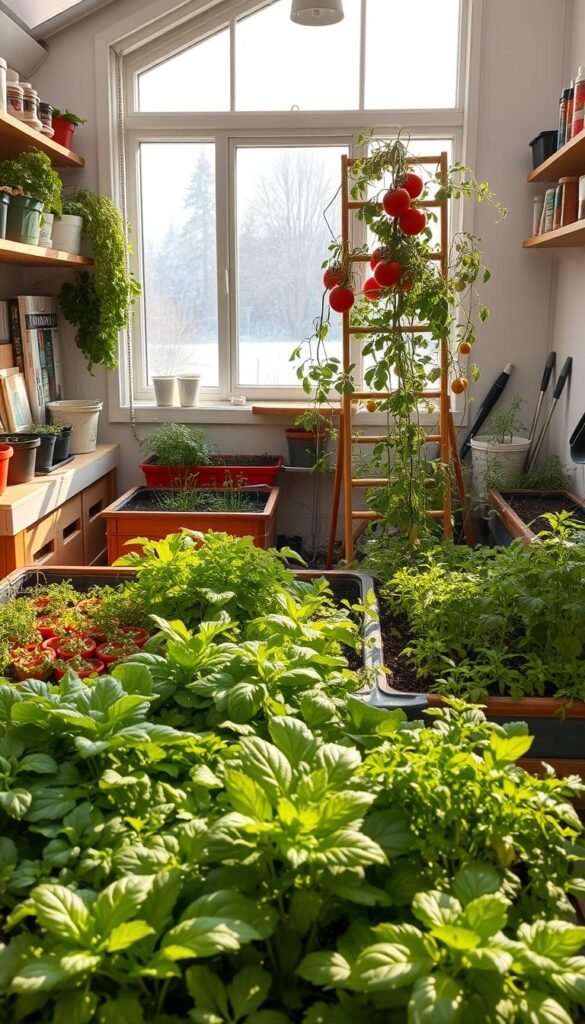
Creative Space-Saving Ideas for Your Indoor Garden
Tight on room? Your home holds hidden growing zones waiting to be unlocked. Vertical surfaces and overlooked ledges can become lush, productive spaces with smart design. Let’s explore how to turn every inch into a thriving green corner.
Utilizing Window Sills and Vertical Planters
Window ledges are prime real estate. Install narrow trays to grow herbs like chives or mint—they need just 4 inches of depth. For taller plants, use tiered shelves that fit snugly against glass panes. Rotate pots every 7-10 days to prevent uneven growth.
Vertical systems multiply your square footage. Try these ideas:
- Repurpose hanging shoe organizers for lightweight greens like arugula
- Mount wall pockets with drainage holes for strawberries or thyme
- Stack modular planters to create a living “green wall” of lettuces
DIY setups work, but commercial options save time. Look for stackable hydroponic towers or magnetic planters that attach to metal surfaces. These let you adjust seed spacing as plants mature.
| Planter Type | Best For | Space Saved |
|---|---|---|
| Pocket Wall | Herbs, microgreens | Up to 80% |
| Tiered Shelf | Leafy greens | 65% |
| Hanging Baskets | Trailing plants | 90% |
Arrange taller plants at the back of shelves to avoid shading smaller ones. Mix textures—pair frilly parsley with bold kale leaves for visual interest. Track light patterns for 3-5 days to find ideal spots before committing.
Experiment with layouts. Shift containers weekly until you find what maximizes both beauty and yields. Your perfect setup might surprise you!
Extending Your Growing Season with Indoor Techniques
Extend your harvest beyond winter’s grip with clever indoor adaptations. Cold frames and row covers aren’t just for outdoor plots—they’re game-changers inside too. These tools create cozy microclimates that shield tender crops from temperature swings, letting you push growth limits even as frost lingers.
Using Cold Frames and Row Covers Indoors
Mini greenhouses work wonders for heat-loving plants. Place a portable cold frame over cucumbers or salad greens near sunny windows. The enclosed space traps warmth and humidity, mimicking spring conditions. Add a row cover inside for extra insulation during coldest nights.
Here’s how to maximize results:
| Crop | Outdoor Season | Indoor Extension |
|---|---|---|
| Cucumbers | 12-14 weeks | +6 weeks |
| Salad Mix | 8-10 weeks | Year-round |
| Mushrooms | Varies | Continuous cycles |
Start by positioning frames where plants get 6+ hours of light daily. Use adjustable lids to vent excess heat—aim for 65-75°F. For mushrooms, layer damp straw under covers to maintain moisture without mold risks.
Rotate crops every 4-6 weeks. One grower harvested three successive cucumber batches by staggering plantings under frames. Pair this method with space-saving varieties for best yields in limited areas.
Adapt as seasons shift. Reduce cover layers in late winter when sunlight intensifies. With practice, you’ll enjoy plump tomatoes in March and peppery arugula through April—all from your living room!
Integrating High-Tech Tools for Optimal Growth
Your home can become a tech-powered greenhouse with just a few smart upgrades. Modern systems take the guesswork out of plant care, letting you focus on enjoying the harvest rather than fretting over schedules.
Smart Grow Lights: Precision Meets Efficiency
Today’s lights adapt to your plants’ needs. Brands like Philips and Spider Farmer offer models that auto-adjust brightness and color spectrum. Set them to mimic dawn-to-dusk cycles or boost red wavelengths for flowering crops like cherry tomatoes.
These systems cut energy use by up to 40% compared to older bulbs. Pair them with motion sensors to dim lights when no one’s in the room—perfect for busy families juggling multiple priorities.
Automated Watering Systems: Consistency Without Effort
Never overwater again. Drip systems from RainPoint or Gardena deliver precise moisture levels based on soil sensors. A 2023 study showed these setups reduce water waste by 55% while keeping roots perfectly hydrated.
| System | Best For | Key Feature |
|---|---|---|
| Blumat Classic | Herbs, greens | No electricity needed |
| AeroGarden Harvest | Compact spaces | Built-in nutrient reminders |
| Click & Grow Smart Garden | Beginners | App-controlled scheduling |
Imagine leaving for vacation without worrying about wilted basil. These tools free up time for family meals or weekend adventures. Plus, they fit neatly into small spaces—no cluttered hoses or bulky tanks.
Start with one device and expand as your confidence grows. Tech-savvy setups turn cramped apartments into lush, productive zones where every square foot works smarter, not harder.
Planning Seasonal Rotations and Crop Calendars
Turn your home into a year-round pantry with smart scheduling. Timing plantings ensures you never face empty shelves—just steady harvests that match your kitchen’s rhythm. A well-structured calendar accounts for growth rates, light shifts, and container space.
Scheduling Successive Plantings for Continuous Harvest
Start by tracking daylight window hours in your growing area. South-facing spots offer 4-6 hours of natural light in winter. Pair this with LED panels to maintain 12-14 total light hours daily. Stagger seeds every 10-14 days for nonstop yields.
| Plant | Days Between Plantings | Container Type | Light Hours Needed |
|---|---|---|---|
| Spinach | 14 | Plastic trays | 6-8 |
| Radishes | 10 | Fabric pots | 4-6 |
| Basil | 21 | Plastic pots | 12-14 |
Use seasonal crop planning techniques to map out rotations. For example, follow fast-growing arugula with slower herbs like oregano. Label plastic containers with planting dates to track progress.
Overcrowding stifles growth. Leave 3-4 inches between plants in shared trays. Rotate pots weekly so each side faces the light source equally. This prevents leggy stems and uneven leaf development.
With a clear schedule, you’ll transform chaotic sprouts into a seamless supply. Imagine plucking fresh greens every Tuesday or basil every Friday—all from your organized indoor oasis.
Tips and Tricks for Enjoying a Bountiful Indoor Harvest
Your journey from seed to salad doesn’t pause when temperatures drop. With smart strategies, you’ll enjoy robust flavors all year. Start by tracking light cycles—adjust timers to mimic longer summer days for herbs like basil. Rotate pots weekly to prevent lopsided growth.
Consistency wins. Water when soil feels dry an inch down—overwatering drowns roots. Pair this with weekly nutrient boosts for leafy greens. A study found balanced feeding increases yields by 25% compared to sporadic care.
Get creative. Use reflective foil behind plants to amplify weak winter light. Try stacking shallow trays of thyme or oregano on tiered shelves. These space-saving setups let you grow summer-like quantities in compact areas.
Celebrate small victories. That first basil leaf in January? A triumph. Share extras with neighbors or freeze herbs in olive oil cubes. Every sprout proves that with care, even winter can’t dim your green ambitions.
Ready to experiment? Start a new tray every Sunday. Track progress in a notebook. Soon, you’ll master the rhythm of year-round growth—where every season brings fresh possibilities.


