
Imagine stepping into your kitchen and plucking fragrant basil or mint leaves whenever you need them. No more rationing store-bought sprigs that wilt too quickly. With a space-efficient setup, you can cultivate vibrant greenery right where you cook—even in tight corners.
This method turns blank walls or unused nooks into thriving plant zones. You’ll get year-round access to ingredients that elevate everyday meals. Whether you’re seasoning soups or garnishing desserts, fresh picks are always within reach.
Small homes and apartments benefit most from this approach. Instead of bulky pots crowding countertops, plants grow upward in organized layers. The design shields leaves from pests and lets you adjust light or water levels easily. Kids love watching seedlings sprout, making it a fun family project.
Beyond convenience, growing your own supply cuts grocery costs. Why pay $3 for a handful of parsley when you can harvest it freely? Plus, nurturing plants feels rewarding—like having a mini-farm that fits your lifestyle.
Ready to transform your cooking space? Let’s explore how this clever system works and why it’s perfect for busy households.
Understanding the Basics of Indoor Herb Gardening
Embracing homegrown ingredients is easier than you think with the right setup. You don’t need a backyard or fancy equipment—just smart strategies that work in compact areas. Many culinary favorites thrive in controlled environments, letting you skip store runs and enjoy flavors picked at their peak.
Why This Approach Fits Your Routine
Busy schedules demand solutions that save time while delivering quality. Imagine seasoning weeknight meals with oregano clipped seconds before cooking. Unlike outdoor plots, your pots stay safe from frost, squirrels, and unpredictable rain. “You become the weatherman for your greens,” says urban farmer Lisa Yang.
Popular varieties like basil and rosemary adapt well to containers. They’re resilient, require minimal care, and grow steadily under basic LED lights. This makes them ideal for first-timers building confidence.
Maximizing Every Square Inch
Wall-mounted planters and tiered shelves turn blank surfaces into lush displays. Compare traditional pots to vertical setups:
| Feature | Vertical System | Traditional Pots |
|---|---|---|
| Floor Space | 0.5 sq ft | 3 sq ft |
| Pest Exposure | Low | High |
| Harvest Access | Eye-level | Bending required |
| Maintenance | Centralized watering | Individual care |
This design lets you nurture more varieties without clutter. Plus, tending to your greenery becomes a calming ritual—a chance to unwind after hectic days.
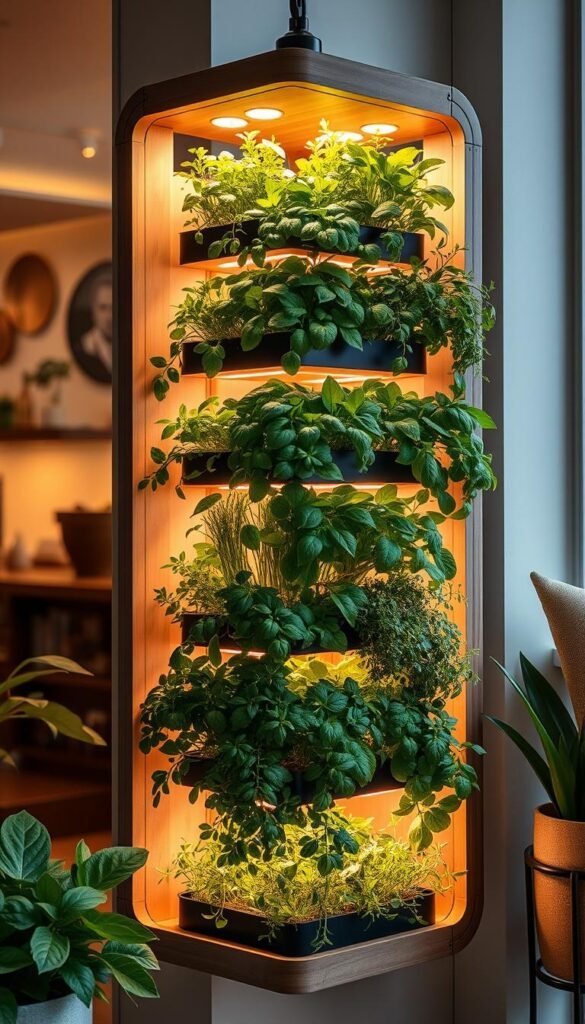
Indoor Vertical Herb Garden: Save Space While Growing Fresh Flavors

Transform your cooking space into a lush oasis without sacrificing precious square footage. Vertical systems blend practicality with smart design, letting you grow multiple varieties in tight areas. Let’s break down what makes these setups thrive.
Smart Design for Maximum Efficiency
Commercial planters like the 5-Tier GreenStalk system offer 30 pockets for herbs like basil and parsley. Its 10-inch-deep containers give roots room to spread while keeping the profile slim. For DIY fans, repurposed pallets or fabric wall pockets work too—just add drainage holes.
Rotating bases are game-changers. They let you spin your setup for even light exposure, so every plant gets its moment in the “sun.” No more leggy stems or uneven growth!
Water management matters most. Look for self-draining trays or built-in reservoirs. They prevent soggy soil—a common issue in traditional pots. “Overwatering kills more plants than neglect,” notes urban gardener Mia Torres.
Style isn’t an afterthought. Ceramic wall planters or geometric metal frames turn functional greenery into eye-catching decor. Imagine a living mosaic of thyme, oregano, and sage beside your stove.
Whether you choose ready-made systems or craft your own, prioritize these features:
- Pocket depth (8-12 inches ideal)
- Modular stacking for flexibility
- Durable, food-safe materials
Finding the Ideal Spot: Lighting, Temperature, and Airflow

Where you place your herbs can make or break their growth. Three factors matter most: bright light, stable warmth, and gentle air movement. Get this right, and your plants will reward you with lush leaves packed with flavor.
Choosing South or East-Facing Windows
South-facing spots deliver the strongest sunlight—perfect for basil and rosemary needing 6-8 hours daily. East-facing windows offer softer morning rays, ideal for mint or parsley. Check your window area at different times to see how shadows from trees or buildings affect exposure.
Use a free app like Sun Seeker to track daily patterns. No south-facing glass? No problem. Many indoor gardening for beginners setups thrive in east-facing spaces with a little creativity.
Supplementing with LED Grow Lights
When natural light falls short, LED grow lights save the day. Position them 6-12 inches above your plants for 14-20 hours daily. Timers automate the schedule—set it and forget it!
Stand-up models work well beside bookshelves, while hanging bulbs fit above countertops. “Full-spectrum LEDs mimic noon sunlight,” explains horticulturist Jamie Chen. “They’re energy-efficient and won’t scorch leaves.”
Keep your room between 65-75°F. A small fan nearby prevents stale air, reducing mold risks. With the right balance, your herbs stay vibrant all year.
Selecting the Right Containers, Soil, and Equipment

What separates thriving plants from struggling ones? It starts below the surface. Your greenery’s success hinges on three elements: smart soil blends, containers that breathe, and tools that simplify care.
High-Quality, Well-Draining Potting Soil Essentials
Skip dense garden soil—it suffocates roots in pots. Opt for lightweight mixes combining coco coir (holds moisture) and perlite (boosts airflow). This duo prevents waterlogging while keeping roots oxygenated. “Overwatering kills through root rot, not drought,” warns gardener Eli Martinez.
Coco coir outshines peat moss by rewetting easily when dry. Mix in worm castings for slow-release nutrients. Your herbs get steady food without chemical fertilizers.
Picking Containers and Planters with Proper Drainage
Drainage holes are non-negotiable. Self-watering pots with trays simplify care—they release moisture as needed. Match container depth to mature plant sizes:
- Basil: 8-10″ deep
- Thyme: 6-8″ shallow
- Parsley: 10-12″ medium
Plastic pots retain moisture for thirsty varieties, while terra cotta dries faster for Mediterranean herbs. Modular stacking systems let you expand your setup as your skills grow.
Planting Your Herbs: A Step-by-Step Guide

Ready to turn those empty pots into a thriving green corner? Let’s transform your kitchen nook into a fragrant hub where flavors grow arm’s reach away. Strategic planting ensures your greenery thrives from seedling to harvest.
Preparing Your Setup and Organizing Your Pots
Start by grouping herbs with similar needs. Sun-loving rosemary and sage belong on top shelves, while shade-tolerant mint stays lower. Clean containers with mild soap to prevent mold. Fill them ¾ full with well-draining soil—leave space for roots to expand.
Arrange pots before planting. Taller plants go behind shorter ones to avoid shading. Leave 2-3 inches between containers for air circulation. “Overcrowding invites disease,” warns gardener Tina Reynolds. Use these steps:
- Label each planter with herb names
- Mix slow-release fertilizer into soil
- Pre-moisten potting mix before adding seeds
Planting Popular Herbs Like Basil, Mint, and Parsley
For basil, plant seeds ¼ inch deep. Cover lightly—they need light to sprout. Mint grows fast from cuttings: place stems in water until roots form, then transfer to soil. Parsley prefers deeper pots (10+ inches) for its taproot.
Water gently after planting. Use a spray bottle for seedlings to avoid displacing seeds. Place newly potted herbs in indirect light for 48 hours before moving to their permanent spots. Rotate planters weekly for even growth.
Within weeks, you’ll snip fresh leaves for sauces, teas, and garnishes. Track each plant’s progress with a simple chart—note watering dates and harvest times. Soon, your kitchen will buzz with life and aroma.
Caring for Your Indoor Herb Garden: Watering, Pruning, and Maintenance

Keeping your greenery vibrant requires mastering two simple rhythms: hydration and haircuts. Like adjusting a recipe to taste, you’ll learn to read your plants’ needs through their leaves and soil. With consistent care, your kitchen becomes a self-renewing spice rack.
Optimal Watering Techniques and Schedules
Check soil moisture by pressing a finger an inch deep. Mint and parsley thrive when damp, while rosemary prefers drying out between drinks. “Water thoroughly until it drains freely—half-hearted sips cause shallow roots,” advises botanist Clara Nguyen.
Seasonal shifts matter. In winter, cut back to weekly sessions. Summer might demand watering every 3 days. Always remove pots from shelves to drain completely—no one likes wet feet!
Pruning Tips to Encourage Fuller Growth
Snip stems just above leaf nodes using clean scissors. This trick wakes up dormant buds, creating bushier shapes. For basil, harvest top leaves first to prevent flowering. Thyme benefits from light trims every 2 weeks.
Feed plants monthly with a 10-10-10 liquid fertilizer. Watch for yellowing leaves—a sign to adjust nutrients or light. Soon, you’ll have lush growth that outpaces your cooking needs!
Troubleshooting and Upgrading Your Indoor Garden System
Even the most carefully tended setups can hit snags. Spotting issues early keeps your greenery thriving. Let’s tackle common challenges and explore clever ways to enhance your growing experience.
Identifying and Resolving Common Issues
Tiny flies buzzing around? Mix apple cider vinegar with dish soap in a jar—they’ll dive in and stay. Leggy stems mean lights are too far. Move bulbs 4-6 inches closer. White leaf spots? Shift fixtures back to prevent light burn.
Algae on soil looks fuzzy but isn’t deadly. Cut watering by half and add a fan nearby. Sprinkle cinnamon—it’s a natural fungicide. For detailed pest management, check foundational strategies that complement these quick fixes.
Creative Upgrades and Custom DIY Ideas
Turn spare materials into smart solutions. Attach magnetic planters to metal shelves for movable herb clusters. Repurpose a shoe organizer into a cascading wall garden—each pocket holds a small pot.
Add a timer-controlled rotating base for even light distribution. In summer, grow heat-loving varieties like lemongrass near sunny windows. These tweaks keep your system fresh and functional year-round.


