
Imagine turning ordinary corners of your yard into whimsical escapes where imagination blooms. These tiny realms blend natural beauty with creative storytelling, inviting you to see slopes, rocks, and old tree roots as foundations for something extraordinary.
You’ll learn how to work with your land’s unique features instead of against them. Gentle hills become rolling meadows for tiny cottages, while weathered stones transform into mystical bridges. Even simple moss patches can anchor a scene straight from folklore.
This approach isn’t just about aesthetics—it’s a chance to slow down and connect. Families often find joy in crafting these spaces together, mixing laughter with dirt-stained hands. For solo creators, the process offers quiet moments of mindfulness amid nature’s textures.
Want to go deeper? Explore our guide to elevating your outdoor space for more ways to blend artistry with ecology. You’ll discover how small additions, like pebble pathways or repurposed branches, can spark big wonder without disrupting your yard’s balance.
Every choice matters here. By letting existing trees frame your scenes and rainwater pools become miniature lakes, you create harmony between fantasy and the real world. The result? A living artwork that grows richer with each season.
Understanding the Allure of Fairy Gardens

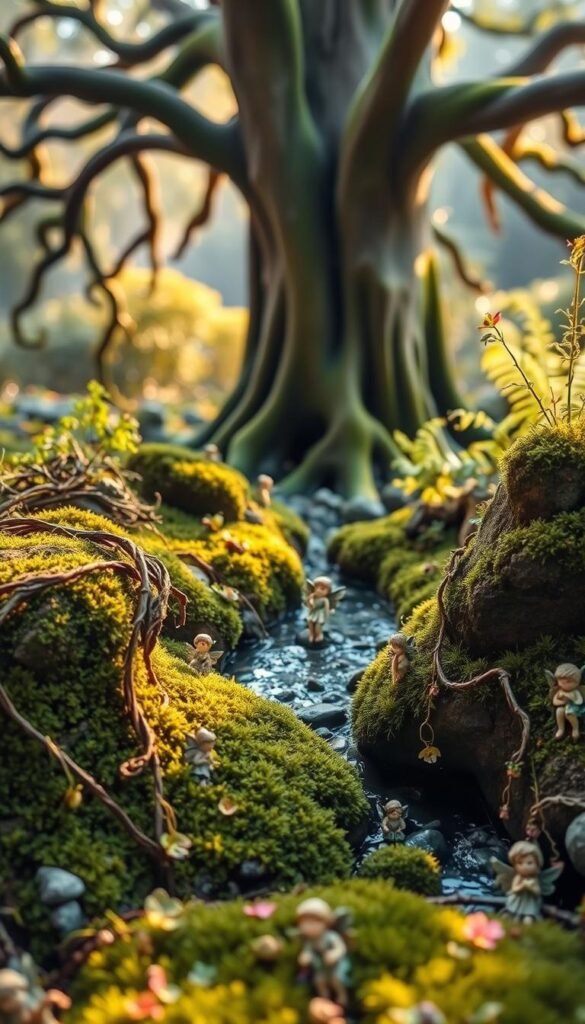
There’s something irresistible about crafting tiny worlds where pebbles become mountains and moss transforms into lush meadows. These whimsical creations awaken your sense of play while grounding you in nature’s rhythms. Let’s explore why these miniature escapes hold such power over our hearts and minds.
What Makes These Tiny Worlds Sparkle?
Fairy gardens thrive on magic hidden in plain sight. A cracked flowerpot becomes a cozy cottage. Twisted roots turn into ancient tree portals. When you build these spaces, you’re not just arranging objects—you’re inviting stories to unfold. Children might spot fairies dancing after rainstorms, while adults rediscover childhood wonder through miniature lanterns glowing at dusk.
More Than Just Pretty Decor
Creating these scenes offers surprising benefits. The rhythmic placement of stones or careful pruning of tiny plants becomes a meditation. Stress melts as you focus on balancing textures and colors. Families bond over shared laughter while hunting for the perfect acorn cap to use as a fairy bathtub. Even solo creators find joy in watching their imagination take root.
Best part? Your creation evolves naturally. Spring wildflowers might frame a new pathway, while autumn leaves become golden carpets. Each season adds chapters to your living storybook—no two visits ever feel the same.
Essential Elements for Creating a Magical Fairy Garden
Every enchanting space begins with careful selection of components that spark wonder. You’ll blend earthy textures with living greenery to craft scenes that feel both timeless and alive.
Choosing the Right Natural Materials
Start by gathering stones, bark, and moss from your surroundings. These natural materials form the backbone of authentic designs. Flat rocks become stepping stones, while twisted branches turn into arched bridges.
Focus on weather-resistant items for lasting charm. Seal wooden elements with non-toxic treatments. Choose stone pathways that won’t shift in rain. This ensures your creation evolves gracefully through seasonal changes.
Incorporating Miniature Plants and Fairy Houses
Select miniature plants that maintain their scale. Irish moss creates velvety lawns, while creeping thyme adds purple blooms. Dwarf conifers give height without overwhelming the scene.
Build fairy houses using bark shingles and acorn caps. Repurpose clay pots as cozy cottages. Add pebble chimneys and twig fences for character. These details make your tiny world feel lived-in and real.
Combine different textures for depth. Layer smooth stones beside rough bark. Mix feathery ferns with spiky succulents. This approach mirrors the cottagecore aesthetic, blending rustic charm with curated beauty.
Large Fairy Garden Designs That Use Natural Landscape Features

Your yard’s natural curves and dips hold untapped magic. Instead of fighting the terrain, let it guide your design. Gentle slopes become tiered neighborhoods, while shallow depressions transform into watery wonderlands.
Building Elevation Into Your Story
Turn hills into layered communities where cottages perch at different heights. Connect them with pebble paths that follow the land’s curves. “Slopes aren’t obstacles—they’re opportunities for depth,” says one seasoned creator. Use existing rock formations as foundations for towers or mossy staircases.
Water’s Reflective Charm
A miniature pond becomes a mirror for surrounding scenes. Line natural hollows with smooth stones to create shimmering pools. Add creeping jenny around edges for soft texture. For movement, shape cascades using stacked slate—the trickle of water over rocks adds soothing background music.
Bridges made from twigs or bark slabs invite exploration across streams. These crossings let your eyes travel through the scene, discovering new details each time. Want more inspiration? Explore these creative large outdoor fairy garden ideas that celebrate land’s natural flow.
Remember: your best tools already exist in the yard. Let that old tree root become a gnarly bridge support. Allow rainwater to pool where it naturally collects, creating organic wetland habitats. When you work with the land, every element feels meant to be there.
Innovative Fairy Garden Layouts and Structures

Transform your outdoor area into a living storybook where every nook sparks curiosity. Thoughtful arrangements turn simple scenes into interactive adventures, letting visitors uncover surprises with each step.
Designing Miniature Villages and Fairy Homes
Cluster houses along slopes to suggest neighborhoods. Position taller cottages uphill and smaller dwellings below, using elevation changes to create fairy districts. Add bark shingle roofs and acorn-cap chimneys for character.
Tiny windows catch dawn light, casting lace-like shadows across paths. At dusk, place tea lights inside hollow stones to make homes glow. These details transform static scenes into dynamic spaces where stories seem to unfold.
Crafting Creative Pathways and Bridge Details
Wind crushed shell trails between homes, varying widths to hint at foot traffic. Mix smooth pebbles with jagged stones for texture contrast. “Paths should whisper, ‘Follow me—something wonderful awaits,’” advises garden designer Mara Klein.
| Material | Use | Effect |
|---|---|---|
| Pebbles | Main walkways | Clean, defined routes |
| Crushed shells | Side paths | Sparkling accents |
| Twigs | Bridges | Rustic charm |
| Slate pieces | Stepping stones | Natural contrast |
Arch twig bridges over dry creek beds lined with blue glass beads. These crossings connect spaces while inviting exploration. Add miniature signs pointing toward hidden fairy house entries to deepen the sense of discovery.
Incorporating Nature’s Touch: Trees, Flowers, and More

Your miniature oasis comes alive when you let nature guide your plant choices. The secret lies in pairing size-appropriate greenery with thoughtful color combinations that mirror wild ecosystems. Start by observing how light dances across your space through the day—this determines which species will thrive.
Selecting the Perfect Planting Options
Choose plants that stay naturally compact. Succulents like hens-and-chicks form rosettes perfect for rocky outcrops. Dwarf snapdragons add vertical interest without overpowering scenes. For year-round appeal:
- Spring: Bellis perennis daisies create polka-dot meadows
- Summer: Thyme bursts into tiny purple blooms
- Fall: Miniature ginger offers golden foliage
- Winter: Moss stays vibrant under frost
Embracing Natural Artistry in Every Detail
Mix textures to create depth. Pair velvety moss with spiky dwarf conifers. Let creeping jenny cascade over stone walls like liquid gold. “The magic happens when you combine contrasting leaf shapes,” notes botanical artist Lila Chen.
| Plant Type | Texture | Visual Effect |
|---|---|---|
| Irish Moss | Velvety | Softens edges |
| Blue Star Creeper | Feathery | Adds movement |
| Sedum | Chunky | Creates focal points |
Use herbs like rosemary for fragrant pathways. Their silvery leaves reflect moonlight, making night visits enchanting. Groundcovers like baby tears form living carpets between pebble paths, blurring the line between gardens and wilderness.
Budget-Friendly Tips for Your Fairy Garden Project

Creating enchanting miniature scenes doesn’t require deep pockets—just clever resourcefulness. Begin by scouting your yard for free materials: fallen twigs become fence posts, flat stones turn into pathways, and moss patches serve as velvety carpets. This approach keeps costs low while adding authentic charm.
Finding Affordable and Recyclable Materials
Transform everyday items into magical features. Cracked teacups make whimsical ponds, while wine corks carve into tiny stools. “The best materials often hide in plain sight,” says DIY enthusiast Clara Bennett. Check thrift stores for mismatched saucers to use as patio bases or dollhouse furniture for scale-appropriate accents.
Prioritize these cost-effective options:
| Material | Source | Use |
|---|---|---|
| Pinecones | Yard | Miniature trees |
| Broken pottery | Recycling bin | Rock gardens |
| Pebbles | Driveway | Pathways |
| Fabric scraps | Old clothes | Canopies |
Build your project in phases. Start with basic structures using found items, then add store-bought pieces during craft store sales. Swap plants with neighbors to diversify greenery without spending. Polymer clay becomes custom mushrooms or mailboxes with minimal effort—let rainy afternoons fuel your creativity.
Seasonal Adaptations for Ever-Changing Fairy Gardens
Your miniature wonderland can shine year-round when you embrace nature’s rhythm. Seasonal shifts become opportunities to refresh scenes while keeping the charm alive. Let’s explore how to weave time into your design, making each visit feel like opening a new storybook chapter.
Spring to Winter: Keeping the Magic Alive
Start spring by clearing pathways and planting tiny crocuses or violas. These bursts of color welcome magic back after winter’s rest. Swap snow-dusted decor for blooming elements—think mini birdbaths filled with petals instead of ice.
Summer calls for shade. Use broad hosta leaves as umbrellas over seating areas. Add pebble “fire pits” surrounded by thyme for cozy evening vibes. Rotate decorations monthly—swap May’s flower crowns for July’s seashell fountains.
Autumn brings golden touches. Create leaf piles using dried fern fronds and acorn-cap baskets overflowing with berry beads. Introduce pumpkin-shaped pebbles or cinnamon stick scarecrows for harvest flair.
Winter protection matters. Frame scenes with evergreen sprigs and line houses with bark insulation. Use clear resin “ice” ponds and cotton batting snowdrifts. Add tiny wool scarves to fairy figures for playful warmth.
Keep updates simple by designating swap zones—a hollow log for holiday ornaments or a flat stone for seasonal signs. This approach lets you create fairy moments that mirror nature’s cycles without overhauling entire scenes.


