
Imagine turning a simple container into a living work of art. This practice lets you craft eye-catching displays using plants that thrive together. Their shared needs make them perfect partners, whether you’re designing for windowsills or outdoor spaces.
These drought-resistant varieties offer endless creativity. Their shapes range from spiky towers to rosettes that resemble flowers. Colors span deep greens to vibrant purples, letting you paint with nature’s palette.
You’ll learn how to build self-sufficient ecosystems that demand little care. Unlike fussy houseplants, these arrangements survive occasional forgetfulness. Their adaptability makes them ideal for busy lifestyles or small spaces.
This guide reveals the secrets to balancing aesthetics with practicality. Discover how textures create depth and contrast in tiny landscapes. We’ll show you techniques professionals use to achieve magazine-worthy results effortlessly.
Whether you’re a seasoned plant lover or just starting out, this approach simplifies gardening. Transform ordinary pots into conversation starters that grow more beautiful over time. Let’s explore how to make nature’s resilience your creative ally.
Introduction to Micro-Landscaping and Dish Gardens

Think of a tiny world where every plant plays a role. This is the magic of crafting miniature landscapes—transforming everyday containers into living scenes. Unlike traditional gardens, these creations focus on balance and storytelling through texture and form.
Discovering the Art of Miniature Landscapes
Small-scale designs let you experiment like a painter. You arrange spiky, round, or trailing varieties to mimic forests or deserts. Each choice affects the whole composition. Even gaps between plants become part of the visual rhythm.
These ecosystems thrive because they’re built for teamwork. Slow-growing species share space without crowding. Their water needs align, making care simple. A gardening expert might call it “survival through cooperation.”
Why Dish Gardens Are Perfect for Succulents
Shallow pots give roots room to breathe while preventing soggy soil. You control moisture levels precisely—critical for fleshy-leaved varieties. The confined space also highlights their geometric shapes, turning practicality into art.
Want a pro tip? Use gritty soil mixes and avoid overcrowding. This setup reduces maintenance while letting colors pop. Your tiny garden becomes a self-sustaining showpiece, whether on a desk or patio.
Fundamentals of Succulent Gardening

Mastering these plants begins with their biology. Their plump leaves act as natural reservoirs, storing moisture for dry spells. This evolutionary trick lets them thrive where other plants wither.
What Makes These Plants Tick
Overwatering drowns their roots faster than desert rainstorms. Wait until soil dries completely before giving drinks. Watch for firm, colorful leaves—they’re your best health indicators.
Designing Effortless Beauty
Choose gritty soil mixes that mimic native habitats. Pair with containers featuring drainage holes—terracotta works wonders. Your reward? Arrangements that need attention only every 2-3 weeks.
| Healthy Signs | Stress Signals | Action Needed |
|---|---|---|
| Firm texture | Yellowing | Reduce watering |
| Even color | Mushy stems | Improve drainage |
| New growth | Wrinkled skin | Deep soak |
Growing succulents successfully means embracing their rhythm. They prefer neglect over fussy care. Match their natural conditions, and you’ll create living art that outlasts seasonal trends.
Essential Tools and Materials for Your Micro-Landscape

Your miniature ecosystem starts with what’s beneath the surface. The right foundation prevents root rot and lets plants thrive for years. Three elements make or break your project: smart soil blends, strategic rocks, and breathable containers.
Choosing the Best Potting Soil and Rocks
Mix standard potting soil with builder’s sand using a 3:1 ratio. This creates fast-draining conditions similar to desert environments. “The grittier the mix, the happier the roots,” seasoned growers often say.
Consider these amendments for better results:
- Perlite for air pockets
- Crushed granite for weight
- Lava rocks for texture contrast
Decorative pebbles belong on top, while functional stones go beneath the soil. River rocks work well as drainage layers in shallow planters. Avoid moisture-trapping materials like moss unless you’re creating a humidity zone.
Selecting Containers That Improve Drainage
Always prioritize containers with multiple holes at the base. Terracotta pots wick away excess moisture naturally. For sealed vessels you love, drill 1/4-inch openings or layer lava rocks at the bottom.
Shallow bowls prevent waterlogging better than deep pots. Their wide shape also showcases your design. Remember: cramped roots stay healthier than drowned ones. Let your arrangement breathe like it would in nature.
Pair these materials wisely, and you’ll create self-regulating displays. Your plants will reward you with vibrant colors and compact growth patterns.
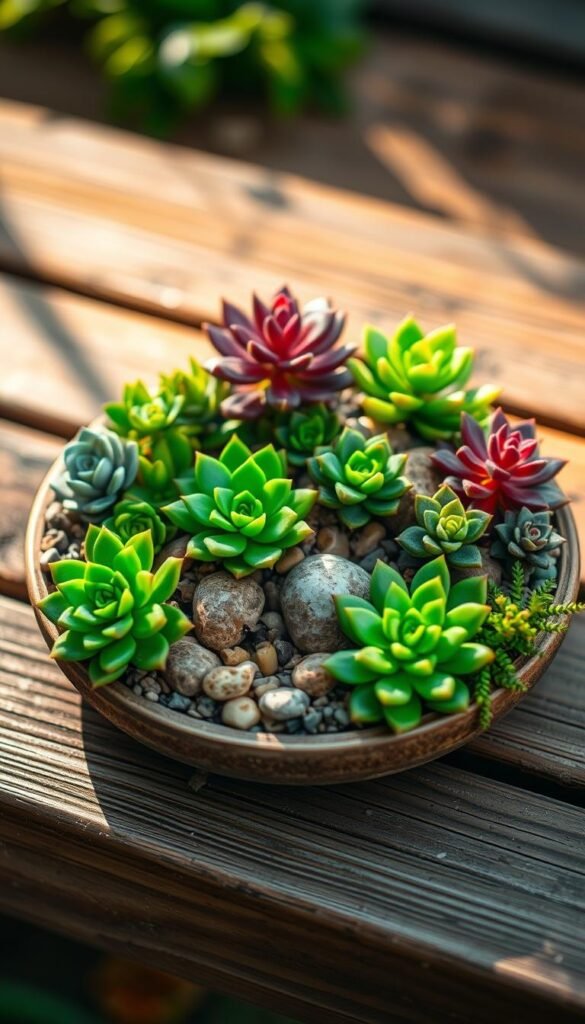
Micro-Landscaping: Combining Different Succulents in One Dish Garden

Creating stunning arrangements begins with understanding how colors and shapes interact. Think of your dish garden as a living canvas where every choice influences the final composition. Strategic placement turns individual specimens into cohesive displays that evolve beautifully over time.
Playing With Texture and Form
Mix spiky Haworthias with velvety Kalanchoes for instant drama. The secret lies in contrasting leaf structures—pair upright plants like Snake Plants with trailing varieties. “Three textures minimum create visual intrigue,” says landscape designer Mara Ripley.
Consider these dynamic duos:
- Echeveria rosettes beside crinkled Crassula leaves
- Blue-toned Senecio cascading over red-edged Graptopetalum
Crafting Depth Through Layering
Place taller specimens like Aloe ‘Christmas Carol’ off-center for movement. Surround them with low-growing Sedum clusters. This mimics natural landscapes while letting each plant shine.
Color theory transforms good arrangements into showstoppers. Try:
- Purple Aeoniums against lime-green Portulacaria
- Orange-painted Graptosedum with blue-gray Pachyphytum
“The best designs use height variation to guide the eye, not overwhelm it.”
Remember—many succulents blush brighter hues when slightly stressed. Position sun-lovers strategically to enhance this natural color shift. Your final design should feel balanced yet spontaneous, like nature itself arranged it.
Choosing the Right Container for Your Dish Garden
Your vessel selection determines both style and survival. While any holder can showcase plants, smart choices prevent root rot and boost visual impact. Let’s explore how to match containers with your creative vision and plant needs.
Traditional Pots Versus Unconventional Options
Terra cotta pots remain classics for good reason. Their porous walls let soil breathe, reducing overwatering risks. Ceramic dishes and stone troughs offer similar benefits while adding rustic charm.
Repurposed items spark creativity. Turn chipped teapots into whimsical homes by drilling drainage holes. Old wheelbarrows with minor cracks become mobile gardens. Even wooden frames work when lined with breathable fabric.
| Material | Pros | Cons |
|---|---|---|
| Terra Cotta | Natural airflow | Breaks easily |
| Ceramic | Stylish finishes | Heavy weight |
| Glass | Modern look | Traps moisture |
| Hypertufa | Lightweight | Needs sealing |
Depth matters as much as design. Shallow dishes suit spreading varieties like Sempervivum. Deeper containers accommodate taproots of Aloe species. Always consider mature sizes—cramped roots stunt growth.
For glass displays, add extra perlite to soil and limit watering. The transparent walls help monitor moisture levels. Explore growing succulents in containers to master drainage setups for any vessel. Your perfect planter awaits—whether store-bought or salvaged!
Preparing and Amending Your Soil Mix

The secret to thriving succulents starts below the surface. Your plants’ long-term health depends on what happens before you even place them in the container. Get this foundation right, and you’ll avoid most common growing pitfalls.
Building the Perfect Foundation
Start with a 3:2:1 ratio—three parts potting soil, two parts builder’s sand, one part perlite. This creates air pockets while mimicking natural desert growing conditions. Commercial cactus mixes often need extra grit—test yours by squeezing a handful. If it clumps, add more sand.
| Material | Benefit | Best For |
|---|---|---|
| Builder’s Sand | Improves drainage | All varieties |
| Pumice | Aerates soil | Thick-rooted types |
| Fine Gravel | Prevents compaction | Shallow containers |
| Pine Bark | Adds acidity | Epiphytic species |
Avoid moisture traps like peat moss. These materials act like sponges, keeping roots wetter than they like. Instead, use chunkier amendments that create drainage highways.
“Gritty mixes aren’t just about drainage—they encourage stronger root systems that anchor plants securely.”
Test your mix before planting. Pour water through it—ideal drainage means complete runoff in under 10 seconds. Adjust ratios based on your local humidity. Dry climates can handle slightly more organic matter, while rainy areas need extra perlite.
Remember: healthy soil means happy plants. Your efforts here pay off in vibrant colors and compact growth patterns that make arrangements shine.
Step-by-Step Guide to Planting Your Succulent Dish Garden
Ready to bring your miniature landscape to life? Let’s transform that empty container into a thriving ecosystem. Follow these hands-on methods to ensure your creation stays healthy and visually striking.
Laying the Foundation with Rocks and Pebbles
Start by filling the bottom container with chunky lava rocks or gravel. This layer acts like a sponge, soaking up excess moisture while letting air circulate. “It’s nature’s insurance policy against overwatering,” notes Phoenix-based gardener Lila Torres.
Use these materials strategically:
- Coarse granite for drainage
- Smooth river stones for visual contrast
- Crushed pumice to balance pH levels
Effective Planting Techniques for Optimal Growth
Position your showstopper succulent first—maybe a spiky Aloe or sprawling Echeveria. Leave two finger-widths between plants for future growth. Gently loosen root balls to help them spread in their new home.
Fill gaps with pea gravel instead of soil. This trick prevents rot while creating a polished look. For container gardening basics, remember: shallow roots need breathing room more than deep burial.
| Tool | Purpose | Pro Tip |
|---|---|---|
| Chopstick | Root positioning | Use dull end to avoid damage |
| Brush | Soil cleanup | Soft bristles protect farina |
| Tweezers | Pebble placement | Precision for tight spaces |
Finish by mimicking natural habitats—cluster pebbles around bases like desert debris. Your arrangement should look untouched by human hands, yet thrive with minimal care.
Incorporating Negative Space and Design Elements
What if empty areas became your secret weapon? In succulent arrangements, negative space transforms simple groupings into striking compositions. Those gaps between plants aren’t wasted real estate—they’re opportunities to guide the eye and highlight your favorite specimens.
Mastering the Art of Empty Zones
Try clustering plants on one side of your container. Leave the opposite half open, covered with smooth pebbles or crushed quartz. This contrast makes your arrangement feel intentional, like a desert scene captured mid-growth.
Resist filling every inch. Three strategic empty zones create natural pathways for visual exploration. Use decorative gravel to define these areas while preventing soil erosion. The result? A balanced design that feels curated, not crowded.
Remember: empty spaces let textures shine. A single fuzzy Kalanchoe stands out more against bare stones than in a packed cluster. Your eye needs room to appreciate each plant’s unique shape and color variations.
Embrace asymmetry—it mirrors how these plants grow in nature. Offset your tallest specimen near the container’s edge. Let trailing varieties spill into the void. Your arrangement will feel alive, dynamic, and effortlessly artistic.


