
Imagine transforming an old bathtub into a thriving vegetable patch. That’s exactly how one gardener embraced the no-dig method, layering compost over weeds to create rich, undisturbed soil. This approach sparks a lively debate among growers: should you build up garden beds from scratch or work with what’s already there?
Both techniques offer distinct advantages. The no-dig philosophy prioritizes soil health by protecting beneficial organisms like earthworms and fungi. Instead of tilling, gardeners add organic materials directly to the surface. This mimics natural processes, creating a self-sustaining ecosystem over time.
Raised beds provide immediate control over growing conditions, ideal for challenging spaces or quick starts. However, they often require more initial materials and labor. Our guide will help you weigh factors like:
• Long-term soil vitality vs instant customization
• Weekly maintenance requirements
• Seasonal adaptability for different climates
We’ll explore how organic layering fuels plant growth and why some gardeners report 30% better water retention in undisturbed plots. Whether you’re growing heirloom tomatoes or pollinator flowers, understanding these methods ensures your green space thrives with minimal effort.
Introduction to No-Dig and Raised Bed Gardening

Picture your backyard as a blank canvas where every planting choice shapes your harvest. Two popular approaches dominate modern gardening: the layered simplicity of no-dig systems and the structured efficiency of raised beds. Each offers unique pathways to cultivate thriving plants while nurturing your soil.
What You’ll Learn in This Guide
This resource breaks down both techniques into actionable steps. You’ll discover how to:
- Build fertile beds without disturbing earthworms or soil structure
- Design raised planters that maximize space and drainage
- Select materials that boost organic matter and suppress weeds naturally
Why Gardening Methods Matter
Your approach directly impacts soil vitality and harvest yields. Traditional tilling disrupts microbial networks, while modern no-dig systems mimic forest-floor decomposition. Raised garden beds solve drainage issues but require more upfront resources.
Recent studies show organic-focused methods increase crop resilience by 40% compared to conventional practices. Whether you’re growing herbs on a balcony or vegetables in a backyard, choosing the right technique saves time and nurtures your green space for years.
Understanding the Basics of No-Dig Gardening

Think of your garden soil as a bustling underground city. Tiny workers like fungi and earthworms constantly build highways and recycle nutrients. The no-dig method keeps this ecosystem intact by adding organic layers instead of disrupting the ground.
The Science Behind the Soil Food Web
When you pile compost, leaves, or straw on top of soil, you’re feeding a natural recycling system. Earthworms drag these materials downward, while microbes break them into plant-ready nutrients. This layer-by-layer approach mimics how forests build fertile soil over time.
Research shows undisturbed soil hosts up to 50% more beneficial bacteria. These organisms form partnerships with plant roots, boosting water absorption and disease resistance. Unlike tilling, which destroys these networks, no-dig gardening lets nature do the heavy lifting.
Key Benefits for Your Garden
You’ll spend less time weeding because organic coverings block sunlight from weed seeds. One study found no-dig plots reduced unwanted growth by 67% in the first year. Your plants also gain:
- Stronger root systems from consistent moisture retention
- Natural pest control via predator insects in undisturbed soil
- Year-round nutrient cycling as materials decompose gradually
For those who prefer structured setups, building a raised bed offers similar soil protection but requires more initial work. Both methods prioritize long-term soil health – the choice depends on your space and gardening style.
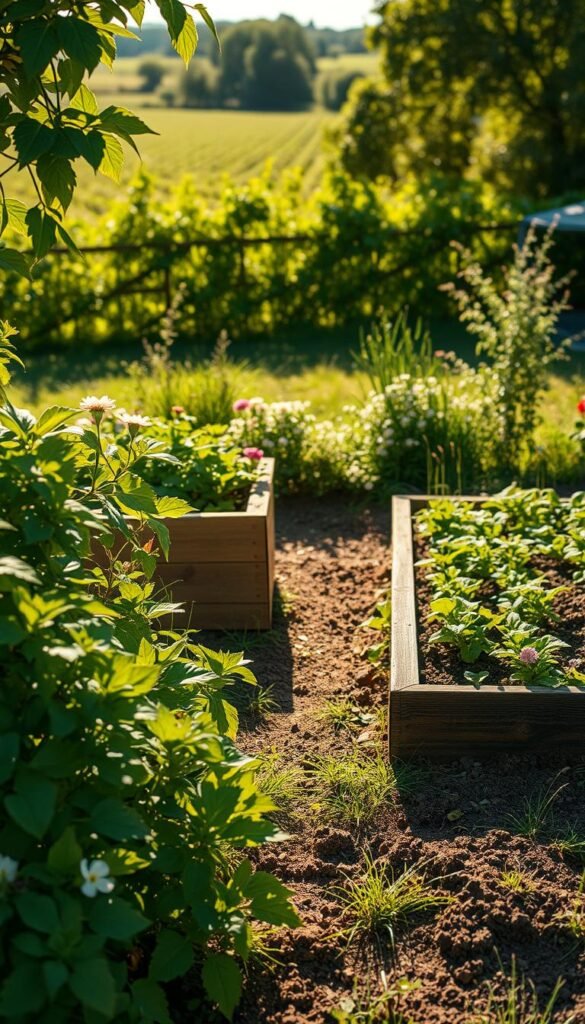
Overview of Raised Bed Gardening Techniques

Envision your garden lifted above ground level, where you dictate every aspect of growth. Raised bed gardening uses framed soil mounds to create optimal conditions for plants. This method shines in urban spaces or areas with poor native soil, letting you bypass common challenges like compaction and drainage issues.
Core Components of a Raised Bed
Three elements form the backbone of successful setups:
- Frame materials: Cedar fencing resists rot, while galvanized steel offers longevity
- Organic layers: Cardboard sheets suppress weeds beneath fresh soil
- Growing medium: A 50/50 mix of topsoil and compost fuels root development
Materials and Structure Essentials
Choose rot-resistant wood or recycled plastic for borders. Temporary beds can use stacked straw bales, while permanent structures benefit from mortared bricks. Layer cardboard at the base to block grass before adding 8-12 inches of enriched soil.
| Material Type | Durability | Seasonal Impact |
|---|---|---|
| Cedar Wood | 5-7 years | Warms quickly in spring |
| Galvanized Steel | 15+ years | Retains summer heat |
| Composite Plastic | 10-12 years | Insulates roots in fall |
Time your bed preparation with the season – early spring allows soil to settle before planting. Mulch with straw after sowing to maintain moisture and discourage weeds. Gardeners report 25% faster growth in raised setups due to improved drainage and root aeration.
No-Dig vs. Raised Bed: Finding the Right Method for You

Your garden’s workload depends on the foundation you choose – like picking between a bicycle and a pickup truck. One method lets you cruise with minimal effort, while the other demands upfront heavy lifting. Let’s break down what each approach requires across seasons and locations.
Comparing Maintenance and Labor Needs
Starting a layered garden takes 70% less time than building raised structures, according to urban farming studies. Spread compost and mulch directly over existing soil, and you’re done. Raised beds need framing materials, soil hauling, and assembly – often 8-12 hours of initial work.
Ongoing care differs too. No-dig systems thrive with seasonal matter top-ups – think fall leaves or grass clippings. Raised beds may need annual soil refreshing and pest checks. Both methods use mulch, but layered gardens require half as much weeding.
Seasonal and Regional Considerations
Clay-heavy soils benefit from raised setups that improve drainage. Sandy areas? Layered gardens retain moisture better. In rainy climates, elevated beds prevent root rot. Dry regions favor no-dig’s water-saving plant roots.
| Factor | Layered Garden | Raised Bed |
|---|---|---|
| Setup Time | 2-3 hours | 8-12 hours |
| Annual Care Hours | 15 | 25 |
| Cost (First Year) | $40-$60 | $120-$200 |
| Best For Regions | All except swampy | Wet climates, urban spaces |
Choose layered gardening if you want low-cost, scalable food forests. Opt for raised beds when tackling poor drainage or limited mobility. Match your pick to local weather patterns and how often you can tend your green space.
Planning Your Garden Bed: Layout and Materials

Mapping out your garden is like setting up a chessboard—every move matters for victory. Start by sketching your space using free tools like Google Sheets or graph paper. Track sunlight patterns and note shaded areas to place sun-loving seeds where they’ll thrive.
Mapping Out Your Garden Space
Measure your available area and divide it into zones. Group plants by water needs and growth height. Tall crops like corn work best on the north side to avoid shading shorter veggies. Leave 18-inch pathways between beds for easy access—a smart way to prevent soil compaction.
Selecting Organic Matter, Compost, and Mulch
Balance is key. Use a 3:2:1 ratio of compost, aged manure, and shredded leaves for nutrient-rich soil. Mulch with straw or wood chips to retain moisture and protect seeds. Studies show proper layering increases germination rates by 35%.
Try these planning methods:
- Rotate crops annually to prevent soil depletion
- Interplant fast-growing radishes with slower peppers
- Use vertical trellises for cucumbers to save ground space
| Material | Best Use | Application Time |
|---|---|---|
| Compost | Base layer | Early spring |
| Straw Mulch | Moisture retention | After planting |
| Leaf Mold | Winter protection | Late fall |
Test your soil’s pH before adding amendments—most veggies prefer 6.0-7.0. This way, you’ll create the perfect place for your seeds to flourish without guesswork.
Step-by-Step Guide to Building a No-Dig Bed

Turn a patch of lawn into a thriving garden in one afternoon. This simple process uses layered materials to create instant growing space while protecting soil life. You’ll need newspaper, alfalfa pellets, straw, and compost to start.
Layering Organic Materials Efficiently
Follow this sequence for optimal root growth and weed suppression:
- Mow grass short and water the area
- Layer 5-10 sheets of newspaper (no glossy pages)
- Spread 1″ of alfalfa pellets for nitrogen
- Add 4-6″ of straw as insulation
- Top with 3″ of finished compost
Vegetable roots easily penetrate these soft layers. The alfalfa heats up as it breaks down, speeding decomposition. Wear work gloves when handling straw to avoid splinters.
Tips for Effective Watering and Composting
Use a watering can or soaker hose to moisten each layer during assembly. This activates microbes and helps materials settle. Add vegetable scraps between layers during the growing season – they’ll compost in place.
| Material | Purpose | Ideal Thickness |
|---|---|---|
| Cardboard | Weed Barrier | 1/4″ |
| Straw | Insulation | 4-6″ |
| Compost | Plant Food | 3″ |
For winter care, cover beds with 2″ of shredded leaves. This protects microbial life and maintains structure until spring. The layered approach means less work long-term – your soil improves each year without tilling.
Step-by-Step Guide to Constructing a Raised Bed

Build a garden that stands tall – literally. Raised beds offer precise control over your growing environment, whether you’re working with clay soil or limited space. Let’s break down how to create a structure that lasts for years while nurturing plant roots.
Building a Sturdy Structure
Start with durable materials that withstand weather and time. Experts like Charles Dowding often use untreated cedar fencing – it resists rot naturally. Follow these steps for a robust frame:
- Cut wood to desired dimensions (4’x8′ works well for accessibility)
- Pre-drill holes to prevent splitting during assembly
- Secure corners with galvanized screws or brackets
- Line the bottom with cardboard to smother grass
| Material | Durability | Cost per Foot |
|---|---|---|
| Cedar | 5-7 years | $2.50 |
| Galvanized Steel | 15+ years | $4.75 |
| Composite | 10 years | $3.20 |
Optimizing Soil and Mulch Placement
Fill your bed using Charles Dowding’s layered approach for optimal soil health. Alternate compost and topsoil to create a nutrient-rich environment. Top with 2-3 inches of straw mulch to:
- Retain moisture during dry spells
- Suppress weed growth naturally
- Regulate soil temperature
For a true no-dig garden experience in raised beds, add fresh compost annually instead of tilling. This maintains microbial networks while feeding your plants. Water deeply after planting to help roots penetrate the layers effectively.
Planning and Organizing Your Garden Layout
Imagine crafting a garden where every inch works smarter, not harder. Strategic design turns limited space into a lush, productive oasis. Start by sketching beds and pathways that balance beauty with practicality—your plants and knees will thank you.
Utilizing Vertical Space and Pathway Designs
Grow upward to save ground space. Install trellises for cucumbers or stacked planters for herbs. Even compact yards can host pole beans climbing bamboo stakes or hanging baskets of strawberries. Vertical structures create shade for heat-sensitive crops like lettuce.
Pathways matter as much as beds. Use wood chips or gravel between planting areas to prevent mud and weeds. Keep walkways at least 18 inches wide for easy kneeling and wheelbarrow access. Make sure edges are defined with bricks or logs to maintain clean lines.
In no-dig gardening, uniform organic matter layers ensure even plant growth. Spread compost and straw equally across beds—use a rake to smooth lumpy areas. Check thickness monthly, topping up thin spots to maintain 3-4 inches of coverage.
Protect your no-dig bed from neighboring weeds. Bury cardboard strips 2 inches deep along bed borders to block invasive roots. Plant marigolds or chives around edges—their strong scents deter pests naturally.
Design with seasons in mind. Position tall summer crops (like tomatoes) to avoid shading spring greens. Leave space for fall garlic planting between spent bean vines. A well-planned layout keeps your garden productive and picturesque year-round.
Enhancing Soil Health and Weed Management
Healthy soil is your garden’s secret weapon against weeds and poor yields. By focusing on natural techniques, you create a self-regulating ecosystem where plants thrive with minimal intervention. Let’s explore how simple materials like cardboard and compost transform struggling plots into productive spaces.
Natural Weed Suppression Techniques
Smother unwanted growth without chemicals using layered cardboard. When placed over grass or weeds, it blocks sunlight while allowing earthworms to work beneath. As the material breaks down over 6-8 months, it adds carbon to your vegetable garden soil naturally.
For a new bed, use 2-3 overlapping cardboard sheets under 4 inches of mulch. This method prevents 90% of weed germination according to university trials. Reapply annually in problem areas – far easier than weekly hoeing.
Boosting Soil Fertility with Organic Amendments
Enrich your vegetable garden with kitchen scraps and yard waste. Mix finished compost into new bed surfaces annually to maintain nutrient levels. Aged manure provides slow-release nitrogen, while crushed eggshells add calcium for stronger plant cells.
| Amendment | Key Benefit | Application Frequency |
|---|---|---|
| Compost | Balanced nutrients | Every spring/fall |
| Aged Manure | Nitrogen boost | Once per season |
| Leaf Mold | Moisture retention | Biannually |
| Biochar | Carbon storage | Every 3 years |
Healthy soil grows vigorous plants that outcompete weeds naturally. By avoiding synthetic chemicals, you protect beneficial insects and build long-term cardboard decomposition rates. Your vegetable garden becomes more resilient with each organic layer added.
Time-Saving Maintenance and Seasonal Garden Care
Picture your garden thriving while you sip lemonade—that’s the power of smart maintenance. Organic strategies let you nurture plants without endless chores. The secret? Working with nature’s rhythms rather than against them.
Cutting Corners the Right Way
Spread aged manure across bed surfaces each fall. This slow-release fertilizer feeds soil microbes all winter, readying nutrients for spring planting. Top dress with compost in early summer—it suppresses weeds while boosting health.
Try these effortless upgrades:
- Layer grass clippings as mulch to block weeds and lock in moisture
- Plant clover between rows—it fixes nitrogen and crowds out invaders
- Use cardboard under pathways to prevent grass encroachment
Summer demands light touch-ups. Water deeply but less often to encourage drought-resistant roots. In winter, blanket beds with leaves or straw to protect microbial life. Rotate crops annually to naturally disrupt pest cycles.
| Season | Key Task | Time Saved |
|---|---|---|
| Spring | Compost top-up | 1.5 hours |
| Summer | Mulch refresh | 2 hours |
| Fall | Manure application | 45 minutes |
Consistency trumps complexity. A 10-minute weekly walkthrough—checking mulch depth and soil moisture—prevents major issues. Your garden becomes self-sustaining, freeing weekends for enjoyment rather than labor.
Wrapping Up Your Gardening Journey
Your garden’s success story begins with choices that respect the earth. Layered systems protect soil life through natural decomposition, while framed setups offer precision for tricky spaces. Both approaches reward you with stronger roots and bountiful harvests when managed thoughtfully.
Organic matter like straw and compost fuels growth without aggressive tilling. These materials suppress weeds and lock moisture into your gardens, mimicking nature’s nutrient cycles. Whether covering grass with cardboard or filling beds with rich soil, minimal disturbance keeps ecosystems thriving.
Smart planning turns any lot into a productive area. An efficient layout maximizes yields while reducing upkeep. Rotate crops, layer mulch, and let earthworms handle the heavy lifting.
Now’s the time to apply these insights. Start small, observe results, and adjust as your green space evolves. With patience and care, you’ll cultivate resilience in every season—one handful of compost at a time.


