
Have you ever wondered how to handle excess water on your property while supporting local ecosystems? Rain gardens offer a smart, nature-inspired solution. These shallow, basin-shaped landscapes capture runoff from roofs, driveways, and other surfaces, letting soil and plants filter pollutants naturally.
By mimicking natural water cycles, these features reduce strain on drainage systems during heavy storms. They’re more than just functional—native flowers and grasses create vibrant habitats for pollinators while improving soil health. You’ll help recharge groundwater supplies and protect nearby streams from contamination.
What makes this approach stand out? It’s part of the low impact development movement, blending practicality with environmental care. Whether you’re in a suburban neighborhood or urban area, a well-planned setup can transform problem spots into thriving green spaces. Plus, it adds curb appeal that might boost your home’s value.
This guide will walk you through creating your own system, from choosing the right location to selecting plants that thrive in wet conditions. Ready to turn rainwater into a resource instead of a hassle? Let’s dive in.
Understanding the Basics of Rain Garden Design

Urban areas face growing challenges with excess runoff during heavy weather events. These shallow, planted basins act as nature’s sponge, absorbing and cleaning water before it overwhelms drainage systems. Let’s break down how they work and why they’re essential for modern communities.
What Is a Rain Garden and Why It Matters?
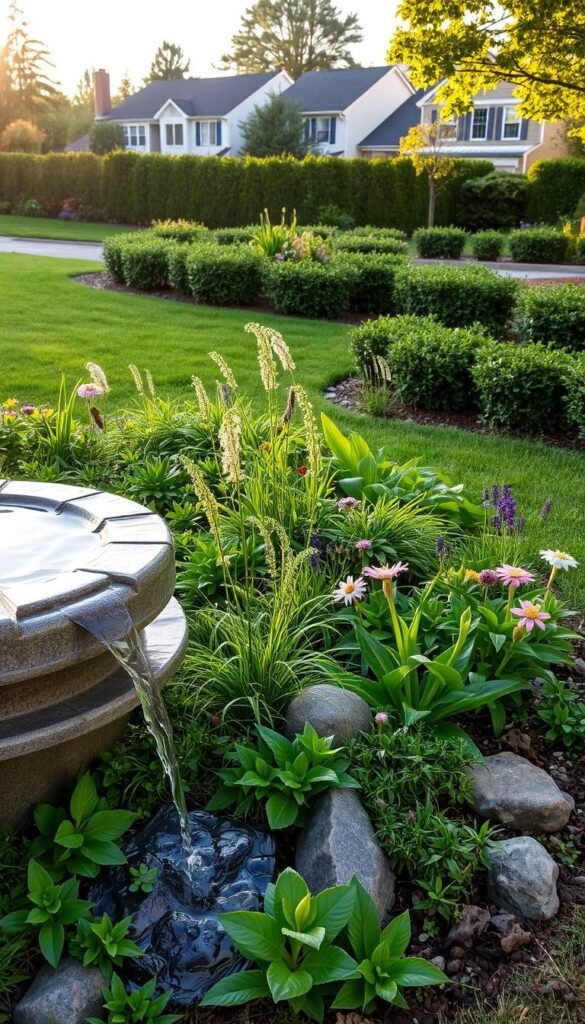
A rain garden is a depression filled with native plants and permeable soil. It captures runoff from hard surfaces like driveways, allowing gradual infiltration into the ground. This process reduces flooding risks while filtering out pollutants that harm local streams.
Key Benefits for Stormwater Runoff and Urban Ecology
Beyond managing water flow, these systems offer surprising ecological perks:
- Cleaner waterways: Soil layers trap oils, fertilizers, and debris before they reach groundwater.
- Cooler neighborhoods: Plants release moisture into the air, countering the heat island effect in paved areas.
- Wildlife havens: Native blooms attract bees, butterflies, and birds—key players in healthy ecosystems.
For those interested in broader sustainable landscaping principles, rain gardens align perfectly with earth-friendly practices. They’re living proof that small green spaces can make big environmental impacts.
Planning Your Rain Garden with Sustainable Goals

Locating the right spot for natural water management involves more than just digging a hole. You’ll need to balance practicality with ecological responsibility while meeting technical requirements.
Selecting the Ideal Site and Determining Size
Start by mapping where water naturally pools during storms. Look for low spots that collect runoff from roofs or paved areas. Keep it at least 5 feet from foundations and underground lines to prevent structural issues.
The soil depth matters too. Ensure groundwater stays 24 inches below the basin and bedrock sits 18 inches down. This allows proper infiltration without waterlogging plants.
For sizing, calculate your drainage area. A good rule? Limit each system to 15,000 sq ft of hard surfaces. The basin itself should cover 6-15% of that space—big enough to handle heavy downpours but manageable for maintenance.
Navigating Local Rules and Environmental Standards
Check slope requirements first. Many areas mandate 100-foot buffers from steep hillsides. Your local planning department can clarify setback distances and permit needs.
Some cities offer incentives for green infrastructure projects. Reach out early—they might provide soil tests or native plant lists to simplify your project. Staying compliant protects both your property and nearby ecosystems.
Rain Garden Design: Eco-Friendly Techniques for Managing Stormwater

Two distinct approaches can transform how your landscape handles heavy rains. Depending on your soil type and local regulations, you might prioritize ground absorption or redirected flow. Let’s explore how these methods work together to protect waterways.
Ground Absorption Tactics for Natural Hydration
Infiltration systems act like nature’s sponges. They let water seep through mulch and soil layers into native earth below. This method works best in areas with permeable ground that absorbs quickly—think sandy soils or loose loam.
These setups reduce runoff volume by 40-60% in ideal conditions. You’ll need a 12-18 inch soil depth for proper drainage. Native grasses with deep roots boost absorption rates while stabilizing the basin.
Advanced Purification Through Engineered Drainage
When soils can’t absorb quickly enough, filtration gardens step in. They use a 12-inch layer of washed drain rock and perforated pipes to move treated water elsewhere. This system captures 70% of sediment and heavy metals before redirecting flow.
Here’s how they compare:
| Feature | Infiltration | Filtration |
|---|---|---|
| Water handling | Absorbs into soil | Redirects via pipes |
| Construction depth | 18-24″ soil | 12″ rock + 4″ pipe |
| Best for | Permeable soils | Clay-heavy areas |
| Pollutant removal | Moderate | High (70% solids) |
Both methods improve water quality by filtering contaminants through plant roots. Pair them with native species that thrive in wet-dry cycles for maximum impact. Your local extension office can recommend plants suited to your system type.
Choosing Native Plants to Enhance Your Rain Garden

Transform your landscape into a thriving ecosystem by working with nature’s original blueprints. Locally adapted species bring unmatched resilience and ecological benefits to your green space.
Advantages of Selecting Locally Adapted Species
Native plants thrive because they’ve evolved with your region’s weather patterns and soil types. Their deep roots handle both heavy downpours and dry spells, cutting irrigation needs by up to 70% compared to non-natives. You’ll spend less time battling pests too—these species naturally resist local insects and diseases.
These green allies also filter contaminants from water more effectively. Research shows they remove 40% more nitrogen from runoff than exotic varieties, protecting nearby streams. Plus, their seasonal blooms create year-round visual interest without constant upkeep.
Creating a Biodiverse Landscape That Attracts Wildlife
Layer different plant heights and flowering times to support diverse creatures. Milkweed feeds monarch caterpillars, while purple coneflower seeds nourish finches. Even small spaces become lifelines when you include native grasses like switchgrass for ground-nesting bees.
Zone your planting areas based on moisture levels:
- Wet zones: Blue flag iris handles standing water
- Transition areas: Bee balm tolerates occasional flooding
- Upland edges: Butterfly weed thrives in drier soil
By mirroring natural habitats, you’ll create a living stormwater management system that’s both functional and beautiful. Your choices today shape tomorrow’s ecosystem health—one bloom at a time.
Soil Preparation and Mulching for Long-Lasting Performance

The secret to a thriving system lies beneath the surface. Proper groundwork ensures your green space handles heavy downpours while nurturing plant roots. Let’s dig into the layers that make or break your project’s success.
Improving Soil Structure with Organic Amendments
Start by testing your soil’s infiltration rate—aim for ½ to 12 inches per hour. Mix 18 inches of organic compost into existing earth to boost absorption and nutrient levels. This creates a sponge-like base that supports roots while filtering contaminants.
Balance soil chemistry for peak performance:
- Maintain pH between 5.5 and 7.5
- Ensure cation-exchange capacity exceeds 5 meq/100g
- Add mycorrhizae fungi to bind compost particles
These adjustments help trap heavy metals and prevent mulch from floating during storms. For areas that flood often, spread 2 inches of coarse compost or wood chips. In drier zones, switch to finer materials that lock in moisture.
Pro tip: Dense plantings outperform mulch alone for erosion control. Deep-rooted natives like switchgrass create living nets that stabilize soil year-round. Pair them with seasonal bloomers for a low-maintenance solution that works while you sleep.
Design Details for Efficient Inlets, Outlets, and Drainage
Smart water flow starts with how you guide it in and out. Concentrated runoff at entry points can wash away soil if not managed properly. You’ll want systems that handle heavy flows without compromising your landscape’s integrity.
Engineering Effective Entry Points
Use gravel beds or concrete splash pads where water enters. These spread the flow across a wider area, cutting erosion risk by 60%. For roofs or paved surfaces, position inlets slightly above ground level to catch the first flush of contaminants.
Sloped channels lined with river rocks work well for natural looks. They slow water speed while letting sediment settle before it reaches planting zones. Pair these with overflow pathways that redirect excess during extreme weather.
Managing Overflow and Preventing Erosion
Outlet pipes should sit 6 inches above the basin’s base. This allows proper infiltration while giving plants time to absorb moisture. Add a 45-degree elbow at pipe ends to dissipate energy—this simple tweak reduces scouring by 40%.
For spillways, use riprap stones or deep-rooted grasses like switchgrass. These materials stabilize soil and handle high volumes without washing out. Regular maintenance checks ensure leaves or debris don’t block your carefully planned drainage routes.


