
Imagine stepping outside to snip fresh flavors for tonight’s dinner—no grocery trip required. A small green oasis bursting with aromatic plants can thrive anywhere, from sunny balconies to cozy patios. With just a few pots or a simple setup, you’ll enjoy ingredients that taste brighter and last longer than store-bought options.
Why start with leafy greens? They’re forgiving for beginners and adapt to tight quarters. Many varieties flourish with minimal care, needing only 4–6 hours of sunlight daily. Plus, homegrown picks pack 30% more antioxidants than dried versions, making them healthier and tastier.
Elevated planters simplify the process by improving soil drainage and reducing strain on your back. You’ll spend less time battling weeds and more time experimenting with recipes. For those in apartments, creative container solutions let you maximize vertical or windowsill areas effortlessly.
This guide walks through designing a personalized setup that fits your lifestyle. We’ll cover soil basics, sun requirements, and budget-friendly tips to avoid wasting money on pricey supermarket bundles. Ready to transform unused corners into vibrant sources of flavor?
Understanding the Benefits of Raised Bed Herb Gardening

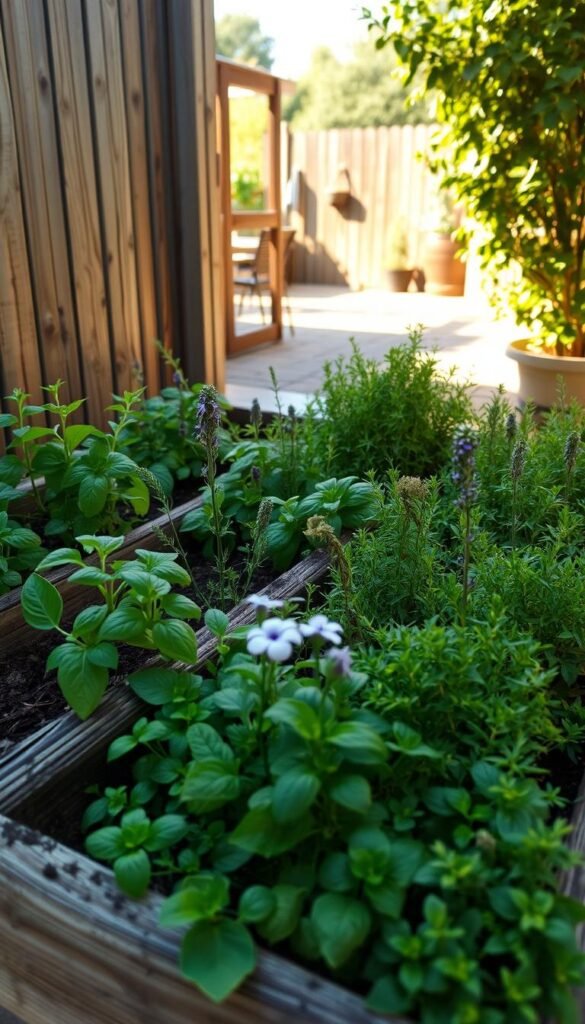
Transforming small areas into lush green spaces starts with smart design. Elevated planters offer distinct advantages for cultivating flavorful ingredients, especially when working with limited square footage.
Better Water Flow and Bug Management
Traditional ground plots often trap moisture around roots. With elevated setups, excess water drains freely through custom soil blends, preventing rot in moisture-sensitive varieties like rosemary. The height also stops slugs and beetles from reaching leaves—no chemical sprays needed.
Smart Layouts for Easy Care
Knee-high designs let you check plants without bending. This setup concentrates your frequently used varieties in one visible spot, helping you catch issues early. Pair this with step-by-step raised bed construction for perfect soil depth and spacing.
| Feature | Ground Planting | Elevated Planter |
|---|---|---|
| Root Drainage | Variable | Controlled |
| Pest Access | High | Limited |
| Soil Customization | Difficult | Full Control |
| Harvest Comfort | Bending Required | Waist-High Access |
Early spring gardeners love how these structures warm soil faster. You’ll get thyme and oregano growing weeks earlier than in cold ground. For recipe ideas using your harvest, explore herb-infused dishes that highlight fresh flavors.
Compact layouts mean less weeding and more focused care. Arrange mint and basil near seating areas where you’ll naturally notice their growth daily. This approach turns maintenance into quick check-ins rather than chores.
Selecting the Perfect Location and Preparing Your Garden Bed

Finding the right spot for your plants is like choosing the best seat in a café—it makes all the difference. Start by scouting areas that soak up sunlight like a sponge. Most leafy varieties need 6-8 hours of direct sun daily to develop bold flavors. Avoid shady corners near buildings or trees that might steal those precious rays.
Sunlight Requirements and Ideal Size
Aim for a 4-foot by 8-foot layout—this gives enough space for multiple varieties without overcrowding. If you’re tight on room, scale down but keep the depth at 10-12 inches. This depth supports robust roots while letting you layer soil properly. Always check for level ground to prevent water pooling on one side.
Soil Preparation and Ensuring Good Drainage
Mix equal parts topsoil and compost, then add peat moss for moisture control. This combo creates a fluffy texture that roots love. For extra protection against soggy soil, line the bottom with gravel before adding your mix. Mediterranean types like oregano thrive when their “feet” stay dry between waterings.
Keep your setup near a water source to simplify care. A quick hose reach beats hauling watering cans across the yard. Remember: smart placement today means fewer headaches tomorrow.
Raised Bed Herb Garden: Growing Culinary Favorites in Compact Spaces

Your spice rack deserves an upgrade, and it starts just steps from your stove. Position your green haven within arm’s reach of cooking areas—think near backdoors or patios. This strategic placement turns fresh picks into spontaneous recipe stars.
Flavor Maximization Through Strategic Placement
Zone 1 principles from permaculture suggest keeping daily-use items closest. By locating your setup 3-5 feet from entryways, you’ll grab thyme for roasted veggies while prepping dinner. Cluster high-traffic varieties like basil and parsley near the front for effortless snipping.
Creative Arrangements for Tight Quarters
Try these tricks to multiply your growing real estate:
| Technique | Benefit | Best For |
|---|---|---|
| Vertical Planters | Doubles growing area | Trailing types like oregano |
| Companion Planting | Natural pest control | Rosemary + sage pairings |
| Container Integration | Controls spreaders | Mint family management |
| Tiered Layouts | Improves air flow | Preventing mildew issues |
Stack shallow-rooted plants like cilantro above deeper systems. Use decorative pots for mint—they’ll look charming while containing runaway roots. Keep pathways 18-24 inches wide so you can tend every corner comfortably.
Mix textures and heights for visual interest. Silver-toned sage makes purple basil pop, while curly parsley softens angular planter edges. Your setup becomes both a pantry and conversation piece.
Choosing the Best Herb Varieties for Your Garden
The secret to a thriving green space lies in pairing the right plants with your lifestyle. Let’s explore two powerhouse categories that deliver flavor and convenience.
Perennial vs. Annual Selections
Long-lasting options like rosemary and lavender return yearly, saving time and money. These hardy survivors withstand temperature swings and require minimal replanting. Chives even bloom edible flowers, doubling as ornamental accents.
Seasonal stars like basil and dill shine brightly but briefly. They’re perfect for rotating flavors—try lemon basil one summer and cinnamon basil the next. “Annuals let you reinvent your space like a chef updates a menu,” notes urban gardener Marco Li.
| Herb Type | Lifespan | Key Varieties | Best Use |
|---|---|---|---|
| Perennial | 3+ years | Thyme, sage, mint | Foundation plants |
| Annual | 1 season | Parsley, cilantro, dill | Seasonal experimentation |
Culinary and Mediterranean Favorites
Sun-loving varieties from southern Europe adore the drainage your setup provides. Oregano spreads like a fragrant carpet, while upright rosemary adds structure. Pair these drought-tolerant plants with moisture-loving mint in separate containers to prevent clashes.
For kitchen essentials, grow:
- Basil (annual): King of pesto and caprese salads
- Sage (perennial): Perfect for brown butter sauces
- Oregano (perennial): Pizza night superstar
Mix both types for continuous harvests—snip annuals freely while perennials establish themselves. This approach keeps your meals exciting across seasons.
Designing a Functional Layout for Your Raised Bed

Plants, like people, thrive best when surrounded by good company. Smart arrangements in your growing space can boost flavor intensity while simplifying care. Let’s explore how strategic placement creates harmony between your leafy stars.
Grouping Compatible Herbs
Companion planting acts like a natural support system. Aromatic varieties like rosemary and sage release oils that repel pests. Pair them with oregano or thyme to create a fragrant barrier against unwanted insects. This method reduces the need for sprays while enhancing growth rates.
For setups near walls, position tall plants toward the back. Bushy rosemary or upright lavender won’t shade shorter front-row varieties like parsley. Freestanding beds benefit from center-placed towers—surround them with low-growing cilantro or creeping thyme.
Mint demands special handling. Its aggressive roots can overpower neighbors if not contained. Use submerged pots within your raised beds to keep it in check while maintaining visual unity.
| Plant Type | Ideal Partners | Spacing Needs |
|---|---|---|
| Woody (rosemary) | Sage, lavender | 18-24″ apart |
| Leafy (basil) | Oregano, parsley | 12-15″ apart |
| Spreading (mint) | Alone in containers | 10″ diameter pot |
Leave 8-10 inches between most varieties for air circulation. This prevents mildew and lets leaves develop robust flavors. Curved pathways around freestanding beds make harvesting effortless from every angle.
Your layout should balance beauty and practicality. Silver-green sage adds contrast to purple basil, while tiered heights create visual depth. With thoughtful planning, your setup becomes both productive and picturesque.
Implementing Planting Techniques and Timing

Timing transforms tiny seeds into thriving flavor factories. Nail your schedule, and you’ll enjoy nonstop harvests from spring through fall. Let’s break down when and how to get your plants growing strong.
Spring’s Sweet Spot
Most leafy varieties kick into gear when soil hits 60-70°F. In cooler zones, wait until night temps stay above 50°F. Tender basil seedlings sulk in chilly dirt, while hardy parsley shrugs off light frosts. Track your area’s last frost date using local extension office resources.
Mint and lemon verbena play by different rules. These heat-lovers prefer late summer planting—their roots establish faster in warm earth. Start them 6-8 weeks before first fall frost for robust growth next year.
| Method | Best For | Timing Tip |
|---|---|---|
| Seed Starting | Dill, cilantro, chamomile | Begin indoors 4-6 weeks early |
| Transplants | Rosemary, sage, thyme | Acclimate outdoors gradually |
Setting Up Success
Young plants need TLC during their first weeks. Use the “pinky test”—water when topsoil feels dry at fingertip depth. Space seedlings 8-12 inches apart so leaves don’t compete for sunlight. For bushy growth, pinch back tips once plants reach 6 inches tall.
Hardening off prevents shock. Move potted starters outside for 2 hours daily, increasing exposure over 7 days. Cloudy mornings are ideal for final transplanting. Shield delicate greens with row covers if late cold snaps threaten.
Stick to these basics, and you’ll fill jars with homegrown flavors all season. Remember: A strong start means fewer headaches and more pesto parties!
Watering, Nutrition, and Soil Care Essentials
Great flavor starts below the surface. Your plants rely on balanced soil and smart hydration to develop vibrant aromas. Let’s dig into creating the ideal foundation for thriving greens.
Mixing a Quality Soil Blend
Start with three key ingredients: 50% topsoil for structure, 30% compost for nutrients, and 20% peat moss for moisture control. This combo feeds roots while preventing soggy conditions. Test your mix’s pH—most varieties prefer 6.0-7.0. Add lime to raise acidity or sulfur to lower it.
Mediterranean types like rosemary need extra grit. Mix in perlite or coarse sand for better drainage. For small-space growers, lightweight blends using coconut coir work well in containers.
Optimal Watering Practices
Young seedlings crave consistent moisture. Check soil daily—if the top inch feels dry, it’s time to water. Mature plants have distinct needs:
| Herb Type | Water Frequency | Soil Preference |
|---|---|---|
| Lemon balm | Every 2-3 days | Moist, rich |
| Rosemary | Weekly | Dry, sandy |
| Basil | 3-4 days | Damp, not wet |
Use the “finger test” before reaching for the hose. Overwatering drowns roots faster than drought. Mulch with straw or shredded leaves to retain moisture naturally.
Refresh beds annually with compost to replenish nutrients. Avoid synthetic fertilizers—they boost growth but weaken flavors. With the right care, your setup becomes a self-sustaining flavor factory.
Pruning, Harvesting, and Maintaining Your Herbs
Regular care transforms your green corner into a flavor powerhouse. A few simple habits keep plants productive while preventing overcrowding. Let’s explore how smart trimming and timely picking lead to healthier growth.
Harvesting Tips to Boost Growth
Snip leaves in the morning when oils peak for maximum aroma. Use sharp scissors to cut just above leaf nodes—this encourages bushier growth. For basil, remove flower buds to redirect energy into leaf production.
Take no more than ⅓ of a plant at once. Frequent light harvesting beats occasional heavy cuts. Store sprigs in water-filled jars on the counter for same-day use.
Effective Pruning Strategies
Trim woody stems every 4-6 weeks to maintain shape. Remove yellowing leaves promptly to prevent disease spread. For mint family plants, cut stems back by half in midsummer to rejuvenate growth.
Rotate potted plants weekly for even sun exposure. Clear debris from soil surfaces to discourage pests. With these routines, your setup becomes a self-renewing source of fresh flavors.


