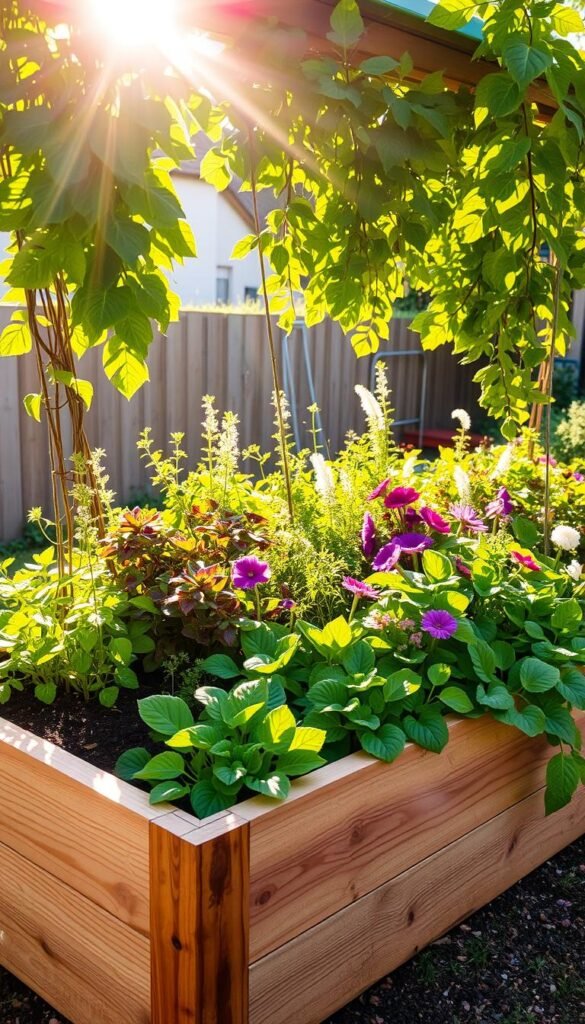
Imagine growing lush tomatoes or crisp greens without daily watering chores. Modern growing solutions use built-in reservoirs to keep plants hydrated for days. These setups, often called wicking beds, let soil pull moisture upward naturally—just like roots absorb nutrients in the wild.
Whether you’re working with a small patio or a spacious backyard, these systems adapt to your space. Build a compact 2-foot planter for herbs or a 12-foot bed for rows of veggies. The design puts you in control while cutting back on manual labor.
How does it work? A hidden water tank sits below the soil, feeding moisture through capillary action. This method reduces evaporation and delivers hydration directly to roots. You’ll spend less time hauling hoses and more time enjoying your thriving plants.
Beyond convenience, this approach uses 30-50% less water than traditional methods. Busy schedules won’t sabotage your harvests—consistent moisture means healthier growth and bigger yields. It’s gardening simplified, letting nature handle the heavy lifting.
Why Choose Self Watering Raised Beds?

Growing fresh produce shouldn’t feel like a second job. These innovative setups simplify gardening by delivering exactly what your greens need—when they need it. Let’s explore how they transform your outdoor space into a low-effort, high-reward ecosystem.
More Free Time, Fewer Headaches
Say goodbye to wilted leaves and cracked soil. The built-in reservoir handles hydration automatically, giving you weekends back. Busy parents and frequent travelers love how their crops stay perky for 5-7 days between refills.
| Feature | Traditional Beds | Self-Watering |
|---|---|---|
| Weekly Time Spent | 3-4 hours | 20 minutes |
| Water Used Monthly | 150 gallons | 75 gallons |
| Pest Issues | Common | Rare |
Stronger Growth, Less Waste
Roots grow downward toward steady moisture, creating sturdy foundations. You’ll see fewer blossom-end rots in tomatoes and crisper lettuce heads. The closed-loop system prevents nutrient runoff, making every drop count.
Drought-prone areas benefit most—consistent hydration means higher survival rates during heat waves. Your herbs and veggies develop natural resilience while using half the water of sprinkler systems.
Self Watering Raised Garden Beds: Saving Time and Conserving Resources

Revolutionize your plant care routine with targeted hydration. These systems act like personal hydration coaches for your greens, delivering water straight to roots through underground channels. No more guessing games—plants drink exactly what they need, when they need it.
Traditional methods lose up to 40% of water to wind and sun exposure. Compare that to these setups, where 95% reaches root zones. See the difference in action:
| Aspect | Overhead Sprinklers | Targeted Systems |
|---|---|---|
| Daily Water Loss | 12-18 gallons | 1-3 gallons |
| Root Health | Shallow growth | Deep, strong networks |
| Monthly Savings | $8-12 | $22-30 |
Your utility bills shrink as plants thrive. Consistent moisture levels mean fewer cracked tomatoes and droopy peppers. Areas with water restrictions become easier to manage, too.
Pair these beds with smart watering techniques for maximum efficiency. You’ll create a garden that practically cares for itself—leaving you free to enjoy the fruits (and veggies) of your labor.
Planning and Designing Your Raised Bed Garden

Transform your outdoor space into a thriving oasis by mastering layout and dimensions. A well-planned setup ensures easy access while maximizing growing potential—no yoga stretches required to reach those back-row plants.
Selecting the Perfect Layout and Dimensions
Keep beds narrow enough to touch the center. For two-sided access, stick to 4-foot widths—your arms can comfortably cover 2 feet from each side. Single-access spots? Never go wider than 2 feet. Depth matters too: 16.5 inches (three stacked 6-inch boards) gives roots room to dive while keeping the water reservoir effective.
Longer beds (2-12 feet) boost planting space but check material limits. Need inspiration? This step-by-step raised bed guide shows how pros balance size and practicality.
Considering Climate and Garden Space
Hot, dry climates demand strategic placement. Position beds where afternoon shade protects soil moisture. Rainy regions? Elevate beds slightly and ensure proper drainage to prevent soggy roots.
Map sun patterns across your space before building. Leafy greens thrive with 4-6 hours of light, while tomatoes crave 8+. Leave 18-inch paths between beds for wheelbarrows and kneeling pads—your knees will thank you later.
Choosing Materials for Your Self Watering System

What separates a thriving setup from a lackluster one? Your material choices determine whether roots stay nourished or struggle through dry spells. Let’s break down the essentials for building a resilient foundation.
Best Wood, Liner, and Reservoir Options
Start with fish-safe pond liners—45 mil EPDM outperforms flimsy plastic in freezing temperatures. This thick barrier prevents leaks while lasting 5x longer than basic tarps. For framing, modern pressure-treated lumber works safely since arsenic treatments were phased out decades ago.
Consider these comparisons for liner options:
| Material | Durability | Climate Suitability |
|---|---|---|
| 45 mil EPDM | 15+ years | All regions |
| 20 mil PVC | 5-7 years | Mild winters |
| 6 mil plastic | 1-2 seasons | Temporary use |
Optimal Soil and Wicking Mix Selections
Skip dense topsoil—it suffocates roots. Instead, use fluffy potting mix with perlite for airflow. Your secret weapon? A custom blend beneath the soil: 3 parts peat moss, 1 part vermiculite, and 1 part perlite. This cocktail pulls water upward like a straw while preventing rot.
Plants thrive when their foundation balances moisture and oxygen. Invest in quality components now, and you’ll avoid costly replacements later. Your greens will reward you with vigorous growth season after season.
Step-by-Step Installation of Your Self Watering Garden Bed

Building your efficient growing setup starts with precise assembly. Focus on three critical components: reservoir placement, pipe spacing, and overflow calibration. These elements work together to create a balanced hydration environment for roots.
Setting Up the Water Reservoir and Drain Pipes
Position 4-inch corrugated pipes in your lined bed, maintaining ¼” to ¾” gaps between them. This spacing prevents moisture gaps while letting soil breathe. Avoid letting pipes touch—crowded layouts block water flow to outer edges.
No fabric wrapping is needed. The narrow slits in perforated pipes resist soil intrusion better than standard drainage systems. Roots rarely penetrate these openings, keeping pathways clear for years.
Installing the Overflow System
Drill the overflow hole 3.25” from the base—this keeps 2-3 inches of water in the reservoir during normal use. Connect flexible PVC tubing or rigid Schedule 40 pipe based on your local rainfall patterns.
Test your system by filling the reservoir completely. Watch how excess liquid exits through the overflow within 10-15 seconds. Adjust pipe angles if needed to prevent pooling near plant roots.
Efficient Watering Techniques and Irrigation Practices
Timing and technique make all the difference in plant health. Let’s explore how smart scheduling and targeted delivery systems boost growth while protecting your greens from common pitfalls.
Automatic Timers and Drip Irrigation Insights
Set your irrigation system to activate at 4-5 a.m.—plants absorb moisture best when waking from their nightly recharge. Drip lines deliver water straight to roots through tiny emitters, cutting waste by up to 60% compared to sprinklers.
Midday watering scorches leaves and evaporates before roots drink. Evening sessions leave foliage damp, inviting slugs and mildew. A quality drip irrigation kit with timers solves both issues, running while you sleep.
Benefits of Early Morning Watering
Plants process nutrients and sunlight most efficiently after dawn. Morning moisture fuels photosynthesis while helping them withstand afternoon heat. Pair this strategy with organic gardening basics for soil that retains hydration longer.
Consistent 4 a.m. watering cycles mimic natural dew patterns, reducing plant stress. Roots grow deeper searching for steady moisture, creating drought-resistant specimens. Your best way water routine becomes a silent partner in garden success.
Optimizing Watering Schedules for Consistent Moisture
Mastering hydration rhythms keeps plants thriving through nature’s curveballs. While automated systems handle basics, your watchful eye ensures moisture stays balanced during sudden downpours or heat spikes. Think of it as setting a dinner schedule for your greens—they’ll flourish when portions match their appetite.
Adapting to Weather and Seasonal Changes
Check soil dampness weekly using a finger test or moisture meter. During rainy weeks, delay refills until the top inch feels dry. In scorching July heat? Boost reservoir checks to every 3 days. Plants whisper their needs—learn their language.
Tomatoes gulp water during fruiting, while herbs prefer sips. Customize zones if growing multiple crops. Pair this flexibility with the best way to water raised beds for precision hydration.
Spring seedlings need gentle misting, not deep soaks. Transition to longer drinks as roots mature. Come fall, reduce frequency as growth slows. Your schedule should breathe with the seasons, not fight them.
Track local forecasts and adjust timers accordingly. A 90°F week demands 30% more hydration than mild 70s. Install rain sensors to pause irrigation during storms. Smart tweaks prevent swampy soil or thirsty plants.
Maintaining and Troubleshooting Your Raised Bed System
Keep your setup thriving with simple yet effective care habits. A well-maintained system rewards you with vibrant growth and fewer surprises. Let’s explore how quick checks and smart adjustments can prevent major headaches down the line.
Practical Tips for Routine Checks
Inspect drip lines weekly for mineral buildup or cracks. A push pin works wonders for clearing clogged holes—just poke gently to restore flow. This takes seconds but keeps your watering system running smoothly.
Track plant health in a journal. Yellowing leaves or stunted growth often signal uneven moisture. If issues arise, troubleshooting common issues becomes easier with dated notes.
Empty and scrub the reservoir monthly to prevent algae. Use a soft brush to avoid damaging liners. Replace 30% of the soil mix each season to refresh nutrients—your plants will show their gratitude with lush foliage.
Test overflow pipes after heavy rain. Make sure excess water exits quickly to avoid root rot. A five-minute check today saves hours fixing soggy beds tomorrow.