
Growing fresh ingredients at home brings joy to your table and pride to your efforts. To succeed, focus on two essentials: sunlight access and smart design. Most edible plants thrive with 6-8 hours of daily light—position your growing area where shadows don’t linger too long.
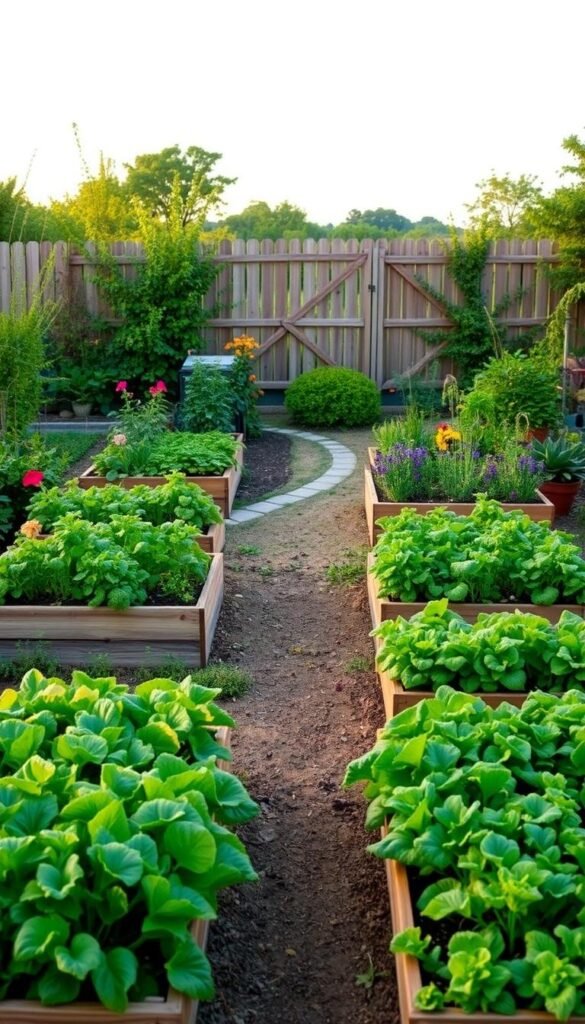
A thoughtful plan turns limited ground into a productive paradise. Whether you prefer classic dirt beds or modern raised setups, the right strategy helps every seed reach its potential. Proper row spacing ensures roots stretch freely while leaves soak up sunshine without crowding neighbors.
Good organization prevents common headaches like thirsty plants fighting for water or tall crops shading shorter friends. Imagine tomatoes climbing upward on trellises as lettuce nestles below—this teamwork maximizes every inch. Even compact spaces can burst with flavor when you match plant sizes to your plot’s dimensions.
This guide walks you through transforming any patch of earth into a flourishing food source. You’ll discover how to arrange crops for mutual benefit and time harvests for continuous bounty. Let’s build a living pantry that keeps your kitchen stocked all season long!
Introduction to Small Vegetable Garden Layout Plans

There’s nothing quite like biting into a tomato still warm from the vine or snipping fresh basil for tonight’s dinner. But here’s the secret many new growers miss: success starts with restraint. That enthusiastic 20-foot bed you’re imagining? Let’s talk about why half that size might serve you better.
Starting modestly lets you master watering routines and pest control without drowning in chores. Think of your first season as training wheels – you’ll build confidence while learning how plants behave in your specific climate. Those four raised beds can outproduce a sprawling plot through smart crop rotation and succession planting.
Ask yourself three questions before sketching your design:
- How many minutes daily can you realistically devote to care?
- Which veggies do you actually enjoy eating?
- What’s your “win” – a salsa garden, salad fixings, or preserving extras?
This focused approach prevents overwhelm. You’ll harvest frequently enough to stay motivated while gradually expanding skills. Remember: a 4×8 foot space can yield 50+ pounds of produce with proper care. That’s enough for weekly stir-fries and fresh snacks without wasting precious time.
By aligning your plan with personal rhythms and tastes, you create a self-sustaining cycle. Each successful harvest fuels enthusiasm for next year’s additions, turning a starter project into a lifelong passion.
Planning Your Garden Space

A thriving garden begins with understanding your land’s unique personality. Let’s transform your yard’s natural features into growth opportunities rather than obstacles.
Evaluating Sunlight and Water Access
Track sunlight patterns like a detective. Spend a day noting where shadows fall every two hours. South-facing spots often get the most full sun – perfect for tomatoes craving 6-8 daily hours of direct light. Leafy greens thrive in areas with afternoon shade.
| Plant | Sunlight Needs | Suitable Locations |
|---|---|---|
| Tomatoes | 6-8 hours | Center beds, unobstructed areas |
| Lettuce | 3-5 hours | East-facing edges, near structures |
| Peppers | 6+ hours | Southern zones, raised containers |
Water access matters as much as light. Place your space within 20 feet of a hose hookup. Consider drip irrigation for consistent moisture – studies show it reduces water waste by 30% compared to sprinklers.
Measuring and Assessing Available Space
Grab a tape measure and notebook. Mark boundaries while leaving 18” walkways between beds. For layout planning, remember:
- 4×8 foot beds allow easy reach from both sides
- Vertical structures add growing area without expanding footprints
- Test soil drainage by digging 12” holes – water should disappear in 15 minutes
Match bed sizes to your available time. A 100 sq ft garden needs about 15 minutes daily care. Start modestly – you can always expand next season when confidence grows.
Creating Your Garden Blueprint on Paper

Paper planning transforms your vision into reality while dodging costly errors. Grab graph paper and colored pencils – this creative exercise helps you test ideas before breaking ground. Remember: every square equals one foot, letting you map beds and walkways accurately.
Sketching the Layout Using Graph Paper
Start by outlining your available space. Use these pro tips:
- Draw permanent structures first (fences, sheds)
- Mark compass directions to track sunlight patterns
- Color-code beds for different plant families
Leave 2-foot pathways between beds for wheelbarrow access. Curved lines add visual interest but straight edges maximize growing space. Keep this sketch handy – you’ll reference it through every season.
Determining Bed and Container Dimensions
Three-foot widths let you reach the center without stepping on soil. Popular configurations include:
- 4×8 foot rectangles (ideal for crop rotation)
- Circular herb spirals (saves space)
- Vertical planters against walls
Containers should match your plants’ root depth. Shallow 8-inch pots work for greens, while tomatoes need 12+ inches. Always note mature plant size on your plan – those cute seedlings will triple in bulk!
“Measure twice, plant once – a detailed blueprint prevents mid-season headaches.”
Choosing the Best Raised Bed Options

Turn challenging spaces into productive plots using smart raised bed solutions. These elevated systems let you grow healthier plants by improving drainage and preventing soil compression. Unlike traditional methods, raised beds warm faster in spring, giving your vegetables a head start.
Material choice impacts longevity and plant health. Consider these options:
- Cedar or redwood: Naturally rot-resistant, lasting 10+ years
- Galvanized steel: Modern look with excellent heat retention
- Composite lumber: Low-maintenance alternative to wood
Ideal dimensions balance reach and root depth. Keep beds 3-4 feet wide so you can access the center without stepping on soil. Depth matters most for root crops – 12” suits carrots, while 18” accommodates asparagus.
Proper drainage prevents waterlogged roots. Drill ½” holes every 18” in wooden beds, or layer gravel beneath soil. Pair with quality potting mix containing compost for optimal growth.
“Raised beds let you control the growing environment like a master chef seasoning a soup – every element gets measured care.”
Maximize your space with built-in features. Attach trellises for climbing beans, or install drip irrigation lines during assembly. Some designs even include tool storage shelves beneath planting areas.
These structures simplify crop rotation – just assign different plant families to each bed yearly. You’ll notice fewer pests and richer harvests as your soil quality improves season after season.
Small Vegetable Garden Layout Plans: Step-by-Step Plotting and Spacing
Perfect spacing turns green dreams into reality. Like puzzle pieces fitting together, each plant needs precise positioning to unlock its full potential. This approach transforms limited ground into a powerhouse of productivity.
Step-by-Step Spacing Guidelines
Successful growers use these measurements as their golden rules:
| Crop | Row Distance | Plant Gap |
|---|---|---|
| Tomatoes | 36″ | 24-30″ |
| Peppers | 24″ | 18″ |
| Carrots | 12″ | 2-3″ |
| Lettuce | 18″ | 8-10″ |
Create visual guides using stakes and string before planting. For vining crops like cucumbers, allow 6 feet between rows. Bush varieties need half that space. Pro tip: Interplant quick-growing radishes between slower cabbages – you’ll harvest radishes before cabbages need the room.
Avoiding Common Layout Mistakes
Three frequent errors sabotage harvests:
- Overcrowding seedlings: Those tiny starts triple in size – trust the seed packet’s spacing advice
- Ignoring height differences: Place corn north of beans to prevent shading
- Forgetting access paths: Leave 18” between beds for comfortable kneeling
Rotate crops annually using a simple numbering system. Beds that held tomatoes this year grow beans next season. This natural pest control method keeps soil nutrients balanced.
“Smart spacing is the difference between surviving and thriving – give roots room to dance and leaves space to breathe.”
Curating Your Vegetable List and Companion Planting

Your kitchen’s flavor profile begins with smart plant partnerships in the soil. Focus on crops that excite your taste buds while naturally supporting each other’s growth. This dual approach reduces maintenance and boosts yields through nature’s teamwork.
Choosing Crops That Match Your Plate
Track your weekly meals for 14 days. Notice which plants want grow sessions align with your actual consumption. If tacos dominate Tuesday nights, prioritize cilantro and jalapeños over crops you rarely use. Peppers and cucumbers often make the cut for their versatility in salads and stir-fries.
Consider these factors:
- Harvest windows matching your cooking rhythm
- Yield amounts your household can consume
- Storage options for surplus produce
Nature’s Dinner Party: Plant Partnerships
Strategic pairings create self-sustaining ecosystems. Tomatoes shield basil from harsh sun while basil repels hornworms. Try these proven combinations:
| Main Crop | Companions | Benefits |
|---|---|---|
| Tomatoes | Carrots, basil | Pest control, flavor enhancement |
| Cucumbers | Radishes, corn | Space optimization, beetle deterrence |
| Peppers | Spinach, oregano | Moisture retention, aphid prevention |
Tall plants become living trellises for climbers, while aromatic herbs mask vulnerable crops’ scents. This planting strategy creates visual harmony through contrasting leaf textures and bloom colors. You’ll spend less time battling pests and more time enjoying vibrant, healthy vegetables.
“Companion planting is like hosting a dinner party – invite guests who energize each other and keep troublemakers away.”
Incorporating Vertical Gardening and Trellises
Elevate your yield by turning empty airspace into productive real estate. Vertical structures let you grow twice as much in the same footprint while adding eye-catching design elements. Trellises transform vining crops into living walls that shield tender greens from harsh winds.
| Trellis Type | Best For | Weight Capacity |
|---|---|---|
| Livestock panels | Cucumbers, peas | 25+ lbs |
| Expandable metal | Tomatoes, tomatillos | 15 lbs |
| Wooden lattice | Beans, small squash | 10 lbs |
Top performers for vertical growth include:
- Diva cucumbers – crisp slicers that climb eagerly
- Golden Sweet peas – colorful pods perfect for small spaces
- Delicata squash – compact vines with edible skin
Secure structures deeply – bury posts 18” underground for stability. Train tendrils clockwise around supports using soft plant ties. Prune excess leaves weekly to maintain airflow and direct energy toward fruit production.
“Vertical gardening turns walls into pantries and fences into food forests – nature’s original space-saving hack.”
These living screens create microclimates for shade-loving plants below. Pair tall trellises with leafy greens to maximize your garden’s potential through layered planting. You’ll harvest cleaner produce with fewer pest issues and back strain.
Tips for Managing a Small Gardening Space
Big harvests don’t require endless square footage. Focus on smart systems that turn limitations into advantages. Two 4×8 foot beds can produce enough for weekly meals when you stack planting times and use vertical space effectively.
Interplant quick-growing radishes between slower cabbage starts. When you pull the radishes, replace them with bush beans. This succession strategy keeps soil active all season. Pair tall crops with shade-tolerant greens below – corn shelters spinach from harsh afternoon sun.
Create daily 10-minute routines. Water while coffee brews, check pests during dog walks, and harvest herbs before dinner. Weekend tasks like fertilizing or trellis adjustments take under an hour. Consistent micro-efforts prevent weekend overwhelm.
| Time Slot | High-Impact Task | Tools Needed |
|---|---|---|
| Morning | Check soil moisture | Finger (no tools!) |
| Evening | Harvest ripe produce | Kitchen scissors |
| Weekly | Feed plants | Liquid fertilizer |
Hang tools on pegboards with outlines marking their spots. Use rolling carts with trays for seed packets and gloves. Compact compost tumblers fit in corners, turning scraps into gold without odor.
“Efficiency isn’t about doing more – it’s about designing systems that work while you’re busy living.”
Drip irrigation kits with timers save hours weekly. Choose dwarf fruit varieties and microgreens for fast returns. Your concentrated care creates a powerhouse plot that rivals larger gardens in productivity.
Essential Garden Maintenance Practices
Consistent care transforms your green space into a thriving ecosystem. Like a well-tuned instrument, your plot responds best to regular rhythms that balance nourishment and protection. Let’s explore routines that keep crops vigorous from seedling to harvest.
Hydration and Nutrition Essentials
Containers dry out faster than ground soil – check them daily during heatwaves. Mix Miracle-Gro Garden Soil into beds for lasting nutrients, while potted plants thrive with their specialized potting mix. Feed every 2-3 weeks using liquid fertilizer, especially for heavy producers like peppers.
Water deeply before noon to reduce evaporation. Use drip lines or soaker hoses for efficient delivery. Morning hydration helps plants endure afternoon heat without stress.
Defending Your Green Oasis
Weeds steal resources fast. Mulch beds with straw or shredded leaves to block invaders. For pests, try these earth-friendly tactics:
• Spray aphids with soapy water
• Plant marigolds to deter beetles
• Handpick caterpillars during evening checks
Rotate crops each season to disrupt disease cycles. Healthy, well-fed plants naturally resist most threats. With these habits, you’ll spend less time battling problems and more enjoying your flourishing edible paradise.


