
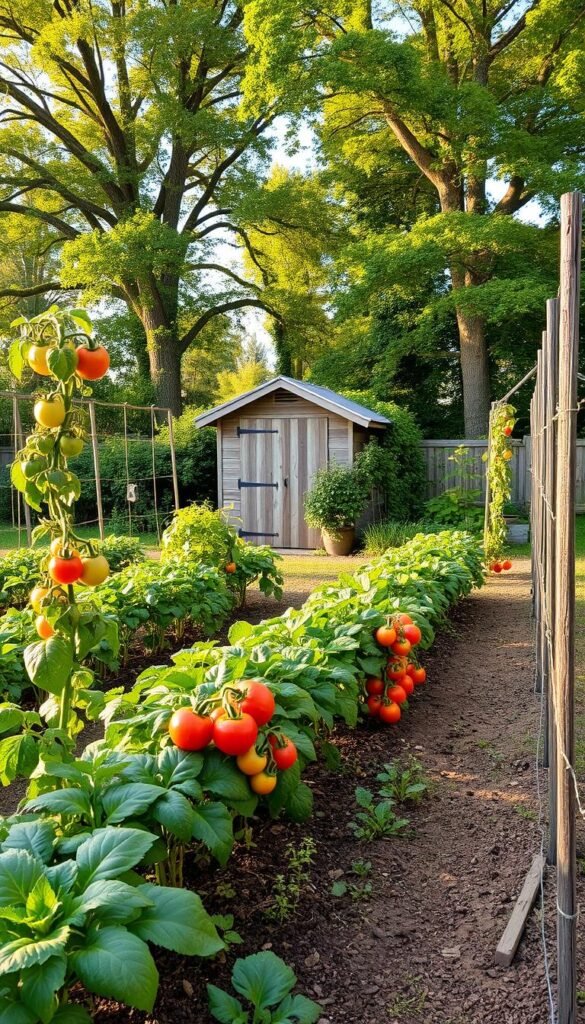
Ever dreamed of biting into a sun-warmed tomato that bursts with flavor no supermarket can match? You’re not alone. Millions are discovering the joy of growing their own food, and this beginner-friendly resource makes it simpler than you might think.
We’ll walk you through creating a productive growing space tailored to your lifestyle. Forget complex jargon or overwhelming tasks – our method focuses on practical techniques that help avoid rookie mistakes. You’ll learn how to work with nature, not against it, to cultivate plants that thrive.
Yes, digging and planning require effort. But picture this: crisp salads from your lettuce bed, aromatic herbs at your fingertips, and zucchini so fresh they practically cook themselves. These rewards make every minute spent worthwhile.
Whether you’ve got acres or just a patio corner, we’ll show you how to maximize your area. From understanding sunlight patterns to choosing plants that grow well together, you’ll gain confidence with each section. Let’s turn that patch of dirt into your personal produce aisle.
Understanding the Benefits of a Backyard Vegetable Patch
Fresh-picked greens taste brighter, last longer, and nourish better than anything from store shelves. When you cultivate plants in your space, you unlock flavors and nutrients that fade during commercial shipping. But the perks go far beyond your plate – let’s explore how this green project rewards your wallet and the planet.
More Nutrients, Fewer Grocery Bills
Plants harvested at peak ripeness pack 40% more vitamins than store versions. Spinach loses half its vitamin C within 24 hours of picking – yours goes straight from soil to salad. A $3 seed packet grows $50 worth of organic tomatoes over summer.
Herbs like basil and cilantro cost $3 per bunch at markets but thrive in small pots. You’ll always have fresh flavors for cooking without wilted plastic-waste bundles.
Earth-Friendly Harvests
Every homegrown meal cuts food miles to zero. No trucks, no plastic clamshells, no chemical runoff. Your plot becomes a mini ecosystem – bees buzz around blooming squash flowers while earthworms aerate the soil naturally.
| Benefit | Homegrown | Store-Bought |
|---|---|---|
| Vitamin C in Peppers | 128mg | 82mg |
| Cost per Pound (Tomatoes) | $0.75 | $3.50 |
| Plastic Waste per Year | 2 lbs | 28 lbs |
Gardening becomes your weekly therapy session. Digging beds burns calories, while watching seedlings grow lowers stress. Extra zucchini? Share them with neighbors – nothing builds community like fresh-picked abundance.
Assessing Your Garden Space and Location

Your growing success starts with smart observation. Before digging, become a detective in your own yard. Track how light dances across your property and notice where water lingers after storms. These clues determine which plants will thrive where.
Choosing the Perfect Spot with Adequate Sunlight
Most veggies crave sunshine like kids love ice cream. Use free apps like Sun Surveyor or simply mark shadows every two hours. South-facing areas typically get the most light. Leafy greens like spinach might tolerate some afternoon shade, but tomatoes demand their daily solar fix.
Watch for sneaky light blockers – fences, sheds, or trees that cast shadows during prime growing hours. Remember: Morning sun dries dew faster, reducing disease risk. Evening light keeps plants warm longer in cooler climates.
Managing Drainage and Soil Quality
Stick a shovel in the ground after heavy rain. If water gushes out like a squeezed sponge, you’ve got drainage issues. Raised beds solve this neatly. For in-ground plots, mix in compost or perlite to improve water flow.
Test soil texture with this trick: Grab a handful, squeeze it, then poke the lump. Sandy soil crumbles immediately. Clay holds its shape stubbornly. Ideal loam soil? It forms a loose ball that breaks apart with gentle pressure.
| Soil Type | Drainage Speed | Best Fix |
|---|---|---|
| Sandy | Too Fast | Compost + Peat Moss |
| Clay | Too Slow | Gypsum + Organic Matter |
| Loamy | Just Right | Maintain with Mulch |
Don’t fight nature completely. If part of your space stays damp, plant water-loving crops like celery there. Windy spot? Build a bean trellis as a natural windbreak while growing food.
Essential Tools and Materials for Your Garden

The right gear transforms gardening from a chore into a joy. Think of your tools as kitchen knives – quality matters more than quantity. Start with these essentials, then expand as your green thumb grows.
Building Your Toolbox
A stainless steel trowel handles planting and weeding without bending. Pair it with bypass pruners that make clean cuts on stems. For watering, choose between a classic can with a rose spout or a lightweight hose with adjustable spray settings.
Don’t overlook soil prep tools. A digging fork aerates earth better than a shovel, protecting worm tunnels. “Good tools cost less in the long run,” says a seasoned grower at GardeningRise. “They save time and prevent blisters.”
Soil Secrets and Mulch Magic
Your plants eat through their roots. Mix compost into native soil like stirring chocolate into batter – evenly and thoroughly. Test your blend: it should crumble like coffee grounds when squeezed.
Mulch acts as both blanket and buffet table. Try these options:
- Straw keeps strawberries clean
- Grass clippings feed nitrogen-hungry corn
- Shredded leaves suppress weeds in flower beds
| Investment | Short-Term Benefit | Long-Term Gain |
|---|---|---|
| Compost Bin | Free fertilizer | Soil structure improvement |
| Weatherproof Storage | Tool protection | 5+ year lifespan extension |
Track your progress with plant markers and a notebook. Jot down which tomato variety thrived or when squash bugs appeared. These notes become your personal gardening playbook.
Preparing Your Garden Area with a No-Dig Approach

Unlock the secret to healthier soil by letting nature do the heavy lifting. The no-dig method protects delicate underground networks of fungi and microbes that help your plants thrive. Unlike traditional tilling, which disrupts these systems, this approach builds fertile garden soil over time while saving your back.
Clearing Wild Plants Effectively
Start by removing existing weeds without turning the earth. Use a sharp hoe to slice plants at the surface, leaving their roots to decompose naturally. For stubborn invaders like dandelions, grip the base and twist gently to extract the entire taproot. Missed a piece? They’ll regrow – patience pays off here.
Heavy weed growth? Lay cardboard over the area and weigh it down with mulch. This blocks sunlight, starving unwanted plants while creating a nutrient-rich bed. As the cardboard breaks down, earthworms mix organic matter into the soil below. It’s like composting in place!
Timing matters most. Begin clearing 6-8 weeks before planting to ensure weeds surrender completely. Turn pulled greens into compost – their nutrients will circle back to feed future crops. For more on balancing no-dig and traditional methods, explore our detailed comparisons.
Step-by-Step Guide to Starting a Backyard Vegetable Patch

Transforming your garden starts beneath the surface. How you prepare the earth determines whether your plants merely survive or truly thrive. Let’s explore techniques that boost fertility while keeping beneficial organisms happy.
Clearing and Loosening the Soil
Grab a digging fork – not a shovel – to preserve underground ecosystems. Push the tool into compacted earth at 45-degree angles, rocking gently to create air pockets. This method lets roots dive deep while protecting worms and fungi.
Work in small sections, loosening soil to about 12 inches deep. If you hit resistance, add compost to improve texture. Avoid turning the entire bed upside down. Nature builds soil layers over time, and disrupting them slows plant growth.
Utilizing Sheet Mulching for Better Soil Health
Sheet mulching mimics forest floors where fallen leaves feed the earth. Start with cardboard to smother weeds, then alternate green and brown materials like lasagna layers. A well-built stack decomposes into rich humus within months.
Try this winning combination:
| Layer | Material | Purpose |
|---|---|---|
| Base | Cardboard | Weed barrier |
| Second | Grass clippings | Nitrogen boost |
| Third | Shredded leaves | Carbon source |
| Top | Compost | Planting medium |
Water each layer as you build. The stack shrinks dramatically as materials break down. By spring, you’ll have crumbly, nutrient-packed soil ready for seeds. This garden hack reduces watering needs and weeds by up to 70% compared to bare earth.
Designing Your Raised Beds and Garden Layout

Smart design turns gardening chores into effortless joys. The right layout helps you harvest tomatoes without doing yoga stretches and keeps tools within arm’s reach. Let’s create spaces that work with your body, not against it.
Planning Paths and Access Points
Start with 4×4-foot raised beds – big enough for 16 tomato plants, small enough to reach every weed. Need more space? Expand to 4×8-foot beds while keeping the same accessible width. Pro tip: “Your elbow-to-fingertip length determines ideal bed width,” notes a raised bed construction guide.
Pathways deserve as much attention as planting areas. Allow 18-24 inches between beds for comfortable kneeling and wheelbarrow turns. These materials keep paths functional:
- Wood chips suppress weeds while decomposing into soil food
- Pea gravel drains quickly after rainstorms
- Stepping stones create visual flow between beds
Face beds north-south for even sun distribution. Leave 3-foot clearance at each end for turning with full harvest baskets. Smart planning today means easier expansion tomorrow – leave space for future beds behind your current setup.
Selecting the Right Vegetables and Companion Plants
What if your first harvest could be both abundant and stress-free? Focus on vegetables that forgive rookie errors while delivering satisfying yields. The secret lies in pairing sturdy crops with natural pest-fighting allies.
Choosing Easy Vegetables for Beginners
Start with quick-growing radishes (21 days!) and leafy greens like spinach. These give fast wins while slower crops establish. Bush beans thrive in most soils and produce heavily. For transplants, cherry tomatoes and peppers adapt well to containers or garden beds.
Incorporating Herbs and Companion Planting Strategies
Basil planted near tomatoes boosts flavor while repelling flies. Marigolds scattered among beans deter beetles naturally. Avoid pairing onions with peas – they stunt each other’s growth. Rosemary’s strong scent confuses carrot-loving pests.
Grow what you’ll actually eat. Three zucchini plants might overwhelm a small family, while rainbow chard adds color to meals all season. Track successes in a journal – next year’s garden will thank you!


