
Looking for a fresh way to grow your own food? Raised garden beds made from repurposed containers offer a modern twist on traditional planting. These setups combine practicality with style, making them perfect for small spaces or tricky soil conditions.
Why choose this method? It’s simple. The height keeps pests away, and there’s no need for complex construction. Plus, it’s a great way to start if you’re new to growing your own herbs or veggies. Even in areas with heavy clay soil, like Colorado, this approach works well.
Whether you want to save on groceries or just enjoy fresh produce, this project fits the bill. It’s not about total self-sufficiency—it’s about learning and having fun. And yes, it looks as good as it functions!
Ready to dive in? Let’s explore how to create a space-efficient, eye-catching setup that’s both beginner-friendly and rewarding.
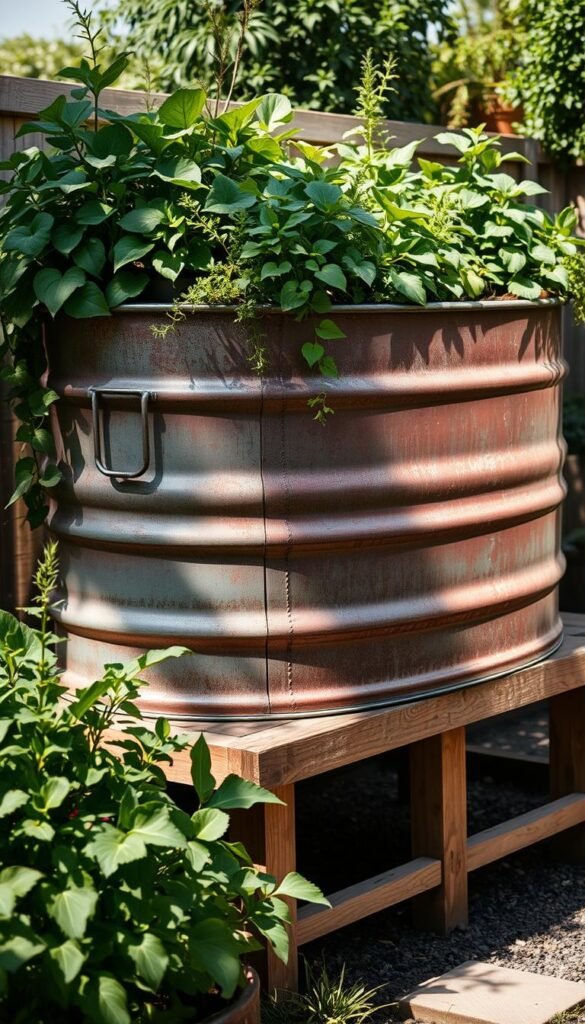
Why Choose a Stock Tank for Your Raised Garden Bed?

Ever struggled with pests ruining your plants? A stock tank solves that. Its 24-inch walls keep rabbits and squirrels out—no extra fencing needed. Plus, it’s ready to use right away, unlike wooden setups that require building.
Benefits of Stock Tank Gardening
These containers are tough. Made of galvanized metal, they handle rain, snow, and sun better than wood. No rotting or warping! You can even paint them to match your patio or pool area.
- No construction: Fill with soil and start planting.
- Easy to move: Relocate if your yard layout changes.
- More root space: Deeper than vertical gardens for healthier veggies.
Ideal for Small Spaces and Urban Gardens
Short on space? The oval shape fits neatly on decks or patios. Over 35% of U.S. households grow food at home, and this method maximizes every inch.
| Feature | Metal Stock Tank | Wooden Raised Beds |
|---|---|---|
| Durability | Lasts 10+ years | 3–5 years (may rot) |
| Pest Resistance | High (24″ walls) | Low (needs fencing) |
| Setup Time | Instant | Hours of building |
Pro tip: Pair with drip irrigation for even easier care. Next, we’ll cover the materials you’ll need.
Gathering Your Materials

Before planting, you’ll need a few key items to set up your garden. Having everything ready ensures a smooth process, whether you’re a beginner or a seasoned grower. Let’s break down the essentials and where to find them without overspending.
Essential Tools and Supplies
Start with a basic toolkit: a drill (½-inch bit for drainage), landscape fabric, and exterior paint like Behr Ultra for durability. Don’t forget safety gear—gloves and goggles protect you during prep work.
Pro tip: Use recycled organic matter (shredded leaves or coconut coir) as a base layer to cut costs. Here’s a quick checklist:
- Soil mix: Combine peat moss, compost, and perlite for drainage.
- Drainage aid: River rocks or mesh for holes.
- Irrigation: A hose splitter works if drip systems aren’t in your budget.
Where to Find Affordable Stock Tanks
Farm stores like Tractor Supply Co. often offer the best prices. Online marketplaces, such as Facebook Marketplace, are great for lightly used tanks. Always inspect in person—nested tanks can vary in size.
| Source | Price Range | Pros |
|---|---|---|
| Farm Stores | $80–$150 | New, consistent sizing |
| Online Marketplaces | $30–$90 | Budget-friendly, local pickup |
For more budget-friendly tips, explore our guide on stock tank gardening. Next, we’ll prep your container for planting!
Prepping Your Stock Tank

Proper prep work ensures your plants thrive from day one. A clean, residue-free surface helps paint adhere better and prevents rust. Here’s how to tackle it like a pro—without harsh chemicals.
Cleaning and Prepping the Surface
Start with a vinegar solution (1:1 with water) to break down the galvanized coating. Scrub gently with a soft brush—no steel wool! *Pro mistake:* Avoid pressure washers; they dent the metal.
For stubborn grime, try a citrus-based cleaner. It’s eco-friendly and cuts through grease. Always wear gloves to protect your hands during this diy step.
Removing Labels and Residue
Peeling labels? Use a heat gun or hairdryer to loosen adhesive. Wipe off sticky bits with rubbing alcohol and a toothbrush. *Tool hack:* A plastic scraper saves the metal from scratches.
Let the tank dry completely in warm weather. Check for chalky residue—it means the surface is ready for paint. Now your garden bed will look as good as it performs!
Painting Your Stock Tank for a Stylish Look

Want to add personality to your garden? A fresh coat of paint transforms a plain container into a standout feature. It’s not just about looks—proper painting protects the metal and extends its lifespan.
Choosing the Right Paint
Not all paints stick to galvanized surfaces. Oil-based or acrylic formulas designed for metal work best. Behr Ultra, used in a recent pool project, lasted three seasons without chipping.
Dark colors like matte black make plants pop. Light shades reflect heat—ideal for hot climates. Consider these factors:
- Durability: High-gloss finishes resist weathering better.
- Safety: Non-toxic, water-based options suit edible plants.
- Coverage: One gallon covers ~15 sq ft.
Step-by-Step Painting Process
Start with a clean, dry surface. Use a foam roller for smooth coverage—brushes leave streaks. Apply thin coats, waiting two hours between layers.
Pro tip: Skip the top edge to prevent wear from soil contact. Here’s a quick comparison of tools:
| Tool | Best For | Drying Time |
|---|---|---|
| Sprayer | Large areas | Fast (30 mins) |
| Foam Roller | Smooth finish | Medium (2 hours) |
| Brush | Edges/details | Slow (4 hours) |
For creative flair, try stencils or geometric patterns. Keep leftover paint for touch-ups. Now your diy project is ready for the spotlight!
Creating Drainage Holes for Healthy Plants

Proper drainage keeps plants healthy and prevents root rot—here’s how to get it right. Without enough holes, water pools at the bottom, drowning roots. A few simple steps ensure your garden thrives.
How Many Holes Do You Need?
Aim for one drainage hole per 2 square feet. For a standard 6-foot tank, 8–10 holes work well. Space them evenly, but cluster a few near the center where water collects.
Pro tip: Remove the factory plug—it blocks airflow. Test drainage by pouring water into the empty tank. If it pools, add more holes.
Drilling Tips and Tricks
Use a carbide-tipped drill bit for metal. A ½-inch bit balances drainage and soil retention. Smaller holes clog; larger ones let soil escape.
- Safety first: Wear goggles and gloves to protect from metal shavings.
- Battery backup: Keep two charged batteries handy—galvanized metal drains power fast.
- Avoid ribs: Drilling into structural supports weakens the tank.
| Hole Size | Pros | Cons |
|---|---|---|
| ½-inch | Prevents soil loss | Requires slower drilling |
| ¼-inch | Faster to drill | Clogs easily |
File sharp edges after drilling to prevent rust. No drill? A hammer and nail work for small tanks, but holes will be less precise.
Setting Up Irrigation (Optional but Highly Recommended)
Want to save time while keeping plants hydrated? A drip line system does the work for you. It delivers water directly to roots, reducing waste and boosting growth. Even better, you’ll spend less time hauling hoses.
Types of Drip Irrigation Systems
Choose between soaker hoses or emitter systems. Soakers seep water along their length—ideal for rows of veggies. Emitters target specific plants, like tomatoes or herbs.
Pro tip: Pair with a timer for 20-minute cycles in dry climates. The Orbit micro tubing kit ($25) is a top pick for adjustable flow.
| Type | Best For | Cost |
|---|---|---|
| Soaker Hose | Dense plantings | $15–$30 |
| Emitter System | Individual plants | $20–$50 |
Connecting to a Water Source
Repurpose a drainage hole for the supply line—no extra drilling needed. Use brass splitters (they outlast plastic) to divide hoses. Add a pressure regulator for steady flow.
- DIY hack: Upside-down wine bottles make slow-release spikes.
- Winter care: Blow out lines before frost to prevent cracks.
- Maintenance: Check filters monthly for clogs.
With the right setup, your garden thrives with minimal effort. Next, we’ll layer the base for perfect drainage.
Layering the Bottom for Optimal Drainage
The foundation of a thriving garden starts with proper drainage. A well-built base prevents soggy roots while delivering nutrients where plants need them most. Follow these steps to create the perfect environment for growth.
Start with the Right Rocks
1-2 inch river rocks work best for the bottom layer. They create air pockets that help water flow through. Avoid pea gravel—its small size clogs easily and reduces drainage efficiency.
Pro tip: Broken terracotta pots make a lightweight alternative. Just ensure pieces are at least 1 inch wide.
Landscape Fabric Essentials
Place a weed barrier fabric over the rocks. This crucial middle layer keeps soil from washing down while letting water pass through. Heavy-duty polypropylene lasts 5+ years outdoors.
| Material | Function | Lifespan |
|---|---|---|
| River Rocks | Drainage base | Permanent |
| Landscape Fabric | Soil separator | 5–7 years |
Nutrient-Rich Organic Layer
Top the fabric with 4 inches of organic matter. Shredded leaves break down in 6 months, while straw takes 12 months. Never use fresh grass clippings—they create mold hotspots.
- Best options: Compost (ready immediately), coconut coir (retains moisture)
- Ratio: 30% organic material to 70% soil
- Weight note: Rocks add ~50 lbs—position your container first
This three-part system—rocks, fabric, and organic materials—creates the ideal bottom structure. Your plants will reward you with stronger roots and better yields.
Filling Your Stock Tank with Soil
Healthy plants start with nutrient-rich, well-balanced soil. The right blend ensures roots get oxygen, water, and food. Skip bagged mixes—customizing your own saves money and boosts growth.
The Perfect Soil Mix for Vegetables
A 40-30-20-10 ratio works best for most veggies:
- 40% topsoil: Provides structure and minerals.
- 30% compost: Adds nutrients and microbes.
- 20% peat moss: Retains moisture.
- 10% amendments: Perlite aerates; worm castings fertilize.
Pro tip: Test pH (6.0–7.0 is ideal). Municipal compost programs cut costs by 50%.
How Much Soil Do You Need?
Calculate volume based on your container’s size. Leave 4 inches of headspace for mulch and watering.
| Container Size | Soil Needed (Cubic Feet) | Cost (Bulk vs. Bagged) |
|---|---|---|
| 6′ oval | 30 | $45 vs. $90 |
| 4′ round | 15 | $22 vs. $45 |
Mix on a tarp for easy blending. Add bone meal for root crops like carrots. Lightweight? Swap peat for coconut coir.
Choosing the Right Plants for Your Garden
Ready to pick the perfect plants for your setup? The right selections boost yields and minimize space challenges. Focus on varieties that love the depth and drainage of a raised bed.
Top Vegetables for Productive Harvests
Peppers and tomatoes thrive in these conditions. Bush beans add quick yields, while cucumbers climb trellises to save area. Here’s what to prioritize:
- Peppers: Plant 18 inches apart for airflow.
- Tomatoes: Pair with basil to deter pests naturally.
- Bush beans: Sow every 2 weeks for continuous harvests.
Smart Spacing and Companion Pairs
Interplant radishes between slower growers like zucchini. They’ll mature before crowding occurs. Avoid mint—it spreads aggressively and chokes neighbors.
| Plant | Sun Needs | Kid-Friendly Pick |
|---|---|---|
| Cherry tomatoes | 6+ hours | Yes (sweet, easy to pick) |
| Lettuce | 4–6 hours | Yes (fast-growing) |
Pro tip: After spring peas fade, replant the area with heat-loving okra. This “succession planting” doubles your output.
Planting Your Garden
Your plants’ long-term health depends on how you introduce them to their new home. Gentle handling and proper timing reduce stress, helping roots establish quickly. Follow these methods to create a smooth transition from nursery pots to your prepared bed.
Transplanting Without Trauma
Always arrange potted greenery in their planned positions before digging. This rehearsal ensures proper spacing for mature growth. When removing from containers, massage tightly wound roots to encourage outward expansion.
Match the original soil level when placing in the ground. Burying stems too deep invites rot, while shallow planting exposes roots. Add half-strength liquid fertilizer during the initial soak—about 1 gallon per plant.
Critical step: Acclimate seedlings over seven days. Start with 2 hours of morning sun, increasing daily until they tolerate full exposure. Use 30% shade cloth during peak afternoon heat for the first week.
Establishing Optimal Moisture
Consistent watering prevents shock during the critical post-planting phase. Drip systems deliver moisture directly to roots without wetting leaves. Compare these approaches for different needs:
| Method | Frequency | Best For |
|---|---|---|
| Drip irrigation | 20 mins daily | Busy gardeners |
| Hand watering | When topsoil dries | New plantings |
Mulch with straw to retain moisture and regulate soil temperature. In cooler climates, Wall O’ Water protectors extend the growing season. Always label varieties with weatherproof markers for easy identification.
Maintaining Your Stock Tank Garden
Keeping your plants thriving requires consistent attention and smart strategies. The right way to care for your setup saves time while boosting yields. From daily checks to seasonal adjustments, these methods keep problems small and harvests abundant.
Essential Care Routine
Morning inspections catch issues early. Look for wilted leaves or chewed edges—early signs of trouble. Pro tip: Use your phone to photograph changes over days.
Follow this weekly schedule:
- Monday: Prune tomato suckers for better fruit
- Wednesday: Apply fish emulsion fertilizer
- Friday: Harvest zucchini at 6-8 inches
Organic Pest Solutions
Peppermint and cayenne spray deters rabbits naturally. For persistent pests, try this garlic recipe:
- Blend 2 garlic bulbs with 1 quart water
- Strain and add 1 tsp cayenne
- Spray leaves every 3 days
Compare these options for common issues:
| Problem | Natural Fix | Commercial Option |
|---|---|---|
| Aphids | Ladybug release | Bonide Insecticidal Soap |
| Fungal spots | Baking soda spray | Copper fungicide |
Post-harvest care matters too. Clean tools after each use to prevent disease spread. With these habits, your garden stays productive all season.
Additional Tips for Success
Whether you’re battling drought or humidity, smart tactics make all the difference. Tailor your approach to local conditions, and you’ll see healthier plants with less effort. Here’s how to refine your routine for maximum results.
Watering Strategies for Different Climates
In arid zones like Colorado, daily watering is a must. Pair drip irrigation with 3 inches of mulch to lock in moisture. *Pro tip:* Bury olla pots—clay vessels that slowly release water—to cut time spent watering by half.
Humid regions face opposite challenges. Use raised bed covers during heavy rains to prevent soggy soil. Water in early morning to reduce fungal risks. Compare these methods:
| Climate | Solution | Tool |
|---|---|---|
| Arid | Deep watering + mulch | Drip system + straw |
| Humid | Morning watering + covers | UV-resistant tarp |
Maximizing Space with Vertical Gardening
Short on room? Go upward. Cattle panel arches support climbing beans or cucumbers, doubling your yield. For herbs, try hanging pockets made from recycled fabric.
- Trellis designs: A-frame structures save space while adding visual appeal.
- Shade solutions: Drape 40% UV cloth over vertical setups to protect delicate greens.
- Pollinator boost: Plant nasturtiums at the base to attract bees.
Rotate crops annually to prevent soil fatigue. Cold frames extend the season, while border flowers like marigolds deter pests naturally. With these tweaks, your garden thrives effortlessly.
Enjoy Your Stylish and Productive Stock Tank Garden
Your diy project is now ready to thrive! This raised bed offers endless possibilities—from fresh salsa ingredients to fragrant herbs. Share your progress on Instagram using #GardenSuccess to inspire others.
Track growth with weekly photos. Celebrate first harvests with homemade salsa using those jalapeños. Join local plant swaps to exchange tips and cuttings with fellow gardeners.
When winter comes, amend the soil with compost for next year’s bounty. Consider adding a companion herb container for mint or basil. One gardener reported 50+ jalapeños in their first season!
Need help? Drop questions in the comments. Spruce up your garden with seasonal decor—pumpkins in fall, twinkle lights in winter. For more ideas, explore our fire pit tutorial to create a cozy outdoor space.
Remember: Every plant started small. Your patience will bloom into delicious rewards. Happy growing!


