
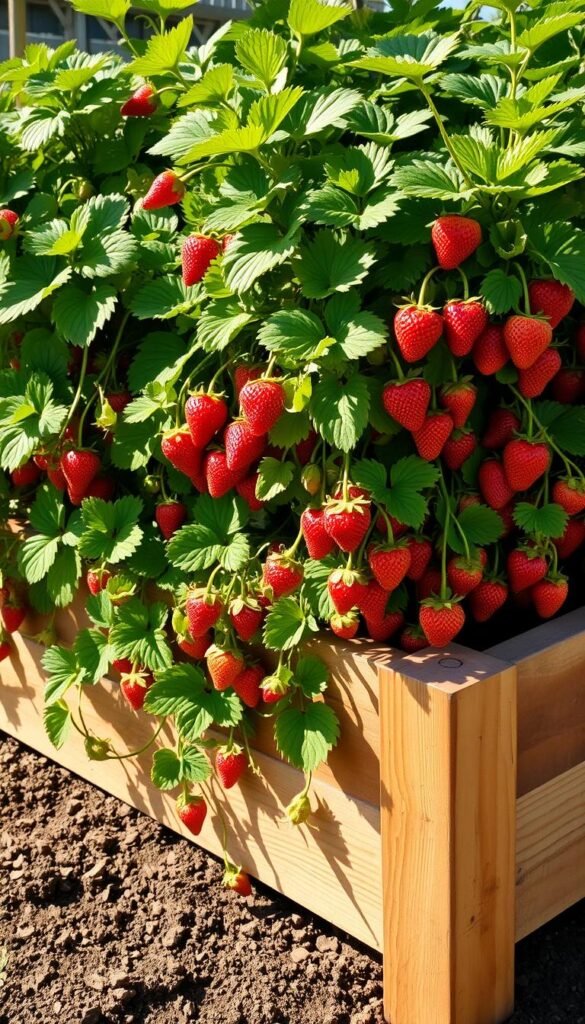
Imagine stepping outside to pick sun-warmed fruit bursting with flavor—no bending or kneeling required. Elevated planters let you nurture vibrant crops while keeping your posture comfortable. These setups aren’t just ergonomic; they create ideal conditions for sweet, plump harvests that outshine grocery-store varieties.
Why choose this method? The soil in raised beds warms faster in spring, giving plants a head start. Better drainage prevents waterlogged roots, and you can customize the growing medium for healthier plants. Plus, keeping slugs and weeds at bay becomes simpler when your crops sit higher off the ground.
Many gardeners notice their homegrown berries taste richer and sweeter. That’s because freshly picked fruit retains nutrients often lost during commercial shipping. You’ll also enjoy longer harvest seasons by selecting everbearing or day-neutral varieties suited to your climate.
Whether you’re new to gardening or refining your skills, this approach simplifies maintenance. No more sore muscles from weeding low-to-the-ground patches! We’ll guide you through designing a productive setup that fits your space and delivers consistent yields season after season.
Introduction to Raised Bed Gardening for Strawberries

Gardening enthusiasts are discovering how elevated planters transform fruit cultivation. These structures offer precise control over growing conditions, making them particularly effective for delicate crops that demand careful attention.
Why Elevated Planters Boost Berry Success
The secret lies in the design. Elevated setups let you craft custom soil blends that traditional gardens can’t match. Unlike compacted earth, loose mixtures let roots breathe while maintaining perfect moisture levels.
Water management becomes simpler too. Excess rainfall drains quickly through the porous soil, preventing root rot. You’ll spend less time battling soggy patches and more time enjoying plump harvests.
| Feature | Traditional Gardening | Raised Planter Advantage |
|---|---|---|
| Drainage | Variable, depends on ground | Consistent flow |
| Soil Control | Limited modification | Full customization |
| Weed Management | Frequent maintenance | Natural suppression |
| Pest Control | Ground-level access | Elevated barriers |
| Aesthetics | Functional layout | Design flexibility |
Maintenance becomes a breeze with contained growth spaces. Runaway stems stay manageable, and you’ll spot pests before they become problems. Early spring warmth gives plants a productive head start, while winter protection extends their lifespan.
Beyond practicality, these planters add visual charm to outdoor spaces. Neat rows of vibrant greenery create living decor that’s as pleasing to the eye as it is productive.
Planning Your Perfect Raised Garden Bed

Creating a thriving home for your favorite fruits begins with smart design choices. Two factors make all the difference: selecting safe materials and planning an accessible layout. Let’s break down how to balance functionality with plant health.
Selecting Safe, Durable Materials for Your Bed
Your planter’s construction directly impacts fruit quality. Untreated cedar resists rot naturally, while brick or stone offers lasting stability. Galvanized metal troughs work well for modern spaces but avoid older models that might contain lead.
“The right materials protect both plants and people,” notes urban horticulturist Lisa Porter. “Non-porous surfaces prevent chemical transfer into your food source.”
| Material Type | Safe Options | Avoid These |
|---|---|---|
| Wood | Cedar, redwood | Pressure-treated lumber |
| Metal | Galvanized steel | Old watering cans |
| Masonry | Concrete pavers | Painted cinder blocks |
Determining Ideal Dimensions and Layout
Keep planters narrow enough for easy reach—3 feet wide lets you tend to center plants without strain. A 4×8 foot setup accommodates 16-20 fruit producers when spaced 12 inches apart. Depth matters too: 12-inch sides allow proper root spread.
Consider sun patterns when positioning your setup. Most fruit-bearing varieties need 6-8 hours of direct light daily. For those building their first planter, our step-by-step construction guide simplifies the process.
Optimizing Soil, Organic Matter, and Fertilization

Healthy plants start from the ground up—literally. Your fruit-bearing champions need a carefully crafted foundation to thrive. Let’s explore how to build living soil that delivers both nourishment and structure.
Crafting the Perfect Growing Medium
Aim for soil that feels crumbly yet holds shape when squeezed. Mix equal parts sandy loam and quality compost to achieve this balance. Test acidity with a $10 kit from your garden center—ideal pH levels range from 5.5 to 6.8.
| Component | Purpose | Best Options |
|---|---|---|
| Base | Structure | Sandy loam, coco coir |
| Amendments | Drainage | Perlite, chipped bark |
| Nutrition | Nutrients | Worm castings, bat guano |
| Acidity | pH Control | Peat moss, pine needles |
Feeding Your Fruit Producers
Enrich your mix with decomposed manure before planting. Top-dress monthly with balanced strawberry fertilizer—1 pound of 10-10-10 blend per 100 square feet. “Organic matter acts like a multivitamin for soil,” explains grower Mia Torres. “It feeds microbes that protect roots naturally.”
Mulch with straw to lock in moisture and suppress weeds. Refresh compost each spring to maintain nutrient levels. Watch for brighter leaves and plumper fruit—these signal your soil strategy works.
Strawberry Raised Garden Bed: Grow Juicy Berries at Waist-Level Comfort

Your local climate plays a crucial role in berry success. Matching plant types to your region’s weather patterns ensures vigorous growth and abundant yields. Let’s explore how to pair varieties with your environment while optimizing their arrangement.
Choosing the Best Strawberry Varieties for Your Climate
Three main categories thrive in different conditions. June-bearing types deliver one large crop—ideal for preserves. Everbearing options produce 2-4 harvests, perfect for steady snacking. Day-neutral varieties yield continuously but need frequent runner pruning.
| Type | Harvest Pattern | Best Use | Maintenance |
|---|---|---|---|
| June-Bearing | Single large flush | Preserves | Low |
| Everbearing | Multiple crops | Fresh eating | Moderate |
| Day-Neutral | Continuous yield | Daily supply | High |
Top performers include disease-resistant ‘Albion’ and adaptable ‘Seascape’. For cooler regions, ‘Quinault’ handles damp springs well. Those in warmer zones love ‘Ozark Beauty’ for its heat tolerance.
Perfect Spacing and Planting Techniques
Give each plant 8-10 inches of breathing room. This prevents overcrowding and reduces disease risk. In a square-foot gardening layout, allocate one square per crown.
Plant crowns at soil level—buried roots prevent drying, while exposed stems avoid rot. Mulch lightly around new plants to retain moisture. Come spring, you’ll see healthier leaves and earlier blossoms.
Watering and Irrigation Best Practices

Proper hydration transforms your fruit patch from surviving to thriving. The right approach keeps roots happy while shielding your crop from common threats. Let’s dive into methods that deliver precise moisture without inviting trouble.
Why Drip Systems Outperform Alternatives
Targeted watering saves effort and resources. Drip lines snake through your planter, releasing water slowly where it matters most—the root zone. This prevents leaf dampness that often leads to mildew or rot.
| Feature | Drip Irrigation | Overhead Sprinklers |
|---|---|---|
| Disease Risk | Low (dry foliage) | High (wet leaves) |
| Water Efficiency | 90% absorption | 60% evaporation |
| Weed Growth | Minimal | Encouraged |
| Bed Longevity | Preserves materials | Promotes rot |
The Hidden Dangers of Spray Watering
Those rotating sprinklers might seem convenient, but they’re trouble in disguise. Moisture clinging to leaves creates perfect conditions for fungal infections. Excess spray also soaks bed walls, speeding wood decay.
“Sprinklers waste 40% more water while harming plants and structures,” warns irrigation specialist Dan Vogel. “Drip systems pay for themselves in one season through healthier crops and lower bills.”
Pair your tubing with a smart watering timer for effortless care. Bury lines under straw mulch to maintain even soil dampness. Check moisture weekly—your plants drink more during flowering and fruiting phases.
Managing Pests, Diseases, and Weeds
Protecting your fruit-bearing plants requires vigilance and smart tactics. Unwanted visitors and overgrowth can quickly undermine your hard work. Let’s explore simple strategies to maintain thriving crops.
Smart Pruning and Proactive Care
Trim runners weekly using clean shears. These energy-draining stems divert resources from fruit production. Focused plants yield plumper, sweeter results with fewer pest hideouts.
Inspect leaves regularly for discoloration or spots. Remove affected foliage immediately to prevent disease spread. A mix of baking soda and water (1 tbsp per quart) makes an effective fungal spray.
Apply mulch around plants to suppress weeds and retain moisture. This barrier reduces slug access while keeping fruits clean. Refresh the layer every 6-8 weeks for optimal protection.
Rotate companion plants like garlic or marigolds to repel common pests naturally. For stubborn infestations, neem oil treatments tackle aphids and mites without harsh chemicals. Healthy soil and proper spacing create resilient plants that resist most threats.


