
Discover how unused planters hiding in your garage or basement can become portals to enchanting miniature worlds. With a little creativity, those dusty containers transform into stage sets for tiny forests, cozy cottages, or mystical hideaways where every detail tells a story.
This rewarding project lets you reimagine ordinary objects as extraordinary landscapes. Turn chipped teacups into bubbling ponds, cracked bowls into rolling hills, or weathered buckets into secret groves. Even broken items gain new purpose when filled with mossy carpets, pebble pathways, and whimsical accents that spark joy.
You don’t need fancy supplies to start. Many upcycled household items work perfectly as bases for these living dioramas. The real magic happens when you combine thrifted finds with natural elements like twigs, stones, and petite plants that mimic full-sized scenery.
Whether crafting a tranquil retreat for fairies or building a playful village for gnomes, these miniature gardens offer endless ways to express your personality. Best of all, you’re giving forgotten materials a second chance while creating something truly unique – no sprawling yard required.
Exploring Imaginative Fairy Garden Themes

Your miniature wonderland becomes a canvas for storytelling through design. Whether crafting a mossy woodland cottage or a lakeside retreat, themes emerge when you blend natural textures with playful details.
Building Tiny Worlds That Tell Stories
Scale matters in these pint-sized landscapes. A sprig of thyme becomes a towering tree, while pebbles form winding trails to secret doors. Jeanie Merritt shares her approach:
“I redesign my wagon garden yearly – fairies love fresh layouts!”
Nature’s Treasure Hunt
Your backyard holds endless supplies. Twigs morph into benches, pinecones become flower planters, and acorn caps serve as fairy bathtubs. Jess Luna proves creativity trumps cost:
“My Bayou House used roadside wood scraps and frog figurines – it’s all about the story you build.”
Learning From Miniature Masters
Linda Roberts’ trio of gardens shows how varied styles can be. One might feature a stone cottage with lavender borders, while another boasts a mushroom-dotted gnome village. The secret? Let your materials guide the theme. Fallen bark becomes roofing shingles, while dried flowers add pops of color to tiny window boxes.
These projects thrive on experimentation. Try arranging smooth river rocks as stepping stones or using lichen-covered sticks for rustic fences. Your garden evolves as you discover new ways to combine plants, found objects, and personality.
Transforming Old Containers into Whimsical Fairy Garden Pots

Before the magic happens, you’ll need a curated collection of items to turn ordinary containers into enchanting scenes. Start by raiding your craft stash and backyard for materials that add texture and charm. The right mix of practical tools and natural finds will make your project shine.
Essential Tools for Enchantment
Your toolkit should include FolkArt Terra Cotta paint – a game-changer for giving weathered pots a rustic finish. Pair it with sponge brushes for smooth application. A hot glue gun becomes your best friend when attaching moss or tiny decorations, but don’t forget silicone finger guards to prevent burns.
| Category | Must-Haves | Nice-to-Haves |
|---|---|---|
| Painting | Textured craft paint, 2″ brush | Metallic accent colors |
| Natural Elements | Preserved moss, small twigs | Acorn caps, pinecones |
| Decor | Mini birdhouse, pebbles | Vintage buttons, broken jewelry |
Crafting Your Vision
- Clean your flower pot thoroughly and let it dry
- Apply two coats of paint, waiting 30 minutes between layers
- Arrange moss and bark pieces before gluing
- Secure larger items first, then add delicate details
Pro tip: Test layouts on scrap paper before committing. Those mismatched earrings? They make perfect fairy swings. A chipped mug becomes a cozy cottage when draped with Spanish moss. Let your imagination run wild – that’s where the real sparkle happens!
Practical Upcycling & DIY Techniques for Your Fairy Garden

Unlock the potential of ordinary household items by applying simple crafting techniques to create enchanting landscapes. With basic supplies and natural materials, you’ll turn forgotten objects into charming settings where tiny stories unfold.
Painting, Gluing, and Detailing the Containers
Start by choosing paint colors that complement your plants. A mix of sage green and slate gray creates depth when applied to wooden birdhouses. Remove existing doors or fences from thrifted structures, then widen openings using sandpaper for smoother edges.
Hot glue becomes essential when attaching moss-covered bark to roofs or securing twig railings. Create miniature tables by bonding jar lids to wooden spools – these unexpected DIY garden art pieces add personality without costing a fortune.
Incorporating Accessories and Functional Decor
Transform champagne corks into mushroom stools using light brown paint and white dots. For lasting garden walls, mix:
- 1 part Portland cement
- 2 parts play sand
- Water until pancake-batter consistency
Pour into beach toy molds overnight. Once set, these sandy blocks create rustic pathways or retaining walls. Complete your scene with pebble fire pits and acorn cap birdbaths nestled among flowering ground covers.
Remember: the best accessories blend function with fantasy. A broken teacup becomes a bubbling fountain when surrounded by blue glass shards and feathery ferns. Let your materials guide the magic!
Wrapping Up Your Enchanted Garden Journey
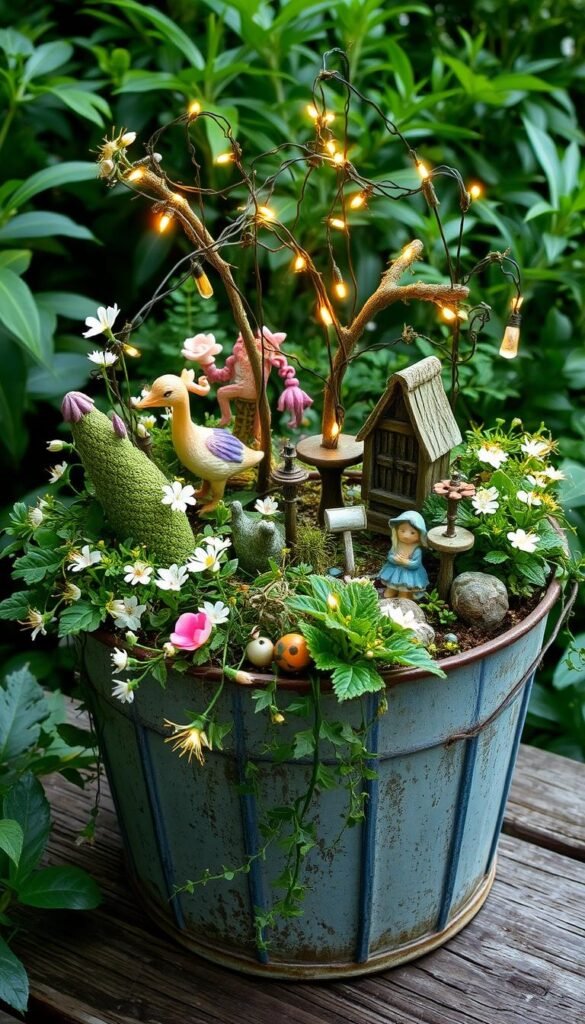
Your enchanted creation comes to life when you balance practicality with imagination. Start by mapping where your fairy house sits among sun-loving flowers like white alyssum and bacopa. These delicate-looking blooms pack surprising durability, thriving in fresh potting soil through summer’s heat.
Frame structures with sturdy sticks to anchor them against wind or rain. As ground cover spreads, empty spaces transform into lush carpets – nature’s way of polishing your design. Remember to leave room for future fairy garden ideas, like adding pebble paths or miniature lights after inspiration strikes.
This living art project grows richer with time. What begins as a container filled with plants and soil becomes a cherished retreat where creativity sparks daily joy. Whether tending blooms or rearranging tiny furniture, you’re cultivating magic one detail at a time.


