
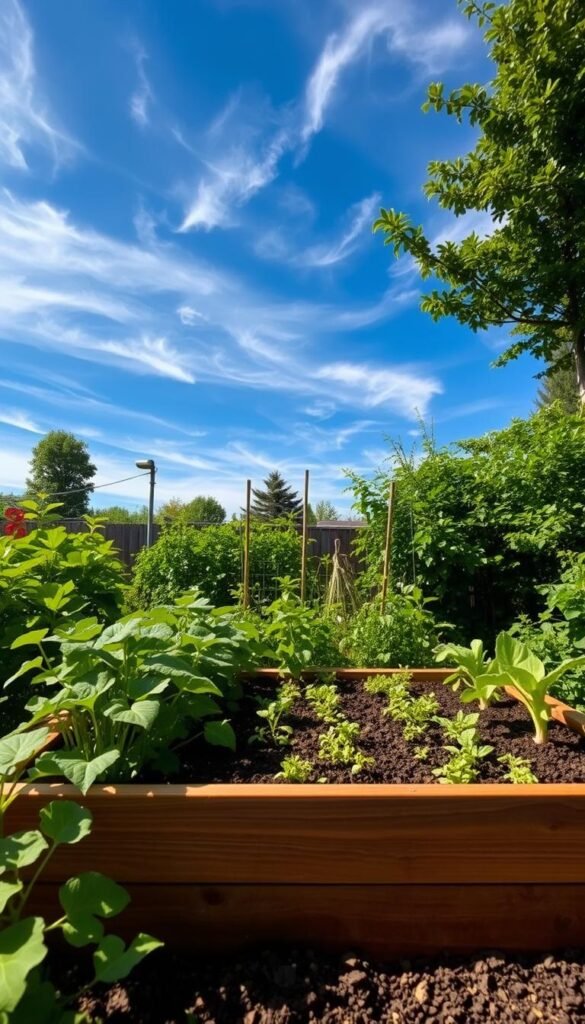
If you’ve struggled with poor soil or back-breaking weeding, raised beds offer a smarter way to grow. Unlike flat rows, these elevated plots improve drainage, reduce weeds, and make planting easier. The secret? Loose, nutrient-rich soil that helps plants thrive.
Many find their garden yields more with less effort. One study showed a 50% boost in harvests after switching. You’ll save time too—no more tilling compacted earth every spring.
Whether you’re short on space or want healthier crops, this method adapts to your needs. Start small, add organic matter, and watch your green thumb flourish.
Why Transition to Raised Bed Gardening?
Ever wondered how to grow more food in less space? Raised beds turn small plots into powerhouses. These structured gardens pack plants closer without crowding, boosting yields by 50% compared to old-school rows.
Higher Yields in Less Space
A 30-inch width is the sweet spot. You’ll reach every plant easily, and some setups even fit small tractors. Studies show raised beds produce 15 pounds of veggies per square foot—traditional methods barely hit 10.
Warmer soil means earlier planting. The elevated design absorbs sunlight faster, stretching your growing season. No more waiting for frosty ground to thaw!
Better Soil Control and Health
You’re the boss of your soil. Mix in compost for a 12-inch depth of fertile goodness. One gardener transformed silty sand into black gold by layering organic matter over three years.
Test pH levels often. Most plants thrive between 6.5 and 7.0. Adjust with lime or sulfur, and watch your garden flourish.
Planning Your Raised Bed Garden Layout

Want a garden that works smarter, not harder? Start with a strategic layout. Proper planning ensures your garden beds deliver maximum yields with minimal fuss.
Choosing the Right Dimensions
Size matters. A 4-foot width lets you reach the center without stepping in—protecting soil structure. For smaller space, 30-inch beds with 18-inch walkways work well.
Calculate depth using this formula:
Bed height = (Root depth + 6″) – Existing topsoil quality.
For tomatoes (12″ roots), aim for 18″ depth in poor soil.
| Bed Width | Ideal For | Walkway Width |
|---|---|---|
| 4′ | No-step access | 24″ |
| 30″ | Compact areas | 18″ |
Mapping Sunlight and Drainage
Track sunlight with apps like Sun Seeker or mark shadows every 2 hours. Most veggies need 6+ hours of direct light.
Slope beds 1″ per 4 feet for drainage. Rebar and mason lines help keep frames level. Avoid north-south layouts in windy spots—east-west reduces wind damage.
“A slight slope prevents waterlogging. My beds yield 20% more after fixing drainage.”
Materials for Building Raised Beds
The foundation of a thriving bed starts with smart material choices. Whether you prioritize cost, durability, or eco-friendliness, each option shapes your garden’s future. Let’s break down the pros and cons.
Wood vs. Metal vs. Composite
Wood is a classic pick, but not all types last equally. Cedar resists rot for 10–15 years but costs $35 per linear foot. Untreated pine? Budget-friendly but lasts just 3–5 years.
Galvanized steel ($22/linear ft) wins for longevity—20+ years with zero rust. Composite materials cost 40% more upfront but need no maintenance. A trade-off worth considering.
| Material | Cost (per linear ft) | Lifespan |
|---|---|---|
| Cedar wood | $35 | 10–15 years |
| Galvanized steel | $22 | 20+ years |
Budget-Friendly Upcycled Options
Pallet wood is free but requires prep. Sanitize with vinegar and remove rusty staples. Avoid railroad ties—they leak toxic creosote into soil.
Pre-2004 pressure-treated lumber contains arsenic. Stick with ACQ-treated materials, proven safe for edible gardens. One gardener’s trash becomes your raised garden treasure!
“Composite beds saved me weekends—no staining or repairs after 5 years.”
Step-by-Step Construction Guide

Ready to roll up your sleeves and build raised beds that last? Follow these steps to create a sturdy foundation for your plants. A little prep work saves time and ensures healthy roots.
Preparing the Ground
Start by clearing the ground. Remove weeds, rocks, and invasive roots. Test soil for lead if you’re repurposing urban space. Mark utility lines to avoid surprises.
Skip tilling—layer cardboard over grass instead. It smothers weeds and breaks down naturally. For a soil-saving method, try hugelkultur: stack logs and branches to fill 30% of the bed’s depth.
| Ground Prep Method | Pros | Cons |
|---|---|---|
| Cardboard Layering | No weeds, eco-friendly | Slower decomposition |
| Hugelkultur | Reduces soil needs by 40% | Requires more upfront labor |
Assembling the Frame
Choose durable materials like cedar or galvanized steel. Predrill holes in wood planks to prevent splitting. Secure corners with galvanized brackets for extra stability.
For lag screws, aim for 8–10 ft-lbs of torque. Too tight cracks the wood; too loose risks collapse. A two-person team can build raised beds fast—one holds, one drills.
“Predrilling saves hours of frustration. My 8’x4’ bed took 90 minutes flat!”
Selecting the Perfect Soil Mix
The secret to thriving plants lies beneath the surface—your soil mix makes all the difference. In raised garden beds, you control what feeds your vegetables, from drainage to nutrients. Get this right, and your roots will reward you with bumper harvests.
Mel’s Mix vs. Bulk Garden Soil
Mel’s Mix (1/3 compost, 1/3 vermiculite, 1/3 peat moss) is the gold standard. It’s light, drains well, and packs organic matter. But at $1.25 per cubic foot, costs add up fast for large beds.
Bulk topsoil-compost blends cost just $0.40 per cubic foot. A 50/50 ratio works for most vegetables. Test both options: one gardener found her tomatoes yielded 15% more with Mel’s Mix, but greens grew equally well in bulk soil.
| Soil Type | Cost per Cubic Foot | Best For |
|---|---|---|
| Mel’s Mix | $1.25 | Root crops, containers |
| Bulk blend | $0.40 | Leafy greens, large beds |
Using Compost to Supercharge Growth
Compost is your garden’s multivitamin. Mushroom compost offers high phosphorus (great for blooms), while manure-based types boost nitrogen. Layer 2 inches annually—no tilling needed.
Try compost tea for a quick nutrient boost:
- Steep 1 lb vermicompost in 5 gallons water for 48 hours
- Strain and apply to roots every 2 weeks
“Switching to compost tea saved my kale from yellowing. Now I brew a batch every planting season.”
Warning: Over-mulching smothers carrot and radish seeds. Keep it light until seedlings establish.
Planting Strategies for Raised Beds

Getting your plants in the right spots can double your harvests. Raised beds let you pack more vegetables into less space while keeping roots happy. Smart layouts and plant buddies boost growth naturally.
Dense Planting vs. Traditional Rows
Square foot gardening is a game-changer. Instead of long rows, divide your garden into 1-foot grids. This method fits 16 carrots or 9 bush beans per square—five times more than old-school planting.
Follow this spacing guide for top yields:
| Crop | Spacing | Plants per Square |
|---|---|---|
| Leafy greens | 6″ | 4 |
| Peppers | 18″ | 1 |
| Tomatoes | 24″ | 1 (with trellis) |
Vertical gardening adds even more room. Trellises let crops like cucumbers climb, freeing up ground space. One gardener grew 200% more food by adding simple A-frame supports.
Companion Planting Tips
Some plants are better neighbors than others. Basil near tomatoes keeps hornworms away. Chives confuse carrot root flies—a natural pest fix without chemicals.
Try these winning pairs:
- Tomatoes + Basil (repels pests)
- Cucumbers + Nasturtiums (deters beetles)
- Carrots + Onions (confuses root flies)
Succession planting keeps beds productive all season. After harvesting radishes, plant beans. When beans finish, grow kale in the same spot. This method gives you three harvests from one space.
“My tomato yield jumped 40% after adding basil. Now I tuck these partners into every bed.”
For more grid-based layouts, see our guide on square foot gardening. It shows how to maximize every inch.
Watering and Irrigation Solutions
Keeping your plants hydrated doesn’t have to waste time or water. Raised beds use 35% less water than traditional plots, especially with smart systems. The right approach keeps roots moist without drowning them or your schedule.
Drip Systems for Efficiency
Drip lines target roots directly, cutting waste. Pressure-compensating emitters deliver precise amounts—perfect for uneven terrain. Compare costs:
- Drip irrigation: $0.25 per square foot
- Sprinklers: $1.10 per square foot (plus runoff losses)
Smart controllers take it further. Rachio adjusts for weather, while Rain Machine syncs with soil sensors. Both slash watering time by 50%.
“Food coloring revealed three leaks in my system. Fixed them in 20 minutes—saved 200 gallons monthly!”
Mulching to Retain Moisture
Cover the surface with 3 inches of straw. This simple step reduces evaporation by 70%. Other options:
- Grass clippings: Free nitrogen boost (avoid treated lawns)
- Wood chips: Lasts all season but decomposes slowly
For passive watering, try DIY ollas. Bury unglazed terracotta pots near plants. They release water gradually as soil dries—an ancient hack for modern gardens.
Pest Control in Raised Beds

Protecting your plants from unwanted visitors is easier with smart raised beds. Unlike traditional plots, elevated designs let you install barriers and choose pest-proof materials. Start with these proactive strategies to keep your garden thriving.
Natural Barriers That Work
Staple ¼” hardware cloth to bed bottoms before adding soil. This blocks gophers and voles—no more chewed roots. For above-ground threats, row covers shield plants from moths and beetles.
Use cedar wood for frames; its oils repel termites. Pair with diatomaceous earth (food-grade) around bed edges. This powder dehydrates slugs and ants without chemicals.
Outsmarting Slugs and Burrowers
Handpick slugs after 10 PM with a UV headlamp. For passive trapping, sink beer-filled jars at soil level. They’ll drown overnight.
- Garlic spray: Blend 2 bulbs with 1 quart water. Strain and spray to deter aphids.
- Trap crops: Plant nasturtiums to lure cabbage moths away from kale.
- Owl boxes: Install within 50 feet to cut rodent populations by 60%.
“Hardware cloth saved my carrots. Zero gopher damage since installation!”
For more organic tactics, explore raised bed pest management. Companion planting with basil or mint adds extra protection.
Low-Maintenance Weed Management
Tired of spending weekends battling stubborn weeds? Raised beds cut weeding time by 60% with smart methods. The secret lies in blocking weeds before they start—saving your soil and sanity.
Cardboard Layering Technique
Cardboard smothers weeds by blocking light. Remove tape and glossy coatings first—these won’t break down. Wet the sheets before laying them flat over your bed surface. Top with 3 inches of compost to anchor them.
Compare mulch types for long-term suppression:
| Mulch Type | Weed Block Duration | Best For |
|---|---|---|
| Straw | 3–4 months | Vegetable beds |
| Wood chips | 6+ months | Pathways |
“Cardboard plus straw eliminated my weeding chores. Now I spend Sundays harvesting instead!”
No-Till Methods to Reduce Weeds
Disturbing soil brings buried weed seeds to the surface. No-till keeps them dormant. Layer compost annually—earthworms mix it naturally. Studies show this method reduces weeds by 60% in two years.
Try these tools for spot treatments:
- Flame weeding: Propane torches zap seedlings (keep 6″ from plants).
- Corn gluten meal: Apply 20 lbs per 1,000 sq ft to prevent germination.
- Stirrup hoes: Slice weeds at the roots without bending.
Healthy garden ecosystems fight weeds too. Dense planting shades the bed surface, leaving no room for invaders.
Seasonal Care for Long-Term Success

Seasons change, but your garden’s success doesn’t have to. With simple routines, you’ll keep soil fertile and plants thriving for years. Adapt your care to spring’s renewal and winter’s chill—your garden will thank you.
Spring Soil Refreshes
Start with a soil audit. A 6-point test kit checks pH, nitrogen, and more. Ideal ranges:
| Nutrient | Target Level |
|---|---|
| pH | 6.5–7.0 |
| Nitrogen | Medium–High |
Add 1″ of compost annually. Try cover crops like crimson clover (fixes nitrogen) or annual ryegrass (prevents erosion). Both protect soil between planting seasons.
“My tomato yield doubled after switching to spring soil tests. Now I adjust nutrients before planting.”
Winterizing Your Beds
Raised beds freeze faster than ground plots. Insulate with:
- Hoop houses: PVC frames + plastic sheeting (holds heat 5°F warmer).
- Cold frames: Wood/glass lids trap sunlight for winter vegetables.
Sharpen tools and oil wooden beds to prevent rot. Rotate crops every 4 years—like moving tomatoes to new spots—to stop disease buildup.
Common Mistakes to Avoid
Even experienced gardeners make these avoidable errors—don’t let them sabotage your harvest. Raised beds simplify growing, but small missteps can cost you time and yield. Here’s how to dodge the top pitfalls.
Overcrowding Plants
Packing too many plants stresses their roots. Peppers spaced 8 inches apart yield 30% more than crowded ones. Follow these spacing rules:
- Leafy greens: 6 inches apart
- Tomatoes: 24 inches (with trellis)
Square foot gardening works, but adjust for crop size. One gardener lost half her carrots by ignoring thinning.
Neglecting Soil Testing
Soil health dictates plant success. Test pH every 2 years—most plants thrive at 6.5–7.0. Use this method to correct imbalances:
| Issue | Fix |
|---|---|
| Too acidic (pH | Add lime (5 lbs per 100 sq ft) |
| Too alkaline (pH >7.5) | Mix in elemental sulfur |
“My kale stopped yellowing after I fixed the pH. Now I test religiously every spring.”
Pair tests with compost to nourish your garden long-term.
Your Thriving Raised Bed Garden Awaits
Imagine harvesting fresh vegetables just steps from your door. With raised beds, you’ll see results fast—some gardeners harvest greens in 30 days. Start small, and let success build.
Connect with local seed swaps to diversify your garden. Healthy soil and proper spacing prevent common issues like yellow leaves. A quick pH test fixes most problems.
Preserve your bounty:
- Freeze herbs in olive oil cubes
- Can tomatoes for winter sauces
Share your progress with #RaisedBedRevolution. Your plants—and plate—will thank you!


