
What if you could grow vibrant plants without expensive gear or crowded windowsills? Imagine repurposing everyday items like milk jugs into tiny protective domes that let you work with the seasons, not against them. This approach uses freezing temperatures to your advantage, creating ideal conditions for dormant sprouts.
By letting Mother Nature handle the heavy lifting, you skip indoor setups entirely. Seeds experience natural cycles just like they would in wild soil – cold snaps trigger germination when warmth returns. The best part? You’ll spend less time fussing over seedlings and more time planning your spring blooms.
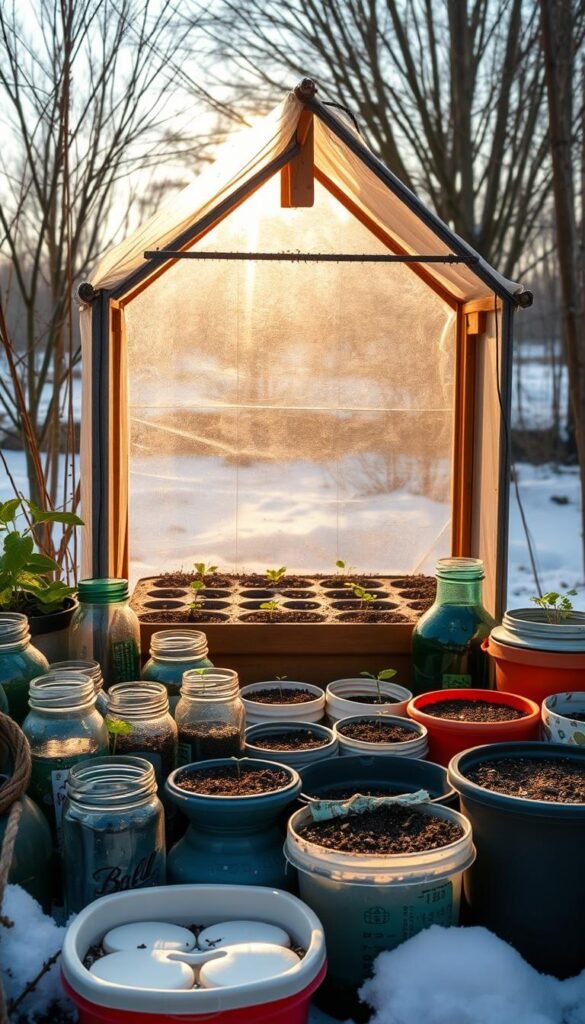
This technique has surged in popularity for its simplicity and reliability. Whether you’re nurturing hardy perennials or colorful annuals, your recycled planters act as cozy shelters during frosty months. Pair this with year-round greenhouse strategies for nonstop harvests, even when snow blankets your yard.
No special skills are needed – just patience and trust in the process. You’ll discover how to harness winter’s quiet energy to build a stronger, more resilient garden. Ready to unlock this game-changing method?
Getting Started with Winter Sowing
Transform your gardening approach by mimicking seasonal cycles. This method skips artificial setups and partners with nature’s rhythms. Instead of battling frost, you’ll use it to prepare future blooms while saving space and effort.
What Is Winter Sowing and How It Works
Think of it as gardening’s best-kept secret. You plant during the coldest months using transparent recycled containers as tiny ecosystems. These act like portable garden beds that shield sprouts while letting snow and rain nourish them.
Timing matters most. Begin after December 21st when days slowly lengthen. In regions like USDA Zone 5, late December through January offers perfect conditions. Your planted jugs stay outside through freezes and thaws – exactly what many species need.
The Science Behind Cold Stratification
Some varieties require a chilling period to wake up. Moisture and cold break down protective coatings, signaling it’s safe to grow. This natural process – called cold stratification – ensures sprouts emerge only when warmth returns.
| Method | Stratification Time | Success Rate |
|---|---|---|
| Indoor Fridge | 4-6 weeks | 75% |
| Outdoor Containers | Natural cycles | 90% |
Hardy perennials like coneflowers thrive with this approach. Their roots grow stronger compared to indoor-started plants. You’re essentially letting the environment do the work while avoiding guesswork.
Reaping the Benefits of Outdoor Seed Starting

Turn your trash into garden treasure while keeping cash in your pocket. This approach transforms everyday items like yogurt cups and takeout containers into powerful growth chambers. You’ll ditch pricey equipment and gain back precious room in your home.
Budget-Friendly Growing, Naturally
Why buy plastic trays when your kitchen stash works better? Milk jugs become self-watering planters, and deli containers turn into humidity domes. Your only expense? A $2 pack of seeds instead of $50 grow lights.
Compare traditional methods with nature’s free services:
| Method | Cost | Space Needed |
|---|---|---|
| Indoor Setup | $100+ yearly | Entire windowsill |
| Outdoor Containers | $0-10 | Porch or balcony |
Smart timing boosts savings. Grab discounted seed packets in October when stores clear stock. These sleeping beauties will wake up right on schedule come spring.
Your plants grow tougher than nursery-bought ones. They’ve weathered real wind and rain from day one. No more shuffling trays indoors and out – these sprouts are garden-ready the moment their roots hit soil.
Choosing the Right Seeds and Containers

Your garden’s success begins with two simple choices: resilient sprouts and clever recycled homes. Pairing frost-friendly varieties with transparent protectors creates a powerhouse combo that works while you stay cozy indoors.
Selecting Cold-Hardy Seeds
Look for clues like “cool season” or “sow in autumn” on seed packets. These phrases signal natural survivors – think snapdragons swaying through March frosts or kale thriving under snow. Columbine and poppies also ace this chill-to-sprout method.
Skip tropical varieties needing steady warmth. Basil and tomatoes prefer indoor starts, but broccoli and herbs? They’re built for this outdoor adventure. Your recycled greenhouses give them just enough shelter without coddling.
Repurposing Milk Jugs, Soda Bottles, and More
That vinegar jug collecting dust? It’s a seed-starting superstar. Clear or translucent plastic containers become sunlight tunnels for emerging sprouts. Milk jugs reign supreme – their gallon size offers room for roots to stretch.
Test your container in three steps:
- Can light pass through?
- Does it hold 3″ of soil plus growing space?
- Can you create drainage holes?
Cat litter bins and takeout clamshells often check all boxes. Just avoid colored plastics that filter crucial sunlight.
Gathering Supplies and Preparing Your Mini Greenhouses

Transform household items into thriving plant nurseries with simple tools and smart techniques. Your setup relies on three essentials: recycled containers, well-balanced soil, and precise drainage. Let’s turn ordinary objects into climate-controlled sprout sanctuaries.
Proper Soil Moisture and Drainage Techniques
Start with potting soil – not seed-starting mix – for better nutrient retention. Squeeze a handful: it should clump without dripping water. Too dry? Add moisture gradually. Too wet? Let it air out before planting.
Drainage holes prevent root rot. Use a drill or heated nail to create 8 quarter-inch openings in the bottom of each container. Pair this with self-watering systems for low-maintenance hydration.
| Soil Condition | Test Result | Action Needed |
|---|---|---|
| Ideal | Holds shape | Ready to use |
| Overwatered | Drips | Dry for 24 hours |
| Too dry | Crumbles | Mist lightly |
Cutting, Drilling, and Sealing Methods
Milk jugs become perfect greenhouses with one horizontal cut below the handle. Leave a 1-inch hinge for easy access. Secure the lid with duct tape after planting – it withstands snow and wind better than standard tapes.
Label containers inside and out using paint pens. Note the planting date and variety twice: weather fades markers faster than you’d expect. Your future self will thank you when sprouts emerge!
Winter Sowing: Starting Seeds Outdoors in Mini Greenhouses

Timing is your secret weapon for unlocking nature’s germination magic. Master three strategic planting windows to match your garden’s schedule with seasonal rhythms. This approach lets seeds wake up when conditions align perfectly for their growth.
Key Techniques to Ensure Successful Germination
Early cold months are ideal for varieties needing extended chilling. Start 5-6 months before your last frost for flowers like columbine. Their tough coatings soften through repeated freeze-thaw cycles.
Mid-season planting (3-4 months pre-frost) suits cold-loving veggies and perennials. Broccoli and kale develop robust roots during this phase. Your containers become protective bubbles as daylight increases.
| Planting Window | Time Before Frost | Best Choices |
|---|---|---|
| Early Start | 5-6 months | Delphinium, Lupine |
| Prime Season | 3-4 months | Snapdragons, Spinach |
| Late Prep | 1-2 months | Zinnias, Basil |
Keep each container dedicated to one plant type. Mixing varieties causes competition and confusion. Follow seed packet spacing like a treasure map – proper depth matters more than you’d think!
Trust the process. Seeds germinate when soil warms enough for their needs. You’re not just growing plants – you’re cultivating patience and precision. Next, we’ll explore how to plant your prepared containers for maximum success.
Step-by-Step Guide to Planting Your Seeds

Ready to turn recycled plastics into plant nurseries? This hands-on process turns ordinary containers into thriving ecosystems. Follow these precise steps to create self-sustaining environments where sprouts develop natural resilience.
Filling, Sowing, and Securing Your Containers
Start with pre-moistened potting soil – aim for 4 inches of depth in each container. This leaves space for roots while preventing overcrowding. Scatter seeds generously across the surface, following packet instructions for spacing.
Press each seed gently into the soil using your fingertips. The goal? Full contact without burying them too deep. Cover with a sprinkle of earth matching the seed’s thickness – like tucking them in with a thin blanket.
| Container Type | Ideal Seed Quantity | Sealing Method |
|---|---|---|
| Milk Jugs | 15-20 seeds | Duct tape hinge |
| Soda Bottles | 10-12 seeds | Electrical tape seal |
| Deli Containers | 8-10 seeds | Clear packing tape |
Labeling and Scheduling for Optimal Results
Use waterproof markers to note planting dates on both the bottom and side of jugs. Why double-label? Sunlight fades exterior ink, while interior markings stay protected. Track growth timelines using a simple calendar – most sprouts emerge 1-3 weeks after final frost.
Pair this method with container gardening basics for foolproof results. Secure lids with heavy-duty tape, overlapping edges to create a weatherproof seal. Your DIY greenhouses now hold everything needed for spring’s grand reveal!
Monitoring Germination and Early Growth
Your containers become living weather stations once sprouts appear. Keep an eye out during unexpected warm spells – nature’s thermostat can trick plants into early action. Those first green tips poking through soil mean it’s time to shift from observer to active caretaker.
Adapting to Nature’s Whims
When temperatures climb above 60°F, crack open container tops like sunroofs. Use scissors to widen existing ventilation holes gradually. This prevents shock while letting excess heat escape. On breezy days, fully remove lids to harden off seedlings against real-world conditions.
Hydration needs change as spring approaches. Water sparingly using a repurposed bottle with pin-sized holes – think gentle rain showers, not monsoons. Check soil moisture every 3-4 days by touching the surface. If it feels dry past your first knuckle, it’s time for a drink.
| Temperature | Action | Frequency |
|---|---|---|
| Below 50°F | Keep sealed | Check weekly |
| 50-60°F | Partial venting | Every 3 days |
| 60°F+ | Full exposure | Daily checks |
Notice leggy stems or yellow leaves? That’s your cue to increase airflow immediately. Healthy seedlings stay compact and vibrant green. Rotate containers weekly so all sides get equal light – no more lopsided growth!
Troubleshooting Common Winter Sowing Challenges
Ever found your carefully prepared planters toppled by a gust? Don’t panic—most issues have simple fixes. Let’s tackle the top hurdles you might face and turn setbacks into learning opportunities.
Managing Excess Moisture and Weather Extremes
Wind warriors: Secure lightweight containers by nesting them in milk crates or weighing them down with stones. For raised beds, bury the bottom inch of your planters in soil—it anchors them like nature’s glue.
Drainage disasters? Check container bottoms weekly. Use a heated nail to add extra holes if water pools. Position your setup where rainwater flows away naturally, like sloped areas or gravel spots.
| Problem | Solution | Pro Tip |
|---|---|---|
| Tip-over risk | Use brick edging | Group containers |
| Pet interference | Install wire barriers | Repel with citrus peels |
| Dry spells | Mist through hinge gap | Check every 5 days |
Unexpected warm days? Crack open container lids gradually over three days. For sudden cold snaps, wrap planters in burlap sacks—they’re like cozy jackets for your seedlings.
Remember that duct tape hinge? It’s your secret weapon. Peel it back slightly during dry winters to add water without disturbing the soil. Your plants get hydration while staying protected.
Embracing Your New Winter Sowing Adventure
Your garden’s next chapter begins with cracked milk jugs and sprouting hope. Those humble containers you’ve nurtured will soon reveal their green treasures, right on nature’s schedule. When seedlings push through the soil, celebrate – your patience is paying off!
Watch for these signs that plants are ready to transplant: three true leaves, sturdy stems, and roots reaching container edges. Gradually expose them to open air over a week. Morning sun and afternoon shade ease the transition beautifully.
Reuse those trusty jugs as temporary cloches for tender starts. Simply cut the bottom off and place it over new transplants – instant protection from late frosts. Your recycled tools keep giving long after their first job ends.
This method turns your entire yard into a garden laboratory. Observe which varieties thrive in your microclimate. Next winter, you’ll know exactly when to start carrots versus cosmos for peak performance.
Share extra seedlings with neighbors or swap them at community exchanges. Your milk jug experiments might spark someone else’s growing revolution. Together, you’re rewriting what’s possible in backyard cultivation – one repurposed container at a time.


