
Growing a vibrant, productive space in regions with distinct weather patterns requires careful planning. This guide helps you maximize every inch of your growing area while working with nature’s rhythms, not against them. By aligning your efforts with local frost dates and USDA recommendations, you’ll create a resilient setup that adapts as temperatures shift.
Start early—January is perfect for safeguarding perennial plants and selecting seeds. Understanding your plot’s sunlight patterns, soil quality, and drainage ensures each plant gets what it needs. Small adjustments, like rotating crops or timing plantings, can boost harvests while reducing pests naturally.
We’ll walk through choosing the sunniest spots, starting seeds indoors, and arranging plants for easy care. Whether you’re prepping for summer tomatoes or extending the growing season into cooler months, these methods simplify the process. Let’s build a space that grows more with less effort—one smart choice at a time.
Getting Started with Your Zone 6 Square Foot Plot Garden

Creating a thriving garden begins with smart groundwork. Focus on three essentials: location, soil quality, and having the right gear. These steps lay the foundation for healthy plants and bountiful harvests, even if you’re new to growing.
Choosing the Perfect Garden Location
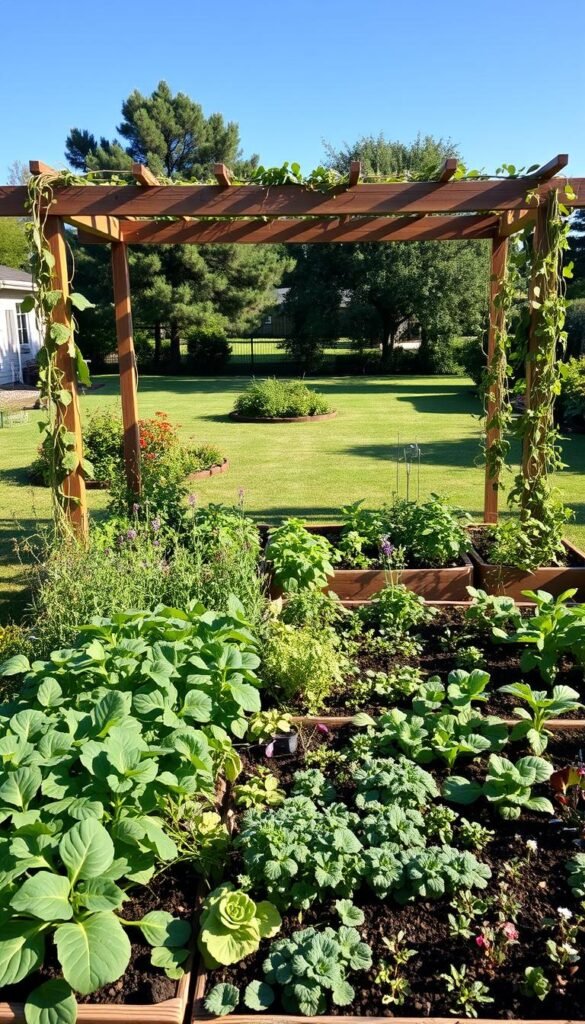
Pick a spot that gets at least 6-8 hours of direct sunlight daily. Avoid low areas where water pools—good drainage prevents root rot. If your yard has heavy grass or weeds, cover the area with cardboard and a 4-inch layer of compost. This smothers unwanted growth while enriching the soil naturally.
Preparing Your Soil and Tools
Test your soil’s pH and nutrient levels using a kit from your local garden center. Mix in compost to improve texture and aeration—your plants’ roots will thank you! Keep tools simple: a broadfork loosens compacted beds, a trowel handles precise planting, and a wheelbarrow moves materials effortlessly.
Start with easy vegetables like lettuce or radishes to build confidence. Early seasonal adjustments ensure you plant at the right time. Sketch your layout on paper first—group plants by their sun and water needs for smoother care later.
Understanding Your Growing Season in Zone 6
Mastering your garden’s calendar starts with knowing your local climate patterns. In Zone 6, frost-free days typically span from late April to mid-October—roughly 150-180 days. This window determines when to start seeds, transplant seedlings, and harvest before chilly nights return.
Pinpointing Your Last Spring Frost
Your local USDA plant hardiness map shows average last frost dates between mid-April and mid-May. Check with nearby agricultural extension offices for hyper-local updates. Track nighttime lows in early spring—soil warms faster when air temperatures stay above 40°F consistently.
Smart Timing for Every Crop
Cool-weather plants like spinach thrive when soil hits 50°F, while tomatoes need 60°F+ ground temps. Start heat-loving crops indoors 6-8 weeks before outdoor planting dates. Test your soil’s temperature with a simple probe thermometer—cold earth delays seed sprouting.
For example: Sow tomato seeds indoors by March 15th, then move them outside after May 1st. Keep notes on bloom times and pest activity each year. Small tweaks based on weather shifts can add weeks to your productive growing season.
Essential Zone 6 Gardening Tips: Seasonal Adjustments for Square Foot Plots

Your garden’s success hinges on adapting to nature’s rhythm. As temperatures shift, simple tweaks keep plants thriving and yields high. Let’s explore how to pivot your care routine through spring’s thaw, summer’s heat, and autumn’s chill.
Adjusting Plantings for Each Season
Spring: Start hardening off seedlings 7-10 days before transplanting. Gradually expose them to outdoor conditions—begin with 2 hours of morning sun, increasing daily. Use row covers if nighttime temps dip below 45°F.
Summer: Swap heavy mulch for light straw to retain moisture without suffocating roots. Water deeply at dawn to combat evaporation. Fertilize every 3 weeks with diluted fish emulsion for steady growth.
| Season | Key Task | Plant Focus |
|---|---|---|
| Fall | Sow cold-hardy crops like kale | Add compost & leaf mulch |
| Winter | Protect beds with burlap | Plant garlic cloves |
When frost threatens, drape frost cloth over tender flowers and veggies. In fall, switch to nitrogen-rich cover crops like clover to nourish soil. Rotate crops annually to prevent disease—try our square foot garden planner for stress-free layouts.
Remember: healthy soil means happy plants. Test moisture levels weekly—stick your finger 2 inches deep. Adjust watering as days shorten in autumn. These small, timely changes let you harvest fresh produce nearly year-round!
Planning Your Garden Layout and Crop Rotation

Smart design transforms small spaces into powerhouse producers. By organizing your garden beds using grid-based methods, you’ll squeeze more harvests from every square foot while keeping pests and diseases in check. Let’s explore how strategic planning creates a thriving ecosystem above and below the soil.
Implementing Square Foot Gardening Principles
Divide your growing area into 1×1-foot grids using string or wooden markers. This method lets you plant vegetables at their ideal spacing—like 16 carrots per square or one tomato plant. Group crops by their sun needs: leafy greens in partial shade, peppers and tomatoes in full sun zones.
Digital tools simplify square foot gardening layout planning. Apps track where you planted each crop last year, making rotation effortless. Sketch your beds on paper first, noting companion plants that boost growth when paired together.
Benefits of Effective Crop Rotation
Swapping plant families yearly prevents soil depletion and breaks pest cycles. Follow heavy feeders (like corn) with nitrogen-fixers (beans), then light feeders (herbs). This three-year pattern keeps your crops healthy without chemical fertilizers.
| This Year’s Plants | Next Year’s Rotation | Key Benefit |
|---|---|---|
| Tomatoes | Beans | Rebuilds soil nitrogen |
| Cabbage | Spinach | Disrupts cabbage worms |
| Carrots | Peppers | Prevents root maggots |
Keep a journal noting which plants thrived where. Come fall, review your notes to plan next year’s improvements. Simple changes—like moving squash to a sunnier bed—can double your yields while cutting maintenance time.
Starting Seeds Indoors and Transplanting Outdoors

Jumpstart your growing season by nurturing seedlings indoors before spring fully arrives. This approach lets you control early growth conditions while outdoor temperatures stabilize. You’ll gain 4-6 extra weeks of development time—perfect for heat-loving crops like tomatoes and peppers.
Optimal Seed-Starting Techniques
Begin with clean containers—biodegradable pots prevent root disturbance later. Fill them with sterile seed-starting mix, then plant 2-3 seeds per cell. Cover trays with plastic domes to lock in moisture until sprouts appear.
Position grow lights 3 inches above seedlings for 14-16 hours daily. Use a heat mat set to 75°F for faster germination. Thin weaker sprouts once true leaves form, keeping the strongest plants. Feed weekly with diluted seaweed solution for robust stems.
How to Harden Off Transplants
Gradually introduce indoor-raised seeds to outdoor life over 7-10 days. Start with 1 hour of morning sun in a sheltered spot, increasing exposure daily. Bring plants inside if nights dip below 50°F.
Water thoroughly before moving trays outside—dry soil stresses tender roots. Shield young greens from strong winds using temporary shade cloth. Time your transplanting for cloudy afternoons to reduce shock.
Tomatoes thrive when moved after nighttime lows stay above 55°F. Dig holes slightly deeper than their pots, then firm soil gently around stems. Consistent care during this transition builds resilience for summer’s challenges!
Seasonal Planting and Succession Strategies

Maximize your harvests by syncing planting schedules with nature’s cues. Succession planting—growing multiple crops in the same space throughout the year—keeps your soil productive and your table full. This approach works wonders for small spaces, letting you enjoy fresh greens, roots, and fruits from spring’s first thaw to fall’s final frost.
Spring and Fall Planting Methods
Start early with cold-hardy greens like spinach and arugula. Sow these as soon as soil reaches 40°F. When summer heat arrives, replace harvested radishes with heat-loving beans or cucumbers. For autumn yields, plant fast-growing carrots and beets 8 weeks before your first expected frost date.
Try this rotation in a single bed: lettuce (spring) → peppers (summer) → kale (fall). Stagger sowings every 2-3 weeks for continuous harvests. Track dates using a simple calendar—mark when to start new seeds as older crops finish.
Tips for Successful Succession Planting
Keep soil nourished between plantings by mixing in compost or planting nitrogen-fixing cover crops like clover. Watch for pest patterns—if cabbage worms plague your broccoli, switch to less vulnerable Swiss chard next cycle.
Follow this succession planting guide for proven schedules. Many gardeners achieve 3-4 harvests annually by:
- Interplanting quick-growers (radishes) with slow-maturing crops (tomatoes)
- Using vertical space for vining plants after harvesting low greens
- Mulching heavily between rotations to suppress weeds
Adapt these strategies to your microclimate. With thoughtful timing, you’ll transform empty dirt into a nonstop buffet!
Managing Watering and Pest Control Throughout the Seasons

Keep your plants thriving through every weather shift with smart water management and pest solutions. Balancing hydration needs while keeping bugs at bay ensures your garden stays productive from spring showers to summer droughts.
Effective Watering and Mulching Practices
Water deeply 2-3 times weekly instead of daily sprinkles. This encourages roots to grow downward, creating drought-resistant plants. Check soil moisture by digging 3 inches deep—if it’s dry, it’s time to hydrate.
Mulch with straw or shredded leaves to lock in moisture. A 2-inch layer keeps soil temperatures stable and blocks weed growth. Refresh mulch monthly during peak summer heat.
| Watering Technique | Frequency | Best For |
|---|---|---|
| Deep Soak | Twice weekly | Tomatoes, peppers |
| Drip Irrigation | 3 hours daily | Leafy greens |
| Hand Watering | As needed | Seedlings |
Organic Pest Control Methods
Spot aphids early—look for curled leaves or sticky residue. Spray affected plants with insecticidal soap at dawn. For cucumber beetles, place yellow sticky traps near vine crops.
Floating row covers protect young crops without chemicals. Remove them once flowers form to allow pollination. Rotate crops yearly to disrupt pest life cycles.
Track rainfall and adjust watering using a simple journal. Note which pests appear each season—this helps you prepare defenses next year. Healthy plants resist bugs better, so focus on building strong soil first!
Utilizing Garden Tools and Keeping Detailed Records

The right tools and organized notes turn garden dreams into reality. When you pair efficient equipment with thoughtful tracking, you’ll spend less time struggling and more time enjoying your green oasis. Let’s explore how smart gear choices and consistent record-keeping boost your success.
Choosing the Right Gardening Tools
Essential tools make small-space care effortless. A hand trowel with depth markings helps plant seeds at perfect spacing. Ergonomic pruners protect your wrists when trimming herbs or harvesting veggies. Keep these basics nearby:
| Tool | Use | Benefit |
|---|---|---|
| Soil knife | Dividing plants | Precise root cuts |
| Collapsible rake | Smoothing beds | Saves storage space |
| Dibber | Creating seed holes | Consistent depth |
Lightweight kneepads save your joints during long planting sessions. A sturdy harvest basket with handles keeps produce clean and easy to carry. Proper tools cut work time by half while preventing common aches.
Maintaining a Garden Journal
Track what works (and what doesn’t) in a dedicated notebook or app. Note when you sowed carrots or spotted aphids on roses. Record rainfall amounts and which tomato varieties yielded best. These details reveal patterns over time.
Try this simple system:
- Date each entry
- Sketch bed layouts
- Rate plant health weekly
Review last year’s journal before spring planting. You’ll remember to rotate crops away from problem areas or adjust water schedules during dry spells. Detailed records turn guesses into confident decisions—your future self will thank you!
Incorporating Companion Planting and Seasonal Crop Charts
Smart plant partnerships create thriving ecosystems above and below the soil. Companion planting groups species that support each other’s growth while deterring pests naturally. This approach maximizes your space and reduces the need for chemical interventions.
Why Plant Buddies Work Wonders
Certain plants release chemicals through their roots or leaves that benefit nearby crops. Basil planted with tomatoes improves flavor and repels hornworms. Marigolds emit a scent that confuses aphids and beetles—tuck them between veggies for built-in protection.
Master Timing With Visual Guides
Seasonal crop charts simplify planning by showing ideal windows for sowing and transplanting. These tools help stagger plantings so you harvest fresh produce continuously. Try this simple three-step system:
| Month | Early Crops | Follow-Up Plants |
|---|---|---|
| April | Peas, radishes | Bush beans |
| July | Summer squash | Fall kale |
| September | Spinach | Garlic cloves |
Digital planners like Smart Gardener auto-generate schedules based on your frost dates. Printable charts from university extension sites offer zone-specific advice. Color-code your garden layout to track rotations and companion pairs at a glance.
Start small—try pairing carrots with onions to deter root flies. As you gain confidence, experiment with three-sister plantings (corn, beans, squash). Organized gardens yield more while requiring less time for pest control and soil fixes!
Wrapping Up: Your Year-Round Guide to a Thriving Zone 6 Garden
Cultivating a flourishing garden in Zone 6 is a journey of observation and adaptation. From selecting sun-drenched plots to rotating crops, each step builds toward healthier plants and bigger harvests. Remember: starting seeds indoors extends your growing window, while strategic companion pairings naturally deter pests.
Keep your garden thriving by tracking weather shifts and adjusting watering routines. Detailed notes on spring frost dates or summer pest patterns help refine your approach yearly. Tools like seasonal charts simplify planting schedules, ensuring continuous yields from fall greens to summer tomatoes.
Embrace flexibility—swap crops if unexpected frost arrives or try small-space hacks to maximize every inch. Share successes with fellow growers and learn from each year’s challenges. With thoughtful planning and a little dirt under your nails, you’ll create a resilient oasis that rewards effort season after season!


