
Imagine growing more fresh veggies in less space while saving time and effort. That’s the magic of organizing your growing area into compact, easy-to-manage squares. Instead of traditional rows, this approach divides your plot into a grid, letting you fit more plants without overcrowding. You’ll focus on quality soil and smart spacing to boost yields—perfect for small backyards or sunny balconies.
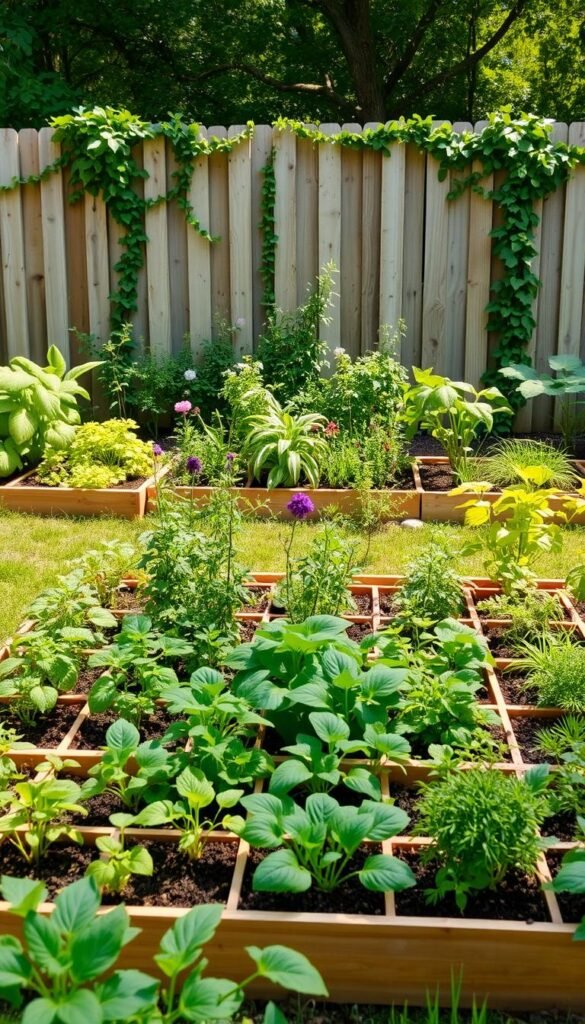
Raised beds are central to this strategy. Their 4-foot width ensures you can reach every plant without stepping on the soil, keeping it loose and healthy. By filling beds with a nutrient-rich mix, you create an ideal home for roots to thrive. Plus, a simple grid system helps you track what’s planted where, making it easier to rotate crops or replant quickly.
One major perk? Less weeding and watering. Tight plant spacing shades the soil, reducing moisture loss and blocking weeds naturally. You’ll also spend less time guessing where to place seeds—spacing charts take the stress out of planning. Whether you’re growing leafy greens or juicy tomatoes, this method adapts to your favorite varieties.
Ready to transform how you grow food? Below, we’ll walk through designing your layout, choosing plants, and maintaining a vibrant, productive space all season long.
Key Takeaways
- Grow more in less space with organized grids instead of traditional rows.
- Raised beds improve soil health and make every plant easily accessible.
- Use spacing charts to avoid overcrowding and maximize harvests.
- Healthy soil mixes reduce the need for constant watering or weeding.
- Compact layouts save time and adapt to any backyard or container setup.
Getting Started with Zone 6 Gardening
Even with unpredictable frost dates, your backyard can become a powerhouse of fresh produce. The key lies in adapting to your climate while maximizing every inch of available space. Let’s explore how to overcome common hurdles and set up your plot for success.

Understanding Zone 6 Challenges and Benefits
Cold springs and early fall frosts shorten the growing window here. You’ll need to start seeds indoors or use season extenders like cloches. But this climate also offers perks—cooler summers let you grow heat-sensitive crops like lettuce longer.
Traditional row planting wastes valuable real estate, leaving empty soil vulnerable to weeds. Instead, a plant spacing chart helps you pack more veggies into less area. For example, one 4×4-foot bed can hold 16 carrot plants in a grid versus just 4 in rows.
| Method | Space Efficiency | Maintenance | Yield |
|---|---|---|---|
| Row Planting | 40% usable | High weeding | Low |
| Grid System | 90% usable | Low weeding | High |
Choosing the Right Time and Location
Track your last spring frost date—usually mid-May—to avoid losing seedlings. Pick a spot with 6-8 hours of sun, shielded from strong winds. South-facing slopes warm faster, giving you a head start.
Raised beds (12-18 inches deep) prevent soil compaction and improve drainage. Fill them with a mix of compost, peat moss, and vermiculite for quick root growth. Mark grids with string or wooden dividers to keep plants neatly organized.
Zone 6 Gardening Using the Square Foot Method
Efficient growing starts with four foundational elements that work together. By focusing on smart design and science-backed techniques, you’ll create a thriving ecosystem right outside your door. Let’s break down what makes this approach so effective.

Four Pillars of Success
Raised beds give roots room to breathe while preventing waterlogging. Their elevated structure keeps soil loose and warm—critical for cool spring starts. Pair them with a custom soil blend (1/3 compost, 1/3 peat moss, 1/3 vermiculite) for fast drainage and steady nutrients.
A visible grid divides your growing area into 1×1-foot squares. This simple visual guide eliminates guesswork—you’ll always know where to plant next. Smaller sections also make it easier to rotate crops or replace harvested veggies quickly.
| Principle | Benefit | Example |
|---|---|---|
| Soil Mix | Retains moisture | No daily watering needed |
| Grid Layout | Prevents overcrowding | 9 spinach plants per square |
| Spacing Rules | Boosts air circulation | 1 tomato per 4 squares |
Follow seed packet spacing guides, but think in squares instead of rows. Large plants like broccoli claim an entire square, while radishes fit 16 per section. This precision means 68% less weeding compared to traditional methods.
You’ll harvest 5x more from the same space by working with nature’s rhythms. The dense canopy shades soil, locking in moisture and blocking weed growth. Plus, nutrient-rich earth feeds plants steadily, reducing the need for fertilizers.
Planning Your Garden Layout and Raised Beds
Transform your backyard into a thriving edible oasis by mastering three core elements of smart design. Strategic layouts and quality materials work together to create optimal growing conditions while saving you effort.

Designing the Square Foot Grid
Start by marking your growing area into 12-inch sections using string or thin wood strips. A 4×4-foot bed holds 16 squares—each becomes a mini-plot for specific crops. Follow spacing charts to determine how many plants fit per square:
| Crop | Plants/Square | Depth Needed |
|---|---|---|
| Carrots | 16 | 12 inches |
| Tomatoes | 1 | 18 inches |
| Spinach | 9 | 6 inches |
Building and Preparing Raised Beds
Choose rot-resistant cedar or redwood boards for longevity. Build frames 6-12 inches tall—deeper beds suit root vegetables. Keep width under 4 feet so you can reach the center without stepping inside.
Pro tip: Line beds with hardware cloth to deter burrowing pests. Fill them with your custom soil blend, leaving 2 inches at the top for mulch.
Creating a Nutrient-Rich Soil Mix
Combine equal parts compost, peat moss (or coconut coir), and vermiculite. This lightweight mix retains moisture while draining excess water—perfect for dense planting. One cubic yard fills a 4×4-foot bed at 6-inch depth.
Refresh the top layer with fresh compost each season. Your plants will get steady nutrients without chemical fertilizers, producing healthier yields year after year.
Effective Planting Techniques and Spacing Strategies
Unlock your garden’s full potential by pairing precise math with smart timing. These strategies help you squeeze every bit of value from your grid while keeping harvests rolling from spring through fall.

Calculating Plant Spacing for Maximum Yield
Start with your seed packet’s recommended spacing. Divide 12 inches by that number to find how many plants fit per square. For example:
- Radishes (3-inch spacing): 12 ÷ 3 = 4 plants per row. 4 rows × 4 plants = 16 per square
- Bush beans (4-inch gaps): 12 ÷ 4 = 3 plants per row. 3 rows × 3 plants = 9 per square
Large vegetables like tomatoes need entire squares. Pair them with shallow-rooted herbs like basil to maximize space without competition.
| Vegetable | Spacing | Plants/Square |
|---|---|---|
| Spinach | 4 inches | 9 |
| Carrots | 2 inches | 16 |
| Peppers | 12 inches | 1 |
Implementing Succession Planting for Continuous Harvest
Replace harvested crops quickly with fast-growing alternatives. After pulling spring radishes, plant heat-tolerant greens like Swiss chard. Follow summer beans with fall kale—just add compost to refresh nutrients.
Pro tip: Stagger plantings every 2-3 weeks for non-stop yields. Sow lettuce seeds in half a square while waiting for slower crops like broccoli to mature.
Maintaining and Nurturing Your Garden
Keeping your plants thriving requires a mix of smart habits and simple tools. Consistent care ensures your green space stays productive while reducing common headaches. Let’s explore how to protect your hard work and enjoy bigger harvests with less stress.

Watering, Weeding, and Pest Control
Water deeply but less often to encourage strong roots. Tools like the TheOya™ watering pot deliver moisture directly to soil, cutting waste by up to 70%. Check soil daily—stick your finger an inch deep. If it’s dry, it’s time to hydrate.
Weeds struggle in tightly planted grids, but stay vigilant. Pull invaders weekly before they seed. Mulch with straw or shredded leaves to block light and retain moisture. Healthy soil grows stronger plants that naturally resist pests.
Spot aphids or beetles? Spray leaves with diluted neem oil at dusk. Plant marigolds near tomatoes to repel nematodes, or grow basil alongside peppers. These partnerships create natural barriers while boosting flavor.
Never step on your beds—compacted soil chokes roots and slows growth. Use narrow boards between squares if you need to reach farther. Refresh mulch every 4-6 weeks to maintain temperature and moisture levels.
For more tips, explore this detailed square foot gardening guide. It covers advanced strategies for year-round success, from crop rotation to soil testing. Stay proactive, and your garden will reward you with baskets of fresh produce all season!
Conclusion
Turn limited space into a bounty of fresh produce with smart design. By dividing your growing area into compact squares, you create an organized system that boosts yields while saving time. Raised beds filled with rich soil mixtures ensure roots thrive, and precise spacing prevents overcrowding. This approach cuts weeding and watering chores, letting you enjoy more harvests with less work.
Ready to see results? Start small—try one 4×4-foot bed this season. Track what grows best in your climate and adjust next year. Share your successes with local gardening groups or online forums to inspire others.
Remember: Great gardens aren’t about size. With thoughtful planning and quality soil, even a tiny plot can produce impressive amounts of food. Your journey toward efficient growing starts today—what will you plant first?


