
Imagine growing fresh veggies year-round in a small space, even under the blazing sun. That’s the magic of combining square foot gardening with smart warm-weather tweaks. Developed by Mel Bartholomew in 1975, this method now thrives in over 2 million gardens worldwide. Here’s why it’s perfect for your sunny backyard.
The secret lies in dividing your raised bed into neat grids. Each square becomes its own mini-garden, letting you grow more with less effort. In hot areas, this setup helps manage water and shade better than traditional rows. You’ll waste fewer resources while harvesting more tomatoes, peppers, or herbs.
This approach simplifies planning, too. No guessing where to plant ones – every crop has its designated spot. Bartholomew’s original design evolved to handle challenges like intense heat and fast-growing weeds. Today’s versions use drip irrigation and shade cloths to protect tender plants.
Key Takeaways
- Mel Bartholomew’s grid system boosts efficiency in small spaces
- Customizable layouts prevent overcrowding and reduce water use
- Modern adaptations include heat-resistant materials and shade solutions
- Easy-to-follow plans eliminate guesswork for beginners
- Works with any soil type when using elevated beds
Ready to transform your outdoor space? The next sections break down how to build your grid, pick heat-loving plants, and maintain your garden through scorching summers. You’ll discover why this method keeps gaining fans from Florida to Arizona.
Getting Started with Zone 9 Gardening
Gardening success in hot areas begins with mastering two key elements: location and layout. Choose a spot that gets 6-8 hours of morning sun but offers afternoon shade. This balance protects tender plants while fueling growth.
Understanding Your Warm Climate
Your local weather dictates everything. Track summer highs – if temperatures regularly hit 90°F+, prioritize heat-tolerant crops like okra or sweet potatoes. Soil matters too: sandy soils drain quickly but need frequent watering, while clay holds moisture longer.
“Shade cloth isn’t optional here – it’s your plants’ sunscreen,” notes Tampa gardener Maria Rodriguez.
| Factor | Ideal Range | Common Mistakes |
|---|---|---|
| Sun Exposure | 6-8 hours | Full-day direct sun |
| Soil pH | 6.0-6.8 | Ignoring soil tests |
| Watering Depth | 12-18 inches | Surface-only watering |
Initial Planning for Your Garden Space
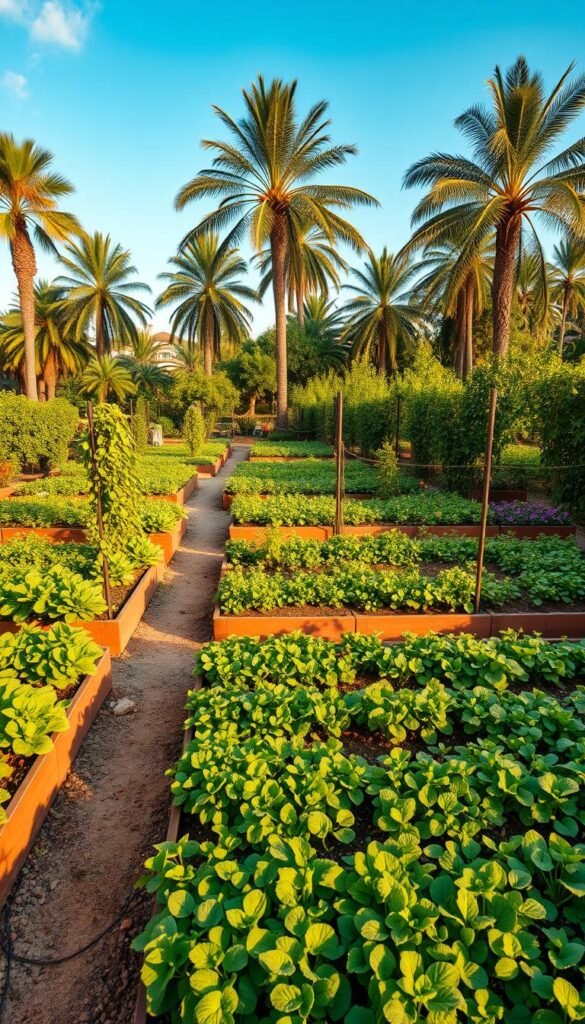
Start small: a 4×4-foot garden bed lets you manage heat and water effectively. Position raised beds north-to-south for even sun distribution. Leave 18-inch walkways between beds – you’ll need room for harvesting and shade adjustments.
When mapping your vegetable layout, group plants by water needs. Place thirsty crops like lettuce near drip lines, and drought-tolerant herbs at the edges. This smart spacing cuts water waste by up to 30%.
Overview of Square Foot Gardening Principles
A retired engineer’s vision changed how we grow food in tight spaces. Mel Bartholomew launched this method in 1981 through his bestselling book, transforming backyard plots nationwide. His system replaces sprawling rows with organized grids, making small beds surprisingly productive.
History and Origins of the Method
Bartholomew noticed traditional gardens wasted 80% of their space on walkways between rows. His solution? A 4×4-foot square foot gardening bed divided into 16 sections. Each square hosts a different crop, as detailed in his groundbreaking guide.
“You’ll harvest four times more food in 20% of the space,” Bartholomew wrote, proving efficiency beats sheer size.
How It Maximizes Limited Space
The grid system eliminates guesswork. You plant 1, 4, 9, or 16 veggies per square based on their size. Compare that to traditional methods:
| Plant | Traditional Spacing | Square Foot Spacing |
|---|---|---|
| Carrots | 16 per row | 16 per square |
| Tomatoes | 1 plant every 3ft | 1 per square |
This method lets you grow basil beside peppers and lettuce under trellised beans. Bartholomew’s TV episodes showed families feeding themselves from just three beds – no farm required.
Zone 9 Gardening: Adapting Square Foot Techniques for Warm Climates
Growing food in hot regions requires rethinking traditional layouts. The grid system shines here – its compact design lets you protect plants from scorching afternoons while maximizing morning light. Rotate heat-sensitive crops to shaded squares during peak summer months.
Raised beds become climate heroes when you make two changes: deepen them to 12 inches for better root cooling, and line walkways with light-colored mulch. This reflects heat away from your greens while keeping soil temperatures manageable.
“Drip lines buried 3 inches deep reduced my watering by 40%,” shares Arizona grower Luis Mendoza. “Roots stay hydrated without surface evaporation.”
Compare these irrigation approaches for sun-baked beds:
| Method | Water Savings | Best For |
|---|---|---|
| Overhead Spray | 15% loss | Cool-season crops |
| Surface Drip | 25% savings | Shallow-rooted herbs |
| Subsurface Lines | 40% savings | Tomatoes, peppers |
Rows get a modern twist too. Space plants slightly wider than usual to improve airflow, reducing fungal risks in humid heat. Pair this with afternoon shade cloth over every third row during heatwaves.
Your garden can outsmart the weather. Use white PVC frames for trellises – they support vines without absorbing excess heat. This simple switch keeps beans and cucumbers productive through August’s peak.
Designing and Planning Your Raised Beds
Your garden’s backbone starts with smart raised bed design. The right materials and dimensions make watering easier, improve soil health, and let you reach every carrot without straining. Let’s break down what works best in sun-drenched areas.

Selecting the Right Materials
Rot-resistant cedar tops the list for longevity – it lasts 10-15 years untreated. Pre-made kits from Gardener’s Supply Company offer 4×4-foot beds with reinforced corners. For DIY fans, galvanized steel beds like Birdies Original resist rust while reflecting heat.
Compare popular options:
| Material | Lifespan | Cost |
|---|---|---|
| Cedar | 10-15 years | $$$ |
| Galvanized Steel | 20+ years | $$ |
| Pine | 5-7 years | $ |
Determining Ideal Dimensions for Accessibility
Keep beds no wider than 4 feet. This lets you reach the center from either side without stepping on soil. Depth matters most for root crops – 12-inch beds let carrots grow straight, while 18-inch versions suit sweet potatoes.
“I built 30-inch tall beds for my wheelchair – now I can tend basil while seated,” shares Orlando gardener Tina Chen.
For kitchen gardens, position beds 18-24 inches from paths. This spacing gives room for harvest baskets and kneeling pads. Pair narrow beds (2×6 feet) with vertical trellises to save space for vining crops.
Optimizing Planting Layouts for Continuous Harvest
A well-planned garden feeds you daily, not just seasonally. By pairing fast-growing greens with slower crops, you’ll always have something ready to pick. This strategy turns your grid into a living pantry that refreshes itself weekly.
Mixing Crop Varieties for Daily Yields
Try this combo: plant leaf lettuce (harvested weekly) beside tomatoes (ripe in 60 days). Add radishes between broccoli – they’ll be gone before the larger plants need space. Stagger planting dates every 14 days for non-stop greens like kale or Swiss chard.
“I harvest something fresh 360 days a year using three succession groups,” explains San Diego gardener Ellie Tran. “Leafy greens, then beans, then root veggies.”
| Crop Type | Days to Harvest | Companion Plants |
|---|---|---|
| Leafy Greens | 21-30 | Carrots, onions |
| Vining Plants | 50-70 | Basil, marigolds |
| Root Vegetables | 40-90 | Lettuce, spinach |
Creating a Visually Pleasing Grid
Arrange plants by height and color for eye-catching patterns. Place purple basil in corner squares, with golden zucchini at the center. Alternate red-stemmed chard with feathery dill for contrast. Your square foot setup becomes both productive and Instagram-ready.
Use these design tricks:
- Group warm-colored plants (peppers, nasturtiums) together
- Edge beds with low-growing herbs like thyme
- Train cucumbers up trellises for vertical interest
This approach transforms your growing space into a living mosaic that delights while delivering daily meals. You’ll enjoy fresh flavors and beautiful views from every angle.
Choosing the Best Soil and Growing Medium
Your garden’s productivity starts below the surface. The right soil mix acts like a nutrient-packed buffet for roots while keeping weeds at bay. Let’s dig into what makes an ideal foundation for thriving plants.

Understanding Weed-Free Soil Mix Options
Quality soil does double duty – feeding crops and smothering unwanted plants. Many gardeners swear by three-part blends that combine compost, vermiculite, and coconut coir. These mixes retain moisture better than regular dirt while staying fluffy for root growth.
Compare popular components:
| Material | Water Retention | Weed Risk |
|---|---|---|
| Bagged Topsoil | Medium | High |
| Compost Blend | High | Low |
| Coconut Coir Mix | Very High | None |
“Since switching to sterile potting mix, I spend 75% less time weeding,” reports Houston gardener Carlos Mendez. “More time for harvesting!”
No-till methods keep your beds productive year after year. Simply add 2 inches of fresh compost each season instead of digging. This protects earthworms and beneficial fungi that help plants access nutrients.
Match your mix to crop needs:
- Leafy greens thrive in nitrogen-rich blends
- Root vegetables need loose, stone-free soil
- Herbs prefer faster-draining mixes with sand
Your seeds will sprout faster in warm, weed-free beds. Test different combinations to find what works best for your planting schedule and local conditions.
Watering Techniques for Heat and Dry Climates
Your morning garden check reveals wilted leaves despite yesterday’s watering. In hot regions, every drop counts. Smart hydration strategies keep roots quenched without wasting precious resources. Let’s explore how to beat evaporation and keep your crops thriving.
Precision Hydration for Thirsty Beds
Drip systems deliver moisture straight to plant bases. Soaker hoses buried 2-3 inches deep outperform surface watering by 35%. Pair these with timers to water at dawn when temperatures dip below 80°F.
“My 6 AM automated sessions reduced leaf scorch by 60%,” says Phoenix gardener Derek Wells. “Plants drink deeply before the sun steals their sips.”
| Method | Water Savings | Best Time |
|---|---|---|
| Hand Watering | 10% loss | Early morning |
| Sprinklers | 20% loss | Not recommended |
| Drip Lines | 35% savings | 5-7 AM |
Mulch acts like a moisture blanket. Spread 3 inches of straw or shredded bark around plants. This simple layer cuts watering needs by 25% while cooling soil temperatures. Refresh it monthly as materials break down.
Adjust your routine during heatwaves:
- Increase frequency to daily 10-minute cycles
- Target root zones with bent-neck watering cans
- Use shade cloth during peak afternoon hours
These methods save time while protecting your garden from drought stress. Your plants get what they need, exactly when they need it.
Planting Guidelines for Diverse Crops
Proper spacing turns your garden into a lush mosaic of flavors. Crowded roots compete for nutrients, while wasted space invites weeds. Let’s explore how to arrange your green companions for maximum yield and health.

Spacing and Density Recommendations
Each crop has unique needs. Leafy greens like swiss chard thrive with 4 plants per square, while radishes pack 16 into the same space. Bush beans need 9 spots – their compact form lets you tuck them between taller crops.
Follow these guidelines for popular plants:
| Crop | Plants/Square | Special Notes |
|---|---|---|
| Carrots | 16 | Thin seedlings early |
| Swiss Chard | 4 | Harvest outer leaves |
| Radishes | 16 | Ready in 25 days |
“I mark planting holes with a grid stencil – ensures perfect spacing every time,” shares Texas gardener Rebecca Cho. Her radishes never crowd neighboring basil.
Adjust for growth habits. Vining crops like cucumbers need vertical support, freeing ground space. Dwarf bush varieties of tomatoes let you grow more in less room. Rotate plantings every 3 weeks for continuous harvests without overcrowding.
Watch for these signs your plants need more space:
- Yellowing lower leaves
- Stunted growth
- Misshapen roots
Integrating Beneficial Insects and Companion Planting
Your garden becomes a self-sustaining ecosystem when you welcome nature’s pest controllers. Strategic flower placements and plant partnerships create thriving environments where beneficial insects handle heavy lifting. This approach reduces chemical use while boosting your harvest quality.
Attracting Pollinators to Boost Yields
Bright blooms act as landing pads for bees and butterflies. Plant sunflowers or zinnias along bed edges – their nectar-rich flowers attract hoverflies that devour aphids. Intersperse herbs like dill between tomato plants to lure parasitic wasps targeting hornworms.
“Since adding marigolds to my pepper beds, I’ve had zero aphid outbreaks,” notes Florida grower Jamal Patel. “Ladybugs moved in naturally.”
Create insect hotels using bamboo stakes or drilled wood blocks. Position these shelters near plants needing protection. A balanced ecosystem means fewer pests and more pollination – crucial for fruiting crops.
| Companion Plant | Benefit | Pairs With |
|---|---|---|
| Nasturtiums | Repels squash bugs | Cucumbers, melons |
| Basil | Deters thrips | Tomatoes, peppers |
| Cosmos | Attracts lacewings | Beans, squash |
Rotate flower varieties seasonally to maintain insect interest. Summer favorites include bee balm and coneflowers, while fall-blooming sedum keeps helpers active longer. Your beds will buzz with life – and productivity.
Cost-effective Tips and Budget-Friendly Solutions
Building a thriving garden shouldn’t drain your wallet. With clever material choices and simple designs, you can create productive raised beds for less than store-bought kits. Many gardeners slash costs by 60% using reclaimed resources without sacrificing durability.

Smart Material Choices for Thrifty Builders
Skip pricey lumber yards – check local listings for free pallets or construction leftovers. Food-safe crates and untreated cedar fence pickets work perfectly for square foot gardening grids. One Houston family built three 4×4-foot raised beds using discarded wine barrels cut in half.
“Repurposed oak pallets lasted six seasons in my Florida backyard,” shares DIY gardener Leah Simmons. “Just remove any rusty nails and sand rough edges.”
| Material | Cost | Lifespan |
|---|---|---|
| Recycled Wood | $0-$20 | 3-5 years |
| Cinder Blocks | $1.50 each | 15+ years |
| Galvanized Troughs | $40-$80 | 10+ years |
For quick assembly, try these steps:
- Line wooden frames with cardboard to suppress weeds
- Use zip ties to secure cinder block corners
- Staple hardware cloth to prevent burrowing pests
Dwarf bush varieties like ‘Patio Pride’ peppers thrive in shallow beds, letting you use cheaper 8-inch-deep containers. Pair these budget-friendly beds with homemade compost to complete your low-cost setup.
Maintaining and Adjusting Your Garden Layout
As temperatures shift, your garden’s needs transform – smart layout tweaks keep harvests flowing year-round. Warm climates demand flexible designs that protect plants from extreme heat while maximizing every inch of space.
Smart Seasonal Shifts
Rotate heat-sensitive crops to shaded squares during summer’s peak. Swap lettuce for okra in sun-drenched areas, using taller plants as natural umbrellas. Phoenix gardener Lina Torres shares: “Moving my basil to north-facing squares reduced leaf burn by 80%.”
| Season | Recommended Crops | Spacing Adjustment |
|---|---|---|
| Summer | Eggplant, peppers | +20% between plants |
| Winter | Kale, broccoli | Standard spacing |
Refresh your grid every 10-12 weeks. Remove spent plants promptly to free up space for new seedlings. Try these timing tricks:
- Sow quick-growing radishes between slow-maturing carrots
- Use vertical trellises for winter squash to save ground area
- Mark planting dates on your grid with weatherproof tags
Adjust watering zones as crops change. Move drip lines closer for shallow-rooted greens in cooler months. These simple changes help your garden adapt without complete overhauls – saving time and effort.
Troubleshooting Common Garden Challenges
Even thriving gardens face unexpected visitors and unwelcome growth. Stay one step ahead with proactive strategies that protect your plants while keeping chemicals out of your harvest. These solutions tackle issues before they spiral out of control.

Outsmarting Unwanted Visitors
Spot chewed leaves? Mix 1 tablespoon dish soap with a quart of water for a gentle pest spray. Apply at dawn when insects are least active. For stubborn infestations, try floating row covers – they block 90% of common invaders while letting sunlight through.
“Yellow sticky traps caught 50 whiteflies in my pepper bed last week,” shares California gardener Mei Lin. “Now I check them daily like a bug forecast.”
| Pest | Natural Solution | Application |
|---|---|---|
| Aphids | Ladybugs | Release at dusk |
| Slugs | Diatomaceous earth | Circle plant bases |
| Cabbage Worms | BT Spray | Weekly leaf coating |
Winning the Weed War
Prevent invaders with a 3-layer defense: cardboard under beds, weed-free soil mix, and 2 inches of mulch. Hand-pull survivors after watering – moist soil releases roots easily. For persistent grasses, spot-treat with vinegar during hot afternoons.
Keep these weed-fighting tools handy:
- Collapsible hoe for quick path sweeps
- Knee pads for comfortable weeding sessions
- Weather app to time removals before rains
Healthy crops resist invaders best. Test water penetration monthly – if it pools, aerate with a garden fork. Balanced nutrition and proper spacing create conditions where your plants thrive, and weeds struggle.
Time-saving Strategies in Square Foot Gardening
Ever wish your garden worked smarter, not harder? The square foot method turns maintenance into quick check-ins rather than weekend-long chores. By design, this system cuts repetitive tasks through smart planning and strategic plant placement.
Low Maintenance Practices for Busy Gardeners
Start with weed-blocking fabric under your beds. This simple step prevents 80% of unwanted growth. Pair it with a thick mulch layer to retain moisture and reduce watering frequency. “I spend just 15 minutes daily tending my 16-square setup,” shares Colorado gardener Ryan Cole. “The grid does the heavy lifting.”
| Task | Traditional Gardening | Square Foot Method |
|---|---|---|
| Weeding | 3 hours/week | 20 minutes/week |
| Watering | Daily rotations | Targeted drip system |
| Soil Prep | Seasonal tilling | No-till amendments |
Implement these time-savers:
- Use pre-made planting templates for perfect spacing
- Group plants by water needs to streamline irrigation
- Install vertical supports during initial setup
“Batch harvesting changed everything,” notes Texas teacher Lisa Park. “Every Saturday morning, I collect ripe veggies from designated squares in 10 minutes flat.”
Automate what you can. Timer-controlled drip systems paired with rain sensors adjust watering based on weather. Your gardening time becomes harvesting time – the rewarding part everyone enjoys.
Integrating the Gardenary Approach for Daily Harvests
What if your garden could feed you fresh meals every single day? The Gardenary method makes this possible through smart layering of many plants in one space. By combining quick-growing greens with slower-maturing veggies, you’ll always have something ready to pick.
Interplanting Medium and Small Crops
Pair large plants like tomatoes with compact companions. Tuck basil at their base and lettuce around the edges. This uses every inch while creating natural shade for heat-sensitive crops.
| Anchor Plant | Companion Crops | Harvest Window |
|---|---|---|
| Peppers | Spinach, radishes | 30-75 days |
| Eggplant | Arugula, green onions | 21-90 days |
| Okra | Bush beans, kale | 40-60 days |
“My family eats salads daily since I started interplanting,” shares Georgia gardener Clara Nguyen. “Six squares now produce what 12 did before.”
Maintaining an Evergreen Harvest
Stagger planting dates every 10 days for continuous supply. Sow new seeds as older plants finish producing. Vertical trellises let you grow peas above carrots, doubling your yield without crowding.
Try this rotation plan:
- Week 1: Plant fast-growing radishes
- Week 3: Add basil seedlings
- Week 5: Start broccoli transplants
Keep harvest baskets handy for quick picks. Gentle leaf plucking encourages regrowth, while mature veggies get replaced with new starters. Your beds stay full and productive year-round.
Planning for a Prolific Kitchen Garden
Transform your backyard into a fresh produce aisle that’s just steps from your stove. A well-designed kitchen garden delivers ingredients when you need them, reducing grocery runs while boosting meal quality. Start by assessing your household’s eating habits – this shapes everything from bed size to crop selection.
Calculating Your Food Needs
Match your planting quantities to actual consumption. A family of four eating salads daily needs six lettuce plants, while occasional herb users might only require two basil bushes. Use this simple formula:
| Household Size | Raised Beds Needed | Key Crops |
|---|---|---|
| 1-2 people | 2 beds | Herbs, greens, tomatoes |
| 3-4 people | 4 beds | Peppers, beans, root veggies |
“I grow 80% of our veggies in eight squares,” says Portland cook Mia Johansen. “The grid helps prevent overplanting zucchini – my eternal weakness.”
Ensuring Easy Access to Harvest
Position beds within 10 feet of your kitchen door. This “arm’s reach” placement encourages frequent harvesting. Build narrow beds (3 feet wide max) so you can easily tend plants without stepping on soil.
Design walkways with these features:
- 18-inch width for comfortable kneeling
- Crushed gravel surfaces for mud-free access
- Vertical planters along edges for herbs
Rotate quick-pick crops like cherry tomatoes near paths. Tuck slower-growing varieties like cabbage toward bed centers. This smart layout turns maintenance into a 5-minute task while you’re prepping dinner.
Conclusion
Your sun-drenched growing space becomes a powerhouse of fresh flavors with the right method. By combining raised bed designs, targeted watering, and smart plant pairings, you’ll see how small squares outproduce traditional rows. This approach lets you grow more with less effort – even when temperatures soar.
Mixing crop types proves essential in warm areas. Bush varieties and climbing beans thrive when positioned strategically, creating natural shade networks. Proper spacing in elevated beds keeps roots cool while maximizing every inch of soil.
Apply these strategies to your own backyard. Start with heat-loving plants, use drip irrigation, and refresh mulch regularly. You’ll conquer common challenges while enjoying daily harvests from your organized grid.
This efficient gardening style turns intense sunlight into an advantage rather than a hurdle. With thoughtful planning, your compact setup becomes the most productive part of your outdoor space – and the tastiest way to beat summer’s heat.


